|
|
|
|
|
|
| |||||||
This is a collaborative walkthrough for Tomb Raider. Please add any missing information to any section and/or correct any errors that you find.
England[]
Lara's Home[]
Peru[]
Caves[]
Follow the paw prints in the snow straight ahead. Shortly you'll reach an area with slits in the walls. This is a dart trap. Keep running and Lara should get past the darts with little or no damage.
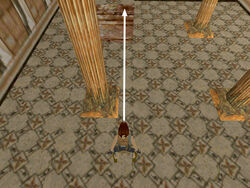
As you round the corner, the camera view shifts up and to the left to show where you need to go next, but before climbing up there do a little exploring: Continue straight ahead into a rectangular cave with an angled block in the far left corner. Note the opening in the wall above this block. The ledge is a little too high to grab, so use the block to give Lara a boost. Grab onto the back of it, pull up and slide down the face. Press Jump and Action as you slide to grab the ledge (as shown in the set of screenshots below). Or, stand Lara in front of the block with her back to the angled surface, then backflip onto the block and hold Jump and Action to bounce off the slope and grab the ledge. Pull up into the small cave, where you'll find SECRET #1, a small medi pack.
")
")
")
BAT CAVES: Jump down and go to the right to the raised opening where Lara looked up before. Climb up over the rocks and through that opening. Draw pistols as you move into the cave, to take advantage of the game's auto-aim feature. Three bats fly in from the caves ahead, and Lara will probably spot them before you do. As soon as her arms move to aim, press Action to shoot. When the bats are dead, head into the cave on the left.
In the far right corner is a low snowdrift below an opening high on the wall. Stand on this drift facing the wall below the opening and sidestep to the left as far as possible. This raises Lara up a bit. Don't try to jump up; just stand close to the wall and press Action + Forward to grab the ledge and pull up. (The screenshots below show how.) Kill another bat in the cave above and pick up SECRET #2, a small medi pack.
")
")
")
CAVE LINED WITH GREENERY & DOOR WITH SWITCH: Drop or jump down and return to the big cave where you shot the 3 bats earlier. Turn left and proceed to a cave lined with greenery. Go down into the opening to the left. Keep descending to the bottom, where you'll find a closed door. Use the Action key to pull the switch next to the door to open it. Enter and kill the bat that swoops down. The wooden gate on the right does not open. Instead head to the far left corner and climb up through the opening there.
ROOM WITH WOODEN BRIDGES & WOLVES: Follow the passageway to a landing above a room with two wooden bridges. Two wolves lurk below. They're asleep when you arrive but will rouse and begin to pace as you approach the edge. You can shoot them from above if you're patient or hop down and take them on.
When you've taken care of both wolves, head for the far corner of the room. Either follow the perimeter, using the bridges to get from side to side. Or, after dropping down into the area below the bridges, walk to the second bridge, stand below it near its middle, jump straight up to grab it and then pull up. Or, climb onto the ledge above the alcove with the mummy. Then cross the second bridge. Go through the doorway in the corner of the room beyond the second bridge.
BEAR PIT: A bit farther on is a gap with a bear lurking below. If you want to, you can easily kill the bear from above. Draw pistols and Let Lara get a target lock on it, then hold the Action key to fire. As long as you keep holding Action, Lara will continue to target the bear and shoot at it whenever it comes into range. When it's dead, safety drop down into the room below.
NOTE: To safety drop, stand near the edge, turn around so Lara's back is toward the open area and then hold Action and tap Back. Lara will drop and hang from the edge. Release Action and she'll drop to the ground. Doing this gives her a shorter distance to fall, so she will not lose health as she would by just running or jumping off the edge.
After dropping down into the bear pit, continue through the one door leading out. A bat will emerge as you enter, and another bat swoops down as you go a little farther into the room. Next you'll come to an area with a small medi pack on the ground and a different-looking tile in the floor next to it. Stepping on this tile opens the door. It closes fairly quickly, so position Lara so she's facing the door, step on the tile, then run through.
You're now back in the room with the bridges. Climb back up and retrace your steps to the gap with the dead bear below. Take a running jump across that gap.
NOTE: Now is a good time to learn that jumping technique if you didn't get it in the training level. Stand on one of the two slightly raised areas at the edge. Walk Lara to the edge, then take a single hop back. Press Forward and Jump, and Lara will run two steps then take off into the air on the third. She'll land safely on the other side. If you set up jumps this way, Lara will never run off the edge and almost never miss a landing.
On the other side of the gap there's a save crystal in the console versions. Behind the columns to the left of the stairs, you'll find another small medi pack. Retrieve it and descend the stairs, guns drawn. A pair of wolves waits at the bottom. (Try side- or backflipping while shooting to avoid taking too much damage.) Enter the room at the bottom of the stairs.
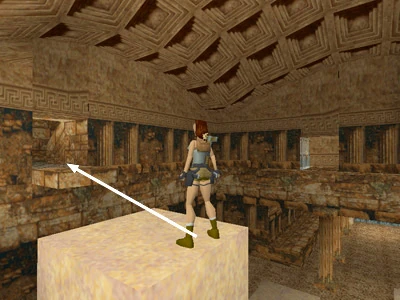
ROOM WITH GREENERY & TIMED DOOR: Note the vegetation-covered ledge on the left side of the room. The greenery conceals an opening, but the ledge is too high to reach from the floor. So climb up on either side—onto the landing with the pillars on the left or the stone ledge on the right—and take a running jump to the ledge with the greenery. (This sequence is shown in the beneath set of screenshots.) Inside is SECRET #3, a large medi pack. Exit, drop down and head for the opposite right corner of the room. In an alcove under the stairs is a small medi pack.
")
")
On the ledge to the right of the big carved exit doors is the switch that opens them. The doors are timed to close after a short time. Climb up, throw the switch, then flip to the left (Jump + Left together) onto the low wall below. Sidestep to the left edge of the wall, then flip left again onto the platform with the door. Run through before it closes.
Continue forward and around the corner. Take the steps at a run to avoid the dart trap. Draw pistols near the top, because a wolf waits in the room above. It's lurking in the alcove on the left as you enter. When you've taken care of it, step on the break-away tiles at the center of the room to fall through to the room below.
LEVEL EXIT: You're now in a long room above a wide hallway. Below, at one end of this hallway you can see the wooden gate you couldn't get through at the beginning of the level. The long hallway is lined with dart traps and the exit doors are closed. So, don't drop down yet. (NOTE: If you do drop down, you can climb back up using the rocks to the left of the exit doors.)
Go to the far end of the room and turn left. Take a running jump across the gap to the opposite side. Turn left and head toward the large medi pack on the ground. Another wolf comes out of the room ahead. Kill it, pick up the health pack and continue forward into the alcove from which the wolf emerged. Use the switch there to open the exit doors. Leave the switch room, turn right and go through the first opening overlooking the exit. Hop down, slide to the ground and go through the big doors to end the level.
Copyright © 1998-2015 - Stellalune (stellalune@tombraiders.net). Special thanks are given to the participants in the alt.games.tombraider newsgroup, without whom some parts of this walkthrough couldn't have been written. Thanks also to Ingrid G. for the timed door tip, to Ian T. for various suggestions, including the locations of the save crystals in the Saturn and PlayStation games, and to damon for reminding me that the Sega Saturn game also has save crystals. All TR1 screenshots were made using Glidos and Fraps. Feel free to copy or print this walkthrough for personal use. By all means, share it with friends, but please include this credit line so people can send me their feedback. No part of this walkthrough may be reproduced on another site without permission.
City of Vilcabamba[]
Ready pistols because a pack of 4 wolves waits in the cave beyond the entrance. Two come from the hallway to the left, one from ahead on the left and the fourth from the passage ahead on the right. Keep moving, jump while shooting and roll to face any wolves that try and sneak up behind Lara. Lara targets enemies automatically, so all you have to do is fire, but remember to release the fire button briefly when you want her to change targets.
Ahead is a network of small rooms and caves surrounding a central area with a pool. You can go whichever way you like to start, and you'll cover the whole area eventually. For simplicity's sake, we'll go more or less counterclockwise around the perimeter of the area. Keep those pistols drawn as you explore, since Lara may spot some of the creatures—bats in particular—before you do.
Starting with the level entrance at Lara's back, go forward and into the tunnel along the right wall. Kill the lone wolf in the next open area. Continue forward and then follow the narrow hallway to the left. Three bats drop from the ceiling as you approach. Continue forward. At the next corner, another wolf jumps out. Kill it and, search the greenery to find a small medi pack. Turn the corner to the left and continue forward, encountering 5 more bats as you go.
The passage widens and there's a hallway leading off to the left. Pass that for now and continue forward. You'll also pass a locked door a little farther along on the right. You'll need a key for that, so keep going. When you reach the end of the long passageway, go up two low steps, turn left, go down two low steps, then turn left again. (Going straight here would take you back to the level entrance.) Two more bats drop down from the ceiling. Shoot them and continue to a large open area with a pool of water.
Approach the doorway on the right side of the pool. There's a bear lurking inside this small barn or stable. Enter with pistols drawn. As soon as Lara gets a lock on the bear, backflip out of the room shooting. Alternatively, keep your pistols holstered, run through the doorway, immediately pull up onto the platform above and shoot the bear from there. If you get tired of waiting for it to approach, you can dangle Lara from the edge momentarily to get the bear's attention (i.e., safety drop without letting go). Then, before the bear can bite Lara, pull up and start shooting. Pick up the small medi pack in the corner of the hayloft. Then drop down and return to the pool.
UNDERWATER PASSAGEWAYS: (The following sequence is illustrated in a series of screenshots below.) Stand at the edge of the water facing the stable with the two doorways and the wooden trough. Jump into the water and swim forward and down along the tunnel. At the bottom, where it comes to a T, swim to the right. Follow the tunnel as it slopes upward. At the top is a flooded room with numerous square pillars. Swim between the pillars on the right and head for the back right corner. Find the lever on the wall below the carved stone faces. Pull it to open a trapdoor above. (To pull the lever, swim close, turn Lara to face it and press Action.) Swim up to the open trapdoor and climb out of the water. This room contains SECRET #1, a small medi pack. The switch in the corner opens the nearby door, which leads back to the room with the pool, but don't go that way.
")
")
")
")
")
Instead return to the open trapdoor and jump back into the water. (This next sequence is also shown in a series of screenshots below.) Swim down and forward, away from the trapdoor toward the opposite (far left) corner of the underwater room. There you'll find another lever. Pull this to open a door elsewhere. If Lara's air meter is less than half full, return to the open trapdoor for air. Otherwise, after pulling the lever, swim between the pillars on the left and then down into the long tunnel you came through before. Follow this tunnel forward and down. At the bottom on the left is the tunnel leading up to the pool. If you have only a little air remaining, go that way and surface to breathe. Otherwise continue straight ahead, following the tunnel as it slopes upward and then turns to the left. Here it is lined with blue tiles. Follow it to another pool and climb out on the far side.
In the far right corner is the door you just opened using the lever. Inside is a small rough-hewn room containing small medi pack and some magnum clips, SECRET #2. There's no other way out, so return to the pool and swim down the tunnel, right at the bend and right again at the next perpendicular passage. Follow that tunnel up to the first pool, near where you killed the bear, and climb out of the water.
")
")
")
")
")
")
")
SKULL ROOM: Now, face away from the stable with the two doors and wooden trough. Ahead on the right is carved stone door with a switch next to it. Use the switch to open the door. Enter and climb the stairs. Take a running jump across the gap to the opening opposite. The room beyond has a floor made of break-away tiles, and the wall beyond has a black-and-white skull motif. Run forward across the tiles and jump to land on the platform on the other side. Here, in an alcove, is a large medi pack.
NOTE: If you miss the jump and fall into the room below, don't worry. Just find the one block in the wall below that looks different from the others. Stand Lara against it and press and hold Action. She'll go into a crouch, showing that she's ready to pull or push the block. Press Back/Down to pull it out and use it to climb to the ledge above.
After retrieving the medi pack, drop down and push the movable block forward several times into the next room. Kill a bat and continue to the far side of the room. Vault onto the low platform and collect a SILVER KEY and GOLD IDOL, from the alcoves on each side.
Return to the movable block and use it to climb onto the platform above. (Console players users will find a save crystal here.) Go to the left side of the L-shaped platform, killing 2 bats on the way. Pick up the large medi pack in the dark corner to the left of the window opening. Then climb into the window and drop down into the hallway below.
LOCKED DOOR: Head back toward the pool. Turn left and go through the passageway lined with greenery and flanked by carved stone statues. Continue straight ahead to the locked door you passed earlier. Use your newly acquired SILVER KEY in the keyhole to the right of the door to open it. Enter and either run/jump past the dart trap or do a dive-and-roll (Walk + Jump + Forward) to avoid it.
RED-ROOFED BUILDING WITH THREE DOORWAYS: The open area beyond contains 5 wolves. Proceed cautiously and they won't all be on you at once. The first two sit on each side of the doorway; the others approach as you go farther into the room—one from the right, one from the left and a third from the stairs.
LEFT DOOR: When they're all dead, go up the stairs to the building with three doorways. Enter through the door on the left (the only one that's open). Follow the passage to a room with a pool and some stairs and ledges. Go to the top of the stairs, turn right, walk to the edge and then jump to grab the ledge beyond. Pull up, and from this ledge take a running jump diagonally across the pool to the next ledge. Go through the doorway and up the stairs. Draw pistols and kill a bat that drops as you emerge on the next ledge. Take a running jump across to the next ledge and continue to the top. Kill another bat, pick up the small medi pack and throw the switch to open the door on the right at the front of the building below.
Exit this room via the other doorway (not the stairs). Safety drop down to the stone ledge below, where you'll find some shotgun shells. Go to the other end of the ledge, where it's a little lower, and safety drop to the red-tiled roof. At the opposite end of the roof there's a small medi pack. Get it and then drop to the ground in front of the building.
RIGHT DOOR: Now enter through the door on the right. Follow the hall to another pool. Go up the stairs on the right. Turn left to face a section of floor made of break-away tiles. Rather than try and run across them, step out onto the first tile and quickly hop back to the ledge as the tile crumbles away. Then take a normal running jump to grab the ledge ahead and pull up. Face the ledge above, step out onto the next break-away tile (in the corner) and quickly hop back. Now walk to the edge of the ledge, jump straight up to grab the ledge (Jump + Action) and pull up. Turn around, walk to the edge, grab the next higher ledge and pull up. Ignore the ledges on the other side of the room. Instead turn right and take a running jump to grab the ledge near the doorway. Pull up, draw weapons and kill the bat.
Follow the stairs up to another room with a switch. Pull it to open the remaining door below. Exit through the doorway to the roof (where there's a save crystal). Do a series of safety drops to reach the ground (i.e., from the ledge outside the door to the gray stone ledge, then to the red roof, and then to the ground). Or, if you prefer, return down the stairs, exit onto the ledge and try a swan dive into the pool below (Walk + Jump + Forward). Climb out and go back to the front of the building.
MIDDLE DOOR: Enter through the middle door and proceed cautiously. Three blades begin to swing back and forth as you approach. Take each one in turn, standing slightly to one side and running through as the blade swings away toward the opposite side. Beyond the blades is a gate. (There's a bear in the room beyond, but unfortunately you can't shoot it through the gate.) Throw the switch and the floor collapses, dropping Lara into a pool.
Swim forward and to the right then upward. If you need air, surface here, but don't climb out of the water yet. That bear is pacing around the pool. Instead, swim through the square underwater opening about halfway up one side of the pool. Follow this passage around to the left and surface in another pool.
Climb the stairs to a room with a switch. Use this to open the gate in front of the exit door (at one end of the pool below). Step out onto the ledge above the first pool and shoot the bear from above if you like. When it's dead, jump down into the pool and climb out on the other side.
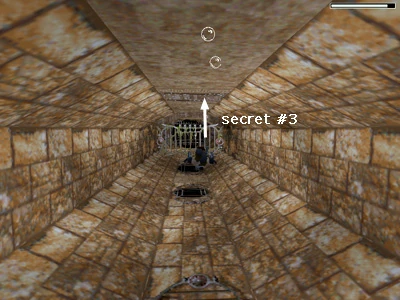
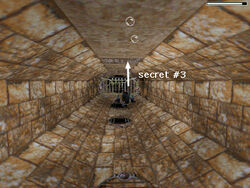
Face the gold gate you just opened, but don't go through yet or you'll miss a secret. Instead, head for the stairs in the room to the left of the gate. At the top of the stairs is a switch that stops the swinging blades. You can ignore it, since you won't be going back that way. Opposite the switch to the left of the stairs is a doorway. Enter and drop down twice to find SECRET #3, Uzi clips. (The path from the pool to the secret is shown in these screenshots below.) Climb back to the switch room and either go down the stairs or drop down off the balcony. Use the GOLD IDOL at the receptacle to the right of the gate to open the door beyond. Go through to end the level.
")
")
")
Walkthrough text and diagrams copyright © 1998-2015 - Stellalune (stellalune@tombraiders.net). Special thanks are given to the participants in the alt.games.tombraider newsgroup, without whom some parts of this walkthrough couldn't have been written. All TR1 screenshots were made using Glidos and Fraps. Feel free to copy or print this walkthrough for personal use. By all means, share it with friends, but please include this credit line so people can send me their feedback. No part of this walkthrough may be reproduced on another site without permission.
Lost Valley[]
NOTE: One of the pick-ups in this level is the SHOTGUN. If you want to, you can get it before exploring the rest of the level, rather than near the end, as I suggest. However, you won't have many shotgun shells to start. For instructions, see this page.
Follow the tunnel to an open area with rough stone pillars and a stream. Hop into the water and allow Lara to be carried over the falls into the pool below. Climb out of the water on the small ledge to the right of the falls (when facing it). From here you can see, and kill, 2 wolves on the other side of the pool and they can't reach Lara. Alternatively, from the level entrance, turn right and make your way down the stepped rocks to the pool, shooting the wolves before you reach the bottom.
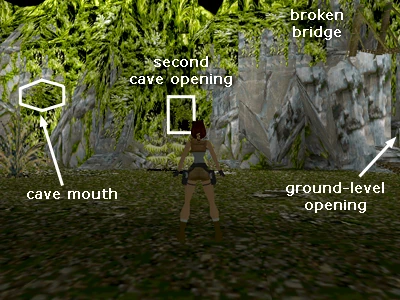
PASSAGE FROM CAVE WITH POOL TO VALLEY: Go through the cave opening opposite the waterfall, where you'll encounter another wolf. When it's dead, continue through the twisty passage until you come to a wall with flat, stepped blocks and an opening high above. You'll climb up in a minute, but if you want all the kills, first follow the tunnel to the right, where you'll encounter 3 more wolves. Once you've drawn them out you can kill them from the top of the slope at the cave mouth. Now return to the raised opening and climb the flat blocks to reach it.
At the top, continue forward. Pick up a large medi pack left behind by some hapless traveler. Continue forward and climb down into a green valley. Proceed with pistols drawn. If you go slowly, you'll hear, then see the first velociraptor approach from the greenery ahead. Backflip while shooting and it should fall before it reaches Lara. Or, if you really want to play it safe, run back to the rocks, climb up and shoot it from safety.
VALLEY FLOOR: Now continue with caution into the valley. You'll encounter another raptor as the valley widens. Kill it then take a careful look around. See the rather large, three-toed footprints? Notice the broken wooden bridge spanning the valley? Feel the ground begin to shake? Nope, it's not an earthquake. That's a Tyrannosaurus Rex. If you want to go head-to-head, give yourself plenty of room to maneuver, don't let him get Lara in a corner, keep moving and keep shooting. And watch out for the head; he can grab Lara in that big mouth, killing her with one bite.
If you want to play it safe, run into a cave along the right-hand (east) wall of the valley. Don't pick the first alcove; it's too shallow, and the T. Rex can easily reach Lara. Instead, choose the ground-level opening just below the right side of the broken bridge (shown in this series of screenshots below). Follow this passageway, which is roughly U-shaped. About halfway in you'll encounter another raptor. Kill it and keep going to a second opening higher in the valley wall. Then just wait and blast the T. Rex as he stomps by.
There's also another opening in the right (east) valley wall a little bit farther along than the first. Lara can take cover in here, though she won't have quite as good a vantage point for dealing with the T. Rex. (This opening is also shown in the third screenshot in the same series.)
")
")
")
ROCK ARCHWAY AND SMALL BUILDING: When the coast is clear, drop down and cross the valley. Pass a waterfall on the right and go underneath a stone archway. Two raptors approach. Kill them and advance forward toward building.
Before entering the temple, go for a secret. (The path to it is shown in these screenshots below.) About 20 walking paces from the rock archway, on the right (north) wall of the valley, is a nearly flat rock you can climb on. Once on top of this rock, turn left and position Lara near the middle of the block, a step or so back from the edge of the next block, which juts upward. (If Lara's feet are right against this edge, she won't be able to jump forward.) Then take a standing jump forward to grab the edge of the higher block ahead. Pull up. Walk to the outer corner of this ledge, then take a standing jump to grab the next ledge—the greenish, slightly angled block, a bit higher and to the left. Pull up. Walk to the front left corner of the block and take a standing jump to grab the highest rock ledge. (This one has an angled block underneath supporting it.) From here, a running jump—or a standing jump from the outer corner—will get Lara on the roof of the building.
")
")
")
")
")
This is SECRET #1. In various spots on the roof you'll find magnum clips, a large medi pack, Uzi clips and shotgun shells. When you've collected the shells, go to the back corner of the roof (farthest from where you landed when you jumped over) and safety drop onto the angled stone block below. Lara will slide to the ground unharmed.
Enter the building at the front. (Console players will find a save crystal inside.) Jump into the water and swim down on the right side. Follow the underwater passage to find a machine cog—the first of three. Surface and exit the building.
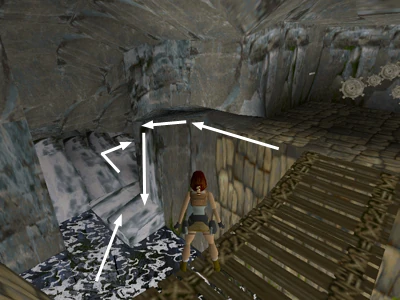
CROSSING THE BROKEN BRIDGE: Examine the valley wall ahead and to the right, and you'll find a well-lit opening with a low block in front of it (shown in this screenshot). Climb up into this opening and follow the passage to the bridge, picking up a save crystal on the way. Walk to the edge of the broken bridge, hop back and then take a running jump to grab the other side of the bridge. Pull up. On the platform where the bridge is attached to the wall, you'll find the second machine cog. Safety drop from the end of the bridge to the ground.

PASSAGEWAY WITH SMALL POOL: Go to the left (north) and you'll find an opening in the right (east) valley wall somewhat camouflaged by vegetation. It's roughly opposite the rock arch and the building where you found the first cog. (You may have used it earlier to hide from the T. rex. It's the middle opening in the screenshot to the right.) Climb into the opening and proceed to where the passage widens. Below is another raptor. You can kill it from above, then drop down into the room. Climb the stepped rocks to the right of the pool. At the top you'll find the third machine cog. Climb down, drop into the water and follow the underwater passage and climb out of the pool to emerge back in the valley.
NOTE: You can also enter the cave with the third cog through the small pool at the base of the waterfall; however, this makes it more difficult to kill the raptor without losing health.
DOUBLE WATERFALLS (AND TWO SECRETS): Falling into the pool you just climbed out of are double waterfalls. To the right of the waterfalls, in the corner, is an opening in the rocks. Climb up and go inside to find SECRET #2, some shotgun shells. Between the double waterfalls and the other waterfall to the left (west) are some climbable rocks. Climb up then take a standing jump forward and to the right to the flat ledge near the wall. Walk forward and jump up to grab and hang from the triangular crevice. Traverse to the right, in front of the falls, until you can pull up into the cave above. At the back of the cave on the right is a little room containing SECRET #3, magnum clips and shotgun shells. Return to the cave mouth, drop into the pool and climb out onto the valley floor. (The paths to both secrets are shown in these screenshots below.)
")
")
BACK TO THE START: Now, return to the far (south) end of the valley where you entered. Climb back up the white rocks, past the skeleton (where you found the medi pack earlier). Climb down the other side and continue back to the pool. Climb the rocks at the left until you're back at the landing near the stream where you began the level.
JUMPING UPSTREAM: Follow the left wall past the passageway where you first entered the level. Pass the fat stone pillar, turn right and approach the stream. Now you're going to head upstream, hopping from bank to bank. Be careful not to fall in the water. The current will wash Lara over the falls into the lake below. As long as she lands in the water she won't take any damage, but you'll have to climb back up and start all over again.
First take a running jump from the starting point to the far side. Walk a few steps upstream and then turn and take another running jump back to the other side. Walk up the slope to the top where it juts out above the stream. Take a standing jump to the ledge across the water. (For this jump, be sure to start on the left side of the ledge or press Action to lower Lara's arc as she jumps; otherwise, she'll hit the ceiling and fall into the water.) Turn left and take another standing jump to the ledge just upstream. Turn left again to face across the stream. Position Lara at the middle or right side of this ledge, walk to the edge, and then take a standing jump to grab the opposite side. Pull up and follow the twisting passageway around to a wooden bridge. (Console players can use the save crystal here.)
MACHINE MISSING COGS: Cross the bridge and replace the three cogs you found in their proper spots in this machine. (You'll notice wooden shafts sticking out where the missing cogs belong.) Throw the switch on the left to start the machine. A little ways downstream, a gate moves, diverting the stream off to one side, thus shutting off the waterfall.

Secret 4
Before heading down the stream bed, let's go secret hunting. Walk to the edge of the floor near the bridge, turn around so the bridge is on Lara's right and drop back, grabbing the edge of the floor. Traverse left and drop down onto a flattish rock. (Or, jump into the water and swim to that ledge. Both paths are shown in the screenshot to the right.) Enter the cave ahead to find SECRET #4, a large medi pack.

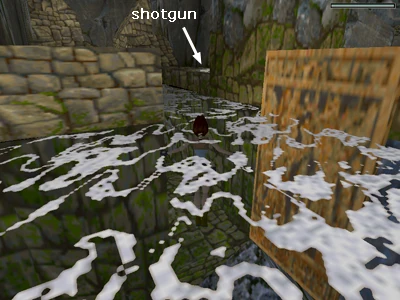
Location of the Shotgun
Jump into the water and swim downstream to the gold gate. Turn left and climb out of the water on a landing on the right bank (shown in this screenshot to the right). Here you'll find the remains of another explorer, along with his SHOTGUN, which may be of use to you.
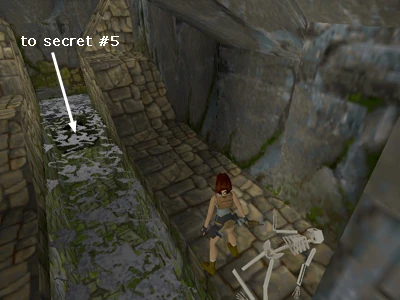
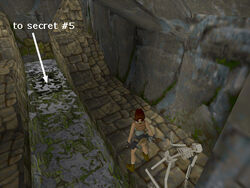
Secret 5
Jump back into the water and swim away from the main stream and the gold gate to the end of the passageway (shown in another screenshot to the right). Make sure you've got full lungs, then dive under and follow the underwater tunnel through various twists and turns. There are no side passages, so just keep following the tunnel and eventually you'll surface in a small room. This is SECRET #5, which includes a small medi pack and 2 boxes of shotgun shells. No need to swim all the way back. Instead safety drop from the doorway into the dry stream bed. Go to the end (away from the gold gate holding back the water) and jump over the sloping rocks to fall safely into the pool below.
LEVEL EXIT: Climb out of the lake on a ledge that was previously hidden behind the waterfall. Follow the passageway to the end of the level.
Walkthrough text and diagrams copyright © 1998-2015 - Stellalune (stellalune@tombraiders.net). Special thanks are given to the participants in the alt.games.tombraider newsgroup, without whom some parts of this walkthrough couldn't have been written. All TR1 screenshots were made using Glidos and Fraps. Feel free to copy or print this walkthrough for personal use. By all means, share it with friends, but please include this credit line so people can send me their feedback. No part of this walkthrough may be reproduced on another site without permission.
Tomb of Qualopec[]
Follow the passage to a large room with ornate wall decorations. There are three other doorways leading out of this room: The one to the left has a series of three gates blocking it. You'll need to find switches to raise each of them. The one to the left is closed for now.
Cross the room and start up the sloped passageway straight ahead. After you've taken about 5 steps up the ramp, the gate at the top closes and a boulder drops from the ceiling and rolls down the ramp. Quickly roll and run down the ramp. At the bottom, run to either side to avoid being flattened. The boulder will roll across the room and into the passageway through which you entered. If you approach the gate at the top of the sloping passageway, you can see into the room beyond, but you can't get inside yet.
Return to the room at the bottom of the ramp. Find the switch on the wall to the left of the passageway where the boulder went. Pull it to open the nearby door, then immediately roll and draw weapons (I like the shotgun here) to dispatch the 2 velociraptors that charge out.
FOUR-WAY INTERSECTION: Follow the hallway the raptors came from to a 4-way intersection. (There's a save crystal here in the console versions.) Note the pictures over the doors: To the right a face, ahead a sun, to the left a bird. Each door leads to one of the switches that raise the gates in the passage leading out of the big room near the start. You can explore these side areas in any order. Here I'll start with the right door (face).
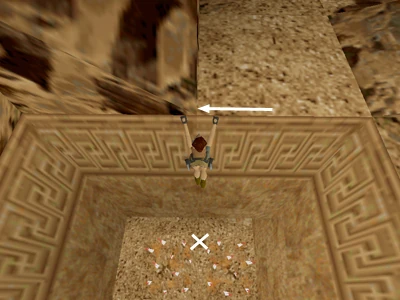
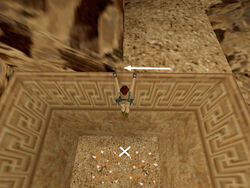
DOOR WITH FACE PICTURE ABOVE: Follow the hallway until you see an area on the left wall that looks different from the rest. Push this movable block twice and you'll see another movable block to the left. Push the second block once to open up the passage beyond. Run across the break-away tiles without pausing. When you reach the other side you'll see the deadly spikes those tiles had been concealing. Pull the switch to raise one of the three gates. Turn around and walk to the edge of the spike pit. Take a standing jump over it and return to the 4-way intersection.
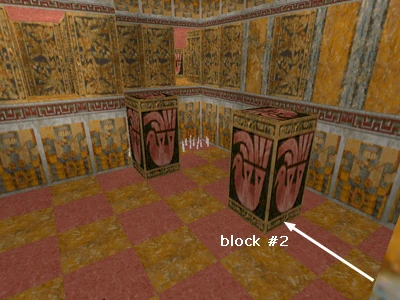
DOOR WITH BIRD PICTURE ABOVE: Now, go straight ahead through the door with the bird picture. Follow this hallway to a room with a switch. Don't pull it yet. (If you already did, pull it again to return it to the up position.) There's also a closed door to the right of the switch. The switch to open it is elsewhere. Leave it for now; you'll return here later. Drop down into the next room, which contains a pair of tall, movable blocks with bird motifs on them and a spiked area on the floor in one corner.
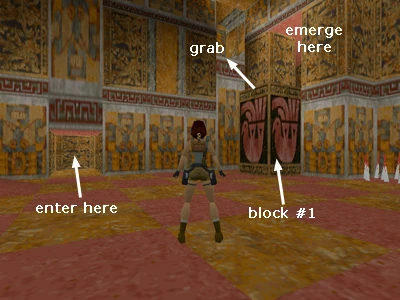
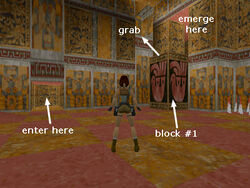
Block 1

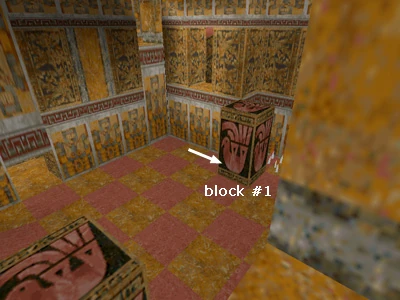
Block 1 moved
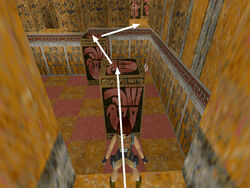
Go through the doorway to the left (south) and climb the stairs to emerge on top of one of the tall blocks. (To distinguish between the two, I'll call this block #1. It's the one near the spikes, shown in the upper screenshot to the right.) Once on top of block #1, turn right, walk to the edge, then jump and grab the opening ahead. Climb up into the passageway above and follow it until you reach an opening in the floor. Drop down twice. Then climb down to the left (west) until Lara is standing on top of block #2. (The right/east passage leads back to the entrance with the switch you didn't pull earlier.) As you climb down, you can hear the sound of a door opening elsewhere. (This is the door near the switch you didn't pull.) Once on top of block #2, walk to the right edge then jump and grab the opening ahead. Pull up and proceed until you come to a switch. Use it to move block #1 out into the room (as shown in the second screenshot to the right). Then return to the room with the blocks and drop down to the floor.

Block 2 moved

The jumps needed
Climb up into the doorway where you first entered this room (above the low ramp). Now, throw that switch you didn't use earlier to move block #2 (as shown in the third screenshot). To the right of the switch is the door you heard opening when you were in the passageway above. Go through it and climb over the ledge ahead to the raised alcove near block #2 (which moved when you pulled the second switch). Take a running jump onto that block. From there take another running jump to block #1. Now you can take a final running jump over the spikes to the doorway. (This sequence is shown in the fourth screenshot.) Inside you'll find the switch to open the second gate in the set of three. Use it. Then jump from the doorway over the spikes to the clear floor beyond.
Climb back up into the room with the switch above the low ramp. Another velociraptor will attack from the hallway beyond. Kill it, dropping back into the block room for safety if necessary. Then follow the hallway back to the 4-way intersection.
DOOR WITH SUN PICTURE ABOVE: Go through the remaining door—the one on the left with the sun picture over it. Proceed to an alcove with a break-away floor and a switch on the wall. The switch is useless so don't even bother trying to pull it. Instead step into the alcove and quickly hop back. The floor will fall in. There are 3 wolves in the room below below. So turn around, drop and hang from the edge of the opening. Let go and as you drop, draw your weapons, so Lara lands ready to fight.
When all the wolves are dead, climb onto the ledge at the top of the ramps. Find the movable block set into the middle of the wall. Pull it once. Then go around to either side and push it to reveal a passageway behind. Go up the stairs. Partway up there's a hole with a small medi pack in it. Continue climbing until you reach another switch. Use it to raise the third gate. Pick up another small medi pack in the corner. Then drop down through the opening across from the switch. Head south to the 4-way intersection.
THROUGH THE THREE GATES: Continue straight ahead to the main room (with the ramp/boulder trap). Cross the room and follow the hallway, passing under the 3 gates you raised. (Console gamers will find another save crystal here.) Around the corner is a dart trap. Take a series of running jumps (or dive and roll—Walk + Jump + Forward) to safely pass through the darts.
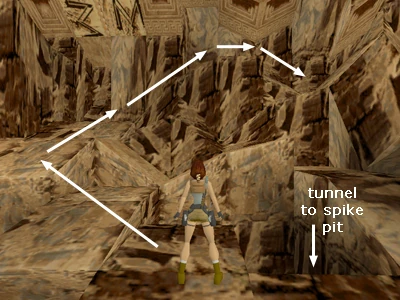
Before continuing up the stairs, take a detour for a couple of secrets. (The path is shown in the series of screenshots below.) Stop on the second step. Face left and step down just to the right of the dart pipe. Pull up into the alcove above. The door behind the statue opens automatically. This is SECRET #1. The floor is made of those break-away tiles and there are spikes below. But there's a solid platform in the far left corner. Run across to it and pick up some shotgun shells. (If you didn't get the SHOTGUN in the previous level, you'll get it here instead.)
Drop back and hang from the edge of the ledge. Traverse until Lara is right next to the wall, then drop and she should land safely between the spikes. Pick up the magnum clips, which count as SECRET #2. Then walk through the spikes to the area below the doorway. Sidestep into a clear spot, walk Lara right up against the wall and then pull up into the alcove (Action + Forward). Drop down on the other side, avoiding the darts.
")
")
")
")
")
")
QUALOPEC'S TOMB: Continue up the stairs to the tomb proper. In the center, on a pedestal, is a piece of the artifact you've been looking for. The mummy on the left will not harm Lara, but it does count as an extra kill if you shoot it until it falls.
Take the PIECE OF THE SCION and the ceiling begins to collapse. Head toward the gate on the east side of the room, which will open as you approach, and run down the ramp. Keep running across the big room and into the opposite hallway. Sidestep past the boulder and go up the passageway toward the lake. (PS1 users will find a save crystal in the passageway.)
BACK AT THE LAKE: Larson (Jacqueline Natla's blond minion from the opening movie) is waiting on the other side of the lake, and he doesn't seem very happy to see Lara. If you aren't bent on getting all the pick-ups, you can snipe at him from the relative safety of the doorway. If you want everything, start by taking a swim.
The mysterious secret hole in the wall.
Down and to the right is an underwater tunnel. (It's shown in the screenshot to the right and, no, it wasn't there when you played the previous level.) Inside is a small room where you can surface to breathe and pick up SECRET #3, a large medi pack and magnum clips.
The final pickup of the level is only for the truly obsessed. Swim back to the lake and surface on the left near where Larson is. Run past him (using a medi pack on the way if necessary) and jump up and over the rocks as if you were going to return to the valley. Larson won't follow. Keep going to the steep wall, climb up and find a large medi pack near where the skeleton and medipack were in the Lost Valley level. You can't go any farther since the tunnel is now collapsed. So return to the cave opening, from which you can shoot at Larson until a cut scene ensues. (He apparently counts as a kill, even through it's really more of a K.O.)
Walkthrough text and diagrams copyright © 1998-2015 - Stellalune (stellalune@tombraiders.net). Special thanks are given to the participants in the alt.games.tombraider newsgroup, without whom some parts of this walkthrough couldn't have been written. Thanks also to the Tomb Raiders Traveler's Guide and Steven Moore for the location of the last item and Ian T. & Carmen Y. for the locations of the save crystals in the PlayStation and Saturn games. All TR1 screenshots were made using Glidos and Fraps. Feel free to copy or print this walkthrough for personal use. By all means, share it with friends, but please include this credit line so people can send me their feedback. No part of this walkthrough may be reproduced on another site without permission.
Greece[]
St. Francis' Folly[]
Upon entering the level, draw weapons, since 2 lions charge from ahead near the square blocks. I like the shotgun here, but it takes several shots to bring down each beast, so you do need to start firing as soon as Lara gets a lock on the first lion. Or, you can jump up on either of the low platforms flanking the entrance and take out the lions from safety with your pistols.
Continue straight ahead and to the right. Beside the tall, tan blocks there's a movable block in a groove in the floor containing two squares marked with the Greek letter omega (W), which looks like a horseshoe. Slide (pull) the block once onto the nearest omega. You'll see a camera's-eye view of the door at the top of the balcony behind you. (You still need to pull a switch to open that door, but it won't work unless you've moved this block first.) Then push the block twice onto the other omega. This opens the door at the top of the landing ahead. Push the block once more to position it next to the tall, tan block on the left. (You'll be climbing up here later.)
GORILLA ROOM: Go to the door you just opened—at the far (west) end of the room on the low landing. Ready weapons and take just a step or two into the doorway. Don't go all the way in yet. Stepping on the pressure pad with the omega on it will close the door behind you. You'll hear gorilla sounds from within. You can probably kill the 2 gorillas from the doorway if you wait for them to come down the stairs. When they're dead enter the room. If you hop over the pressure pad, the door will remain open.
If you stepped on the pressure pad and the door closed, climb the stairs to the platform on the right. Throw the switch to open the door.
Pull the switch at the center of the lower level to open the door on the high ledge at the far end of the big room outside. This also causes another gorilla to appear out of nowhere on the landing above and to the left. Kill it as it comes down the stairs.
Now exit cautiously to the room with the blocks. Draw pistols and prepare to fire on Pierre DuPont, who'll be lurking among the blocks. You can't kill him at this stage of the game, but you do need to deal him a certain amount of damage before he'll disappear. To conserve Lara's health and ammo, use only pistols and try and use the door for cover, emerging every so often to get his attention. Or, if you prefer a direct approach, run right up to him and blast away. You may lose a little more health this way, but you'll drive him off more quickly. Just be sure to duck behind cover now and then to break line of sight, otherwise he won't disappear. You'll encounter Pierre several times over the next few levels. Then later, at the end of Level 9 (Tomb of Tihocan), you'll finally be able to finish him off.

When he's gone, go to the movable block and climb up on it. (First make sure you've pushed it as far as it goes toward the gorilla/switch room.) Take a standing jump to grab the taller stone block next to it and pull up. Turn left, walk to the edge, hop back once and take a running jump to grab the next pillar. Pull up. Walk to the far left corner and line Lara up facing the ledge in front of the doorway beyond (as shown in the screenshot to the right). Hop back and take another running jump to the ledge.
SECRET ROOM: Inside are several angled blocks with an opening above. You need to do a tricky jump combination to get up there. To make it easier, I've included a diagram and a series of screenshots below. I refer to areas marked with letters in the descriptions that follow.
Here's how: As you enter the room, there's an angled block that meets the floor on the left (A). Stand Lara in the doorway facing the angled block, with her left foot on the line of tiny triangles that spans the doorway. (This is the red line in the diagram.) Walk forward as far as possible toward the angled block. Hop back then press and hold Action. Press Jump + Forward, then release forward while holding both Action and Jump. Lara will jump forward onto the angled block (A), backflip off it onto the angled block behind her (B), automatically turn to face down the slope and jump to grab the ledge above. Continue holding Action as you release Jump and press Forward to pull up to the middle level.
Here you'll find 2 more angled blocks—a lower one on the left (C), a taller one on the right (D). Position Lara facing the middle of the lower block with her back against the higher block. Hold Action and press Jump + Forward. Release Forward while holding Jump and Action, and Lara will jump forward onto the first block (C), backflip onto the higher block (D), then jump forward to grab the ledge above (E). Pull up to the upper level.
This is SECRET #1, which includes a large medi pack and shotgun shells. Avoid the break-away tiles in the corner (F). To get down, safety drop from the ledge where you climbed up (E).
")
")
")
")
")
")
")
")
Exit to the ledge and take a running jump back to the nearest square pillar to the right. From there, turn right, walk to the edge and take a standing jump back to the next lower pillar. Turn left and walk to the edge of this pillar. (The movable block should be behind you now.) Take a standing jump to grab the taller pillar beyond. Pull up and pick up the large medi pack. Now take a running jump to the brownish-gold ledge against the wall.
Now use running jumps to make your way across the ledges on the long side of the room to the door on the balcony at the far end, which you opened earlier. Enter and follow the hall to a long slope.
NOTE: If the door here is not open, it means you missed something in the previous area. Drop down off the balcony and check that you've slid the movable block onto the tile with the omega symbol nearest this door, also that you have pulled the switch in the "gorilla room" at the far end of this area. Details appear above.
LONG SLIDE AND SECRET ROOM: At the bottom of the slide there's a secret room which can be a bit difficult to reach. Lara needs to slide down the long slope, drop onto a smaller slope below it and then jump across a gap to reach the secret area. If she misses the jump, she'll fall into the water below uninjured but will then be unable to get the secret. Since you only have one chance, I recommend saving your game here if you can. To reach the secret with minimal effort, slide down the slope facing uphill. Near the end, press and hold Action so Lara grabs the end of the slide. Pull up, wait a moment for Lara to slip off the edge and then press and hold the Jump button. Do not press Jump before she falls off the upper slope or she will jump from there and miss the opening to the secret. If you hold Jump as she falls onto the short slope below, she'll land there and immediately backflip to into the opening of the secret room. (This sequence is shown in a series of screenshots below. Special thanks to Jimmii M. for suggesting this method.)
")
")
")
")
")
Pick up the small medi pack and shotgun shells, SECRET #2. (NOTE: If you don't already have the SHOTGUN, you'll find it here in place of the shells.)
Go to the small alcove ahead and drop down into the room below. Don't use that switch yet. (If you already did, pull it again to return it to the up position.) Move to the edge of the opening over the water and, if possible, shoot the crocodile below. You may have to take a dip to get its attention. Then climb out of the water to shoot. If you want to, you can wait to kill it, but then you'll have to outswim it to reach the next secret.
Secret 3 location.
Jump in the water, turn around to face the switch and then swim down underneath the switch room and forward to a small opening in the ceiling (shown in the screenshot to the right). Climb into the room above and pick up some shotgun shells. This is SECRET #3. (NOTE: If you don't already have the SHOTGUN, you'll get it here instead of the shells.)
Return underwater to the room with the switch. Use it to drain the water and drop down. Kill the crocodile now if you didn't do it earlier. It's faster on dry land but also easier to target. Head to the end of the now-dry passageway and go up the stairs on the right.
VERY TALL ROOM WITH CENTRAL STRUCTURE: You'll emerge at the top of a 6-story room with many ledges and landings. (Console players can save the game here with the save crystal.)
This section of the level is all about finding four switches to open four different doors—named after Thor, Atlas, Neptune and Damocles. (If you're not familiar with the myths involved, you might want to do a little research.) Behind each door is a trap or hazard, along with one of the four keys needed to open the exit.
In case you get disoriented or forget to throw a switch, you can always climb up and down between the different levels. Here's how the room is laid out: The switches are all on the central structure, the doors around the perimeter. Sixth (top) level = Neptune door. Fifth level = Thor switch. Fourth level = Damocles switch and Atlas door. Third level = Thor door. Second level = Neptune switch and Damocles door. First (bottom) level = Atlas switch and exit.
Take a running jump to the structure at the center, where you'll meet 3 bats. Kill them and cross to the other side. Drop down and find the THOR SWITCH at the center near the small square opening. Use the switch and then hop across the small square opening so you have a little more room to maneuver as you kill 2 more bats. Now hop back to the switch.
PRESSURE PAD & SECRET ROOM: On a ledge across the gap, is a gray pressure pad. (It's on the right when you're facing the THOR SWITCH.) Stepping on this pad opens a secret door on the bottom level. When Lara steps off the pad, a timer begins to count down. After about 18 seconds, the secret door closes. So you really need to choose the shortest route and go like mad to reach the door in time. (The path to the secret is shown in the screenshots below.)
Take a running jump from the ledge near the THOR SWITCH to the pressure pad. Until she steps off the pad, the timer won't start. So take all the time you want to get her into position: Turn so the central structure is on Lara's left and her feet are on the back edge of the pad. Make sure her health bar is at least half full, since she'll lose some in the process, and save your game if you can. Now comes the speed run: Hold the Action key and take two hops back to drop and hang from the edge. Immediately let go and fall to the ledge below. As Lara falls, press and hold Roll, so that when she hits the ledge, she rolls and comes up facing in the opposite direction. Run forward and fall down to the next lower level. As Lara falls, again hold the Roll button so she lands and comes up facing the other way. Run forward along the long ledge. If you want to, you can draw pistols and kill the 2 bats that swoop in from the left. If this distracts you, don't worry about it. You can get the bats later. Just keep running off the edge and straight on through the timed door. (Don't jump off the ledge, since it will actually take longer to stand up and start running again than it would to just fall down and continue running.) Inside is SECRET #4, a large medi pack and magnum clips.
")
")
")
")
")
")
")
")
GROUND LEVEL: Exit the secret room (the door opens as Lara approaches). Kill those bats if you didn't do so earlier, and go around to the far side of the central structure to find the ATLAS SWITCH and pull it.
NOTE: PS1 users can find a save crystal on the ground level; however, you may want to wait to use it until just before you enter the DAMOCLES ROOM later.
Climb onto the ledge at the top of the steps. Go to the end, jump straight up to grab the ledge above and pull up. Walk to the end of this ledge. On the ledge across and to the right you should see some magnum clips. Ready weapons, jump across, roll and kill the bat that flies in. Then pick up the clips and jump back to the previous ledge.
Return to the far end of the ledge. From there take a running jump to grab the edge of central structure. Pull up, then go around the corner to the left to find and use the NEPTUNE SWITCH. (There's also a save crystal here in the PlayStation game.)
Turn around and walk to the outer corner of the central structure. Jump over to the ledge near the DAMOCLES DOOR (which is still closed). On the ledge above the door, where the word "Damocles" is carved, there's a large medi pack. Climb up and get it now, since later on when you return, Pierre will be lurking about. Hop down and go up the short flight of steps ahead. Turn to face the central structure. Walk to the edge and take a standing jump to grab the edge. Pull up.
You're now on the third level. Go to the far right side of the platform and take a running jump across to the ledge. Roll, drawing weapons, and kill 2 bats. Jump back to the central structure and go forward and to the right. Take a standing jump from the edge to grab the ledge opposite. Pull up, turn right and climb up on the next ledge. Kill 2 more bats and then jump back to the central structure.
You're now on the fourth level. Climb over the low block to the other side where you'll find the DAMOCLES SWITCH. Kill the bat that tries to mess with Lara's hairdo, then pull the switch. Turn left. Across the gap you'll see a small medi pack on a ledge. Jump over to get it then jump back to the switch. (There's also a save crystal on this level.)
Climb back onto the block next to the DAMOCLES SWITCH. Jump up to grab the edge of the opening in the central structure and pull up to the next level (the fifth) near the THOR SWITCH, which you should have used earlier. (If you didn't, pull it now to open the THOR DOOR.) From here take a running jump to the bottom of the L-shaped stairs below and to the left of the door through which you entered this area. (It's the brightly lit one high above on the east wall.) Kill another bat when you land, then go to the top of the stairs.


Lever location.
NEPTUNE ROOM: Across the way you'll see the NEPTUNE DOOR. Make your way over to it and go inside. (Save your game if you can.) Jump into the pool and swim downwards as the strong current carries you that way. When you reach the bottom, swim forward. There's a gate ahead, but don't go there yet. Instead, look for an opening on the left at the top of the passage. (It's shown in this screenshot to the right.) In this alcove is a lever. Pull it to open the gate and shut off the current. If you have plenty of air, turn around and swim out of the tunnel with the lever then down and to the left. Grab the NEPTUNE KEY, turn around and swim forward along the bottom and then up the long shaft to the pool to surface. If you're low on air after pulling the lever, turn around and swim down and to the right, then up to the pool for air. Then dive down again, swim forward to get the key, then return to the top.
Exit the Neptune room, jump back to the central structure and drop down two levels. Now that you've started getting the keys, your favorite sniper, Pierre DuPont, will start to shoot at Lara as she makes her way from door to door. Try and stay under cover as best you can, and if you do shoot back, remember you still can't kill Pierre yet. So only use pistols so as not to waste ammo. There are also 2 lions roaming around down there with him, so avoid dropping down to the ground until after you've killed them.
ATLAS ROOM: Approach the ATLAS DOOR with weapon drawn. (The shotgun is a good choice here if you have shells for it.) Kill the gorilla lurking inside. Go to the far end of the room and step on the pressure pad to open the gate. When Lara steps through, the gate closes. Turn right and walk toward the base of the ramp. Before you reach it, the huge boulder at the top will start to roll down the ramp. Backflip three times to land in the shallow pit at the end of the hallway and quickly run forward to the front edge. The boulder will roll overhead and stop when it hits the wall. At this point the gate re-opens. Pick up the small medi pack on the floor, climb out of the pit and return to the ramp. Climb onto the ledge on the left. Pull up to the next ledge, go to the other end and pick up the ATLAS KEY. Drop down and exit the room.

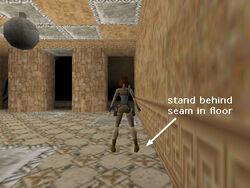
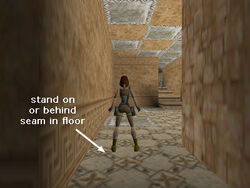
THOR ROOM: Take a running jump back to the central structure. Go to the left and drop down to the level below. (Get the save crystal in the PlayStation version.) Enter the THOR DOOR. Proceed slowly down the steps until the disco ball on the ceiling begins to shoot bolts of lightning. To get through without taking any damage, walk to the right, staying close to the back wall. Then turn to so the lightning ball is ahead on the left. Walk slowly toward the gray floor tile ahead. Stop just before the seam in the floor so there's one regular floor tile between Lara and the gray tile (as shown in this screenshot to the right). Now take a diving roll over the gray tile by holding Walk and pressing Jump + Forward. Quickly release walk and jump or run forward into the next room. (NOTE: The same technique also works on the left side of the room where the tiles are arranged similarly. Thanks to Ivans Chou for this tip.)
Now comes phase two. Above is an enormous hammer. On the floor is a pressure pad. Stand on the pad until you hear a crack, then hop back. The hammer will crash to the ground, along with a couple of large movable stone blocks. Go to the block near the hammer and push it over to the ledge so you can climb up. Pull the second movable block along the ledge three times. Then climb on top of it. From there, take a standing jump to grab the tall block in the corner. Pull up and get the small medi pack. Turn left and take a running jump to grab the ledge beyond. Pull up, enter the alcove and get the THOR KEY. Return to the ledge, jump back to the corner block, drop down to the lower ledge, then the floor.

Return to the room with the lightning trap. Step up into the doorway and walk forward carefully, stopping with one regular floor tile between Lara and the gray tile near the wall (as shown in this screenshot to the right). Dive and roll over the gray tile as you did before (Walk + Jump + Forward). Run into the corner and then go up the steps and exit the room. (NOTE: This technique works on both the left and right side of the lightning room.)
DAMOCLES ROOM: Go back across the walkway to the central structure and drop down to the level below. Jump over to the steps near the DAMOCLES DOOR. If you didn't already get the large medi pack on the ledge above the door, you can climb up and grab it now. Just watch out for Pierre. If he starts shooting at Lara from below, run inside now get the medi pack on your way out.
The swords hanging from the ceiling of the Damocles room are not a hazard. . . yet. Pass through the outer room into the chamber beyond and take the DAMOCLES KEY. Climb onto the platform above and get the shotgun shells and small medi pack. Now drop down and walk very cautiously out through the sword room. If your console or video card displays the shadows of the swords on the floor, you can use them to help you navigate, but only up to a point. The swords don't always fall exactly where their shadows do. Use the Look button to check the ceiling, though some of the swords are concealed. Take a step at a time, listening for the telltale "swoosh" of the falling swords, and stay close to the walls and pillars, and you'll make it through.
When you emerge, Pierre will be ready for some action. Shoot at him with pistols, staying under cover as best you can, until he disappears. Then kill the 2 lions from above before dropping down. Use your 4 KEYS in the locks on the wall and exit the level.
Copyright © 1998-2015 - Stellalune (stellalune@tombraiders.net). Special thanks are given to the participants in the alt.games.tombraider newsgroup, without whom some parts of this walkthrough couldn't have been written. Special thanks to Helena for finding the alternate weapon pick-up points and Black Tiger for additional Pierre Dupont strategy. Diagrams made with the aid of GraphTablet freeware ([1]). All TR1 screenshots were made using Glidos and Fraps. Feel free to copy or print this walkthrough for personal use. By all means, share it with friends, but please include this credit line so people can send me their feedback. No part of this walkthrough may be reproduced on another site without permission.
Colosseum[]
Follow the passage until it opens into a cave with a pool. Shoot the crocodile from the edge. (It won't come out of the water.) Then jump in and swim around to the left to the other side of the pool. You can paddle along the surface but swimming underwater is faster. On the far side of the pool is a large cave with a building, presumably the entrance to the Colosseum.
COLOSSEUM EXTERIOR: A lion is waiting near the building. If you can see it from the water, wait for it to go behind the building before climbing out, then kill it as it charges. The shotgun works well at close range, but you can also use pistols and hop back into the water if the lion gets too close. When it's dead, head toward the left side of the building and kill another lion.
If you don't care about getting all the kills, there's no need to enter the building. Skip to the next paragraph. Otherwise, come back around to the front of the building and go inside. The stairs on the right lead to a dead end. When you start up the stairs on the left, a third lion charges down at you, so backflip out shooting. The gate at the top of the stairs cannot be opened from this side. So go back outside and around to the right side of the building (left when facing it).
If you run along the side of the building toward the back, you'll find a pile of rocks you can climb on. From the top of these rocks, jump over to the ledge that runs around the building. Follow the lower ledge all the way around the front of the building to the far side and pick up a large medi pack.
Return along the ledge to the rear of the building. Climb on the low block, turn around and jump straight up to grab the higher ledge. Pull up and follow that ledge around to the front. Take a running jump across the gap in the ledge and continue to the end. Then jump diagonally to the flat spot ahead and to the right. With the building behind Lara on the right and the pool ahead on the right, you can spot a well-lit cave opening below on the left. If you don't mind missing a secret, you can go in there now (and pick up the walkthrough below at the CROCODILE PIT). Otherwise continue following the paragraph below.
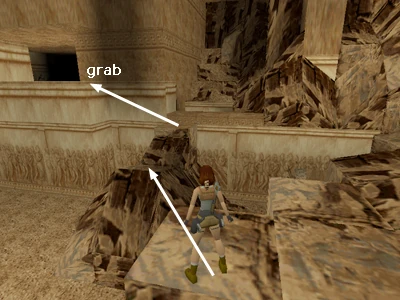
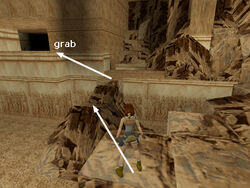
SECRET CAVE: (This sequence is shown in a series of screenshots.) Look straight ahead and a little to the right beyond the jumble of rocks. That rectangular cave opening on the far wall is where you're headed. Slide down the rocks ahead and walk forward along the two flat blocks ahead. Now you should see a square flat block just ahead and below, a steeply angled block ahead and to the right, and beyond that, a little farther to the right, another flat spot. Take a running jump over the corner of the steeply angled block to the flat block beyond. Step to the right a bit and then take a standing jump to land near the cave opening. Enter and pick up some shotgun shells, SECRET #1.
")
")
")
")
")
")
")
Return to the cave opening and walk out onto the block in front of the door. Take a standing jump from the middle of this block to the flat block ahead on the right (i.e., back the same way you came). From there, take a running jump to the low, flat ledge between the higher blocks ahead and to the right, or to the slightly angled block beyond it. If you land on the lower ledge, climb onto the higher one. Walk up the slope and jump over the steeply sloping blocks where they come down in a V to land in the well-lit cave you passed earlier.
NOTE: If you miss a jump and slide down the rocks, climb up the building again at the back left corner and follow the top ledge back to the end. Jump across the gap and drop down into the cave.
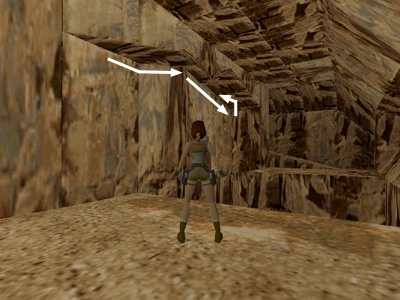
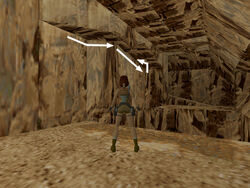
CROCODILE PIT: Head into the cave and approach the pit ahead. Stand at the edge and shoot the 2 crocodiles from above. Then drop down into the pit to get the small medi pack. Climb back out at the right corner where there's a low block for a boost. On the wall above that block there's a horizontal crevice that runs all the way across the pit. (It's shown in this screenshot to the right.) Stand facing the wall with Lara's chest against it. Jump straight up and grab the crevice, then traverse to the right. About halfway across the pit, pull up into a cave. This is SECRET #2, the reward more shotgun shells. Go back to the edge, drop back and hang, then continue to traverse to the right until you reach the other side.
Follow the tunnel to a hole in the floor where you can drop back down into the Colosseum. You're now on the other side of the gate you came up against at the beginning of the level. If you didn't kill the lion inside the building earlier, pull that switch to open the gate and the lion will charge out. (If you already killed it or don't want to, just leave the switch alone.)
ENTERING THE ARENA: Go up the stairs and get ready for another confrontation with Pierre. As in the previous fight with him, use pistols only, since you can't kill him yet and don't want to waste ammo. Approach to get a lock on him. Then backflip to a safe distance and jump from side to side while shooting. This minimizes the damage he does to Lara. Just be careful not to jump off the ledge into the arena below. Once Pierre has had enough, he'll run down the stairs where you entered the arena and disappear. If he doesn't, try shooting him a little more and then retreat down those stairs yourself. When you break line of sight, Pierre should then vanish. Maybe he just needs a little privacy to sneak away. ;)
When you've driven him off, look down into the arena. You should be able to pick off the gorilla and 2 lions lurking down there before you descend. If they won't come close enough to target, try using Lara as bait by hanging from the edge of the arena wall and then pulling up when the creatures approach.
NOTE: If you don't mind missing a few kills and one pick-up, you can skip the next two areas: the LION CAGES and ROOM WITH TIMED GATES & PRESSURE PADS. Resume the walkthrough at the * below.
LION CAGES: Drop down to the floor of the arena and head for the northeast corner, where you'll find a doorway leading to a ramp. Ready weapons, slide down and kill the 2 lions at the bottom. Pull the 2 switches. One opens the exit from this room, the other a gate in the southeast corner of the arena. Follow the passageway to a pit inside the arena. (There's a save crystal here in the console versions.)
Three more lions will have been released above. If you want to, you can kill them from the safety of the pit by waiting for them to approach. If necessary, climb out to lure them near, fire a few rounds then jump back down to safety. Or, jump straight up and down to get a pistol lock on one of them and continue jumping and firing until it's dead. When the coast is clear, climb out of the pit.
Cross to the brown rock pile in the southeast corner. Another lion will charge, so take it out then go behind the rocks to the gate you just opened.
NOTE: Read ahead now in order to decide whether you want to take the easy or difficult way through the next area. Once you slide down into the next room you must complete the timed run to get out. To avoid it, skip down to the section marked with an *.
ROOM WITH TIMED GATES & PRESSURE PADS: Enter and slide down a ramp into a room with three gates and a door. (The third gate is inside the room behind the left outer gate.) These gates can be opened using pressure pads and switches, but they are timed to close after a short time. So, in order to exit, you'll need to race against the clock.
First go forward to the second alcove on the right and find the pressure pad on the floor at the back. Standing on this pad opens both outer gates. When Lara steps off the pad, the timer starts and you have about 20 seconds before both gates close.
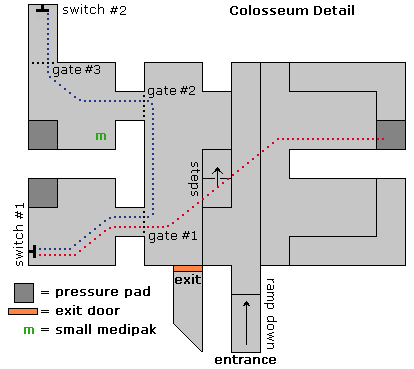
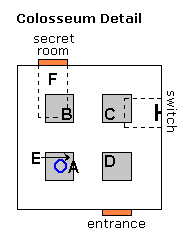
Stand on the front edge of the first pressure pad. When you're ready, cross the room to the gate on the left using a series of running jumps, which is faster than just running. Throw the switch to open the third gate inside the other room. You have about 10 seconds to get there before that gate closes. Press Look to get Lara's perspective back, then roll and run out and to the left, then in through the second gate. Keep going through the third gate into the passageway. Once you make it past the third gate, you can take your time. Pull this second switch to open the exit door. (NOTE: The path from the pressure pad to the first switch is marked with red dots on the diagram above. The path from the first switch to the second switch is marked in blue.)
Pick up the small medi pack on the floor next to the outer gate. Then step on the pressure pad to open the gate and return to the outer room. If you're too slow and the gates close before you finish, just step on either pressure pad to open the gate, run out and start again. Or reload the game if you saved here. Exit through the door you just opened and follow the passage to a spike pit.
- NOTE: Instead of sliding down into the LION CAGES or the ROOM WITH TIMED GATES & PRESSURE PADS, head for the spike pit in the southwest corner of the arena. Go to the far (south) edge of the pit and drop and hang above the spikes. Traverse to the left. Lara will get about halfway across but won't be able to go any further because of the rocks, as shown in this screenshot to the right. If your video card shows shadows, you should be able to see Lara's shadow on the ground between spikes. Drop down safely and walk out of the spikes. Thanks to Dracman for this tip.
Walk carefully through or around the spikes (picking up a save crystal on the way). Enter the tunnel on the left (or straight ahead if you dropped down from above) and follow it to a series of stepped blocks. Climb up through the tunnel to an opening on the rocks above the arena.

ROCK PILE & ROOM WITH BALCONY: Turn around and make your way up the rock pile to the back right, where you'll find a box of shotgun shells. (Its location is shown in the first screenshot to the right.) Climb back down and go to the front of the rock heap. Take a running jump across to the other pile of rocks. Walk up to the flat rock at the corner of the building and take a running jump from there to grab the edge of the balcony beyond. (Both jumps are shown in the second screenshot to the right.) Pull up and ready weapons.
Kill the 2 gorillas inside. They will occasionally come up onto the ledge at the edge of the balcony, but most of the time Lara is safe if she stands there. Note the locked gate on the right, and the steps down to a closed door at the rear. You can't open either yet, but you'll be back later. (PS1 players will find a save crystal here. You can use it now or later when you return to this room.) Near the back of the room on the left is a gray, movable block. Pull it out twice, pick up the small medi pack behind it and throw the switch, which opens the door to the room in the southwest corner of the arena. Return to the balcony. Walk to the left edge and take a standing jump back down to the rock pile. Slide from there to the ground.
SOUTHWEST CORNER ROOM: Go to the southwest corner of the arena and use the stone block to climb up to the spectator area. Climb up the steps to the corner room. Kill 2 bats in the anteroom, then go through the door you just opened. Run forward into the pit, and the boulder will pass safely overhead. Climb out, walk to the edge of the pit and take a standing jump to grab the opposite edge. Pull up and go up the ramp to the room at the top. Throw the switch to open the door in the room at the northwest corner of the arena. Follow the dark passageway to a ramp. Slide down backwards, grab the end of the ramp and drop back into the anteroom below.
Exit the room and get ready for another shoot-out with Pierre. He emerges from the stairway on the west side, where you first entered the arena. This time he's got a lion with him. Deal with the lion first if possible. Then go after Pierre the same way you did before. Shoot him a bit and he should run back down the stairway. If he doesn't, or if he runs off toward the far corner of the arena, run after him (without getting too close), shoot him a bit more, then break line of sight by turning around or hiding behind something and he should disappear. When he's gone, proceed to the northwest room near the collapsed seating area.
NORTHWEST CORNER ROOM: Kill 2 more bats in the anteroom, then follow the passage to the well-lit room beyond. At the top of this room behind a timed door is a secret room. It's another tricky series of jumps to get there. I've included a diagram, which I hope will make it a little easier. I refer to areas marked with letters in the descriptions that follow. You can probably do it without the picture, but a visual aid may help.
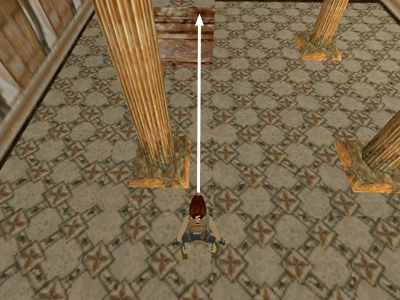
First, make sure the volume is up so you can hear the door open and close above (not essential but helpful). Position Lara next to the first pillar on the left with her back to the entrance and her left foot against the middle of the base of the pillar (A). Stepping on this spot causes the door to open above. Hop back once. Adjust Lara's angle so she's facing squarely toward the right side of the low square platform ahead (B). (Lara is shown in the correct starting position in this screenshot to the right.) Save your game if you can. Now, take a running jump over the spot that opens the door to land on the low platform (B). As Lara jumps, release the forward key, but continue holding the Jump key. As she lands, press Right, then Back, then Left, then Forward (while holding Jump the whole time). If you've lined it up correctly she'll side flip off the low platform to land on the platform above and to the right (C), backflip from there to the platform above and behind (D), side flip from there to the platform to the left and directly above where you began (E), then jump forward to land on the ledge in front of the secret door (F). If you've done the jumps in one fluid sequence, the door will still be open and you can run through. This is SECRET #3, which consists of the MAGNUMS, 2 large medi packs and some Uzi clips. Pick up everything and exit. (The door opens automatically.)
Before descending, take a running jump to the platform on the left, where there's a switch. Use this to open a door in the northeast corner room. To get down, safety drop from the switch platform to the platform below (C) and from there safety drop again to the ground. Lara will take no damage.
NORTHEAST CORNER ROOM: Go to the room at the northeast corner of the arena. Vault up into the doorway you just opened. Use the switch to open the door at the back of the room with the balcony and the gorillas. Jump into the pool and follow the underwater passage until you can surface. Climb out and pick up the small medi pack. Find the movable block and push it twice. Go around to the right side and pull it once to open up an alcove. Inside is a RUSTY KEY. The key looks like it's sitting on a pressure pad but, as far as I can tell, this one is just decorative and doesn't actually do anything. Take the key and swim back to the previous room, then return to the arena.
There's now another gorilla down on the arena floor. Kill it before or after dropping down to the ground. Then make your way back to the room with the balcony. To get there, go through the ROOM WITH TIMED GATES & PRESSURE PADS in the southeast corner of the arena. (If you've already done the timed run, you won't need to do it again.) Or, drop down into the spike pit in the southwest corner using the safe technique described above at the *.
BALCONY ROOM (AGAIN) & LEVEL EXIT: Go to the back of the room, through the door you just opened, and get another small medi pack (and a save crystal if you're playing the PS1 version). Return to the room with the furniture. If you want all the kills, you can shoot 2 more gorillas that are now running around down in the arena. When you're ready to move on, use the RUSTY KEY in the lock to open the gate.
Jump into the water and swim down, then forward and up to a small square opening in the ceiling of the flooded passage where you can climb out of the water. Go quickly to avoid the crocodile, which you can then kill from inside this small room if you want to. Pull the switch to open the gate at the other end of the underwater tunnel. Swim through to exit the level.
Walkthrough text and diagrams copyright © 1998-2015 - Stellalune (stellalune@tombraiders.net). Special thanks are given to the participants in the alt.games.tombraider newsgroup, without whom some parts of this walkthrough couldn't have been written. Thanks also to Ian T., Ingrid G. and Black Tiger for various tips. Diagrams made with the aid of GraphTablet freeware ([2]). All TR1 screenshots were made using Glidos and Fraps. Feel free to copy or print this walkthrough for personal use. By all means, share it with friends, but please include this credit line so people can send me their feedback. No part of this walkthrough may be reproduced on another site without permission.
Palace Midas[]
Keep swimming, surface in a lovely pool decorated with dolphins and climb out of the water. There are three side passages leading out of this room at ground level (and more up above). For now, draw weapons and head through the doorway on the north side, the same side as the underwater gate. Kill the crocodile in the hallway and continue to the base of a stairway. Don't go up yet. Instead turn right and follow the long passageway to an open area with a tall building.
ROOM WITH MANY ALCOVES BELOW AQUEDUCT: Advance slowly to the left with weapons drawn. Give yourself room to back up while shooting at the 2 lions that emerge from the second to last alcove. If you go in slowly, you can probably draw them out one at a time. You can also climb up on one of the low blocks near the entrance where the lions can't reach. When they're dead, continue to the far left end of the room where it's darker. Kill 4 bats there and pick up a small medi pack on the floor on the left. The sound of running water here suggests that this structure is actually an aqueduct. You'll get to the top later on from above.
Turn around and head back toward the hallway where you entered. Pass it and continue to the other end of the room. Behind the building is a narrow alley with a gorilla and 2 sets of magnum clips in it. Kill and pillage. Then return through the long passage to the north (the way you came) to the base of the stairs.
Go up, turn left and continue to a large room. Three more gorillas there need your attention. You can probably shoot them from the doorway by advancing to draw them out then backing up. When all the apes are dead, enter the room.
ROOM WITH SQUARE PILLARS AND FIVE SWITCHES: Here you see a number of tall square pillars, a high platform with 5 switches, plus several doors. Note the inscriptions above the doors. Each has a series of five Greek letters—a different combination of omegas (W), which look like horseshoes with the round end up, and upsilons (U), which look like capital Y's, for each door. Five symbols, five switches. Omega points up, Upsilon points down. Get it?
NOTE: If you don't have the Symbol font installed on your computer, the omegas and upsilons will read as U's and W's or else as blank squares in the walkthrough text.
Before climbing up to the switches, pick up a few items: Cross to the far right (southeast) corner of the room. Here you'll find the lowest pillar, which you can climb on. Turn around and take a running jump to the next pillar. Then turn left, walk to the edge and take a standing jump to grab the ledge above the door. Pull up, follow this ledge to the far end and take a running jump to grab the ledge ahead. Pull up and retrieve some magnum clips and a small medi pack. Safety drop to the floor.
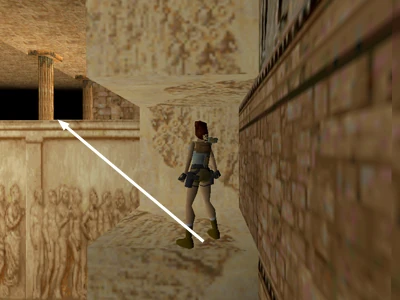
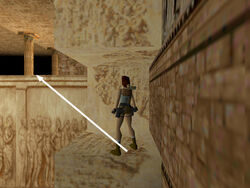
Return to the southeast corner and climb onto the pale tan stone block structure to the right of the switch platform. Climb up to the second level and position Lara facing the switch platform, at about a 45-degree angle. (The correct positioning is shown in this screenshot to the right. You can check the angle by using the Look button to line up Lara's head with the second fluted golden column from the left side of the switch platform.) Hop back and then take a running jump (without grabbing) to land on the platform.
If you have trouble making that jump, you can go the long way: Return to the shortest pillar, climb up, take a running jump to the second pillar and another running jump to the third. From there, take a running jump to grab the top of the next pillar. Pull up and take a standing jump to the fifth and a running jump to grab the last pillar. Now jump over to the switch platform, which should be on your immediate right.
Once you've reached the switches that open the side areas, you can explore them in any order you like. I suggest you try the most difficult first. Then, if at first you don't succeed, you can always go on to the other rooms and try this one again later. Lower the leftmost switch so you have, from left to right: Down, Up, Up, Up, Up (UWWWW). The door below near the lowest pillar opens. Go down the stairs in the middle of the platform and use the switch there to open the gate. Now you can reach the switches more easily next time.
NOTE: See that large medi pack way, way up there on top of the light stone structure to the left of the switch platform? You can't get it without cheating, but it can be done. Check out the note on the Unreachable Large medi pack, at the end of the walkthrough.
FIRE PILLAR ROOM (FIRST LEAD BAR): Enter the door you just opened (on the south side of the switch room). You're now facing a pool and five square pillars with torches on top. Stepping on the floor in front of the first torch turns off the flames. You then have about 10 seconds to get to the other side. Here's how:
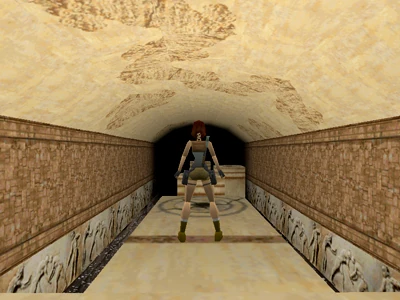
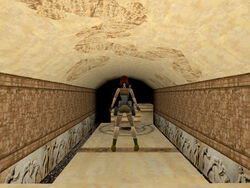
First, kill the 3 rats swimming in the pool. Then if you fall in—and you probably will at least a couple of times—they won't start nibbling as you swim back to the steps. Save your game. (There's a convenient save crystal here in the PS1 version.) Position Lara's feet on the brown line in front of the first pillar, squarely facing the middle of the next pillar (as shown in this screenshot to the right). The timer doesn't start until you pass the line, so take your time getting set up. Now, press Forward, then Jump, and hold both keys to take a smooth series of running jumps from pillar to pillar. Use the left and right arrow keys to turn Lara in the air so she lands on each pillar facing in the direction she needs to run. At the fourth pillar keep holding Forward and Jump until take-off then press Action in the air to grab the edge of the last pillar. Pull up and run across the burner as quickly as possible.
NOTE: If you're having trouble getting across the torch pillars with the method above, try one of the alternate methods at the end of this walkthrough.
Pick up the LEAD BAR—the first of three you'll need to find to finish the level. (There's also another save crystal on this side of the torches.) Jump in the water, swim back across the pool, climb out on the steps and exit the room. Another gorilla will be lurking about. Kill it and return to the switch platform.
SPIKE ROOM (SECOND LEAD BAR): Now arrange the 5 switches to match the inscription over the door to the right of the entrance: WWUWU—from left to right, Up, Up, Down, Up, Down. Descend and enter the room, taking care to walk through the spikes. Go through the doorway on the right and locate the movable block behind the ramp. Pull it twice then go behind it and use the switch there to raise a series of pillars in the room with the spikes.
Go up the ramp and then follow the stairs to the opening at the top. (Console players get a save crystal here.) Walk to the edge of the opening and take a standing jump to the top of the nearest pillar. Jump from pillar to pillar counterclockwise around the room (running jumps all) until you're facing the opening to a small room. Walk to the edge of the pillar, take a standing jump into the doorway and immediately backflip out onto the pillar. Kill the gorilla from safety and jump back over to retrieve the second LEAD BAR.
Jump back to the pillar, then jump over the spikes to a clear spot on the floor. Or, safety drop from the one of the pillar's corners to land in a safe spot amid the spikes. Return to the other room and climb back up to the switches.
SAND ROOM/ROUNDABOUT ROUTE TO TEMPLE (THIRD LEAD BAR): Arrange the 5 switches to match the inscription over the door to the left of the entrance: WWUUW—from left to right Up, Up, Down, Down, Up. Go through the door, around the pillar at the center of the room and through the doorway at the back of the room. Turn right and go down the stairs to the small room at the bottom. Find the movable block and pull it once to cause the ceiling to collapse in the room above. Go back up the stairs then straight ahead up several more flights of stairs to an opening above the now sand-filled room.
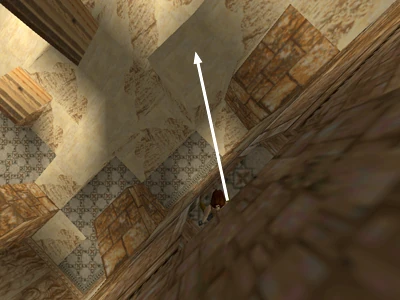

Take a standing jump from the doorway to the flat spot below and to the right (shown in this screenshot to the right). It's easy to overshoot the flat spot, so aim to the right a bit to land on the slope next to it, or press Action as you jump to shorten the distance Lara travels. From the flat spot take a running jump to grab the broken pillar. Pull up and then take another running jump to grab the higher end of the angled sandy ledge just to the right of the elevated doorway. Pull up again and jump into the doorway.
TOP OF THE AQUEDUCT: Climb up the rocks on the right until you come out in a doorway across from a water-filled aqueduct. (There's a save crystal here.) Mind the gap ahead. It's a long way down. You can see some items in a hole below, but don't drop down yet.
Kill 2 bats and 2 gorillas from the doorway. You can probably also target another gorilla running around in the room below. If you can't kill it from this height, you may be able to injure it so it'll be easier to kill later. Jump across to the walkway around the aqueduct. If you look down, you'll notice you're now high above the area where you killed the lions earlier.
Two crocodiles swim along the aqueduct here. You may need to take a dip to draw them out so you can shoot them from the walkway. When it's safe, swim through the tunnel at the west end of the aqueduct and surface in a small cave. Climb out of the water on the right. Turn left then climb up on the rocks. Walk forward (with the pool on your left) until Lara won't walk farther. Jump over the angled block and immediately jump again to land on the rocks ahead. Lara will slide down to a flat spot in the corner. Turn left and walk/slide down to the magnum clips and small medi pack, which are SECRET #1. (The path to the secret is shown in these screenshots below.)
")
")
")
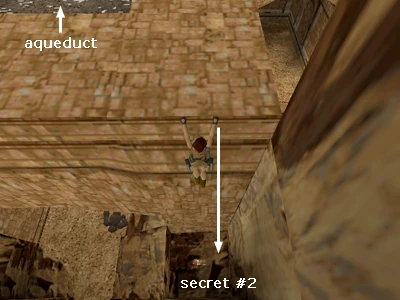

Swim back through the tunnel and return to the north end of the aqueduct where you entered this area. Safety drop down into the hole with the small medi pack, shotgun shells and Uzi clips. This is SECRET #2. (This screenshot to the right shows the spot.) If you didn't kill the gorilla from above, do it now by jumping up and down until you get a pistol lock on it, then continuing to jump and fire until it's dead. Then take a standing jump out of the hole.
Go into the dark room ahead. It contains many shallow alcoves. One of these—the second on the right—contains a small medi pack. Grab it and return to the openings overlooking the area where you killed the two lions earlier. Jump from the left opening to the building ahead on the left. Two more gorillas are hiding ahead—one in the second alcove, another in the farthest. You can probably kill the first one from safety by jumping across the gap to get its attention then back-flipping to the ledge where you started. As you fight, be careful not to fall off the high ledge. If Lara survives the fall, you'll have to make your way back to the ROOM WITH FIVE SWITCHES and retrace your steps through the SAND ROOM to the aqueduct and drop down again.
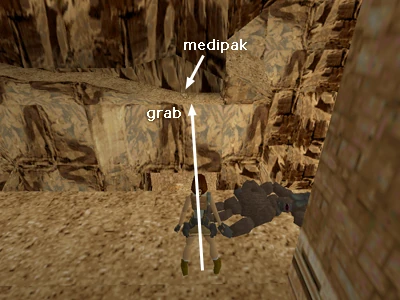
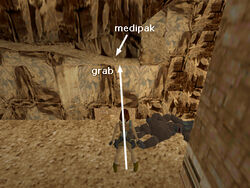
ROUNDABOUT ROUTE TO THE TEMPLE: After dealing with the gorillas, turn to face the rock wall across the gap. You'll notice a large medi pack in the long, horizontal crevice in that rock wall. Take a running jump to grab the flat part of the crevice at the right end (shown in this screenshot to the right) and pull up. If Lara won't pull up, traverse a little to the left where the ceiling is higher and try again. Take the medi pack. Then drop back to grab the edge and traverse all the way to the left. Drop onto the flat block, roll, draw pistols, and kill 2 bats.
Take a running jump back across the gap to the dark hallway that is lit at the far end. Follow this twisty passage up a series of ramps. Then climb the rough stone blocks until you emerge in a cave with a section of break-away floor. Run across the tiles to the niche with the large medi pack. Then take a standing jump diagonally to the right to land on the solid ground beyond. If you fall through the floor, you'll land in the pool at the end of the aqueduct and have to climb all the way back here.
Slide down the ramp ahead, drop down into the area below, then climb down the rocks to emerge on a ledge above the pool at the level entrance. A lion emerges from the opening on the opposite wall. You should have plenty of time to kill it with pistols as it approaches along the ledge. Follow the ledge around and go through the opening where the lion came out. Continue to another opening on the left side where you can climb up then out onto a ledge.
Be careful not to fall down into the room below or you'll have to reload your last save or come all the way back to this point from the switch room. (You can also use the corner bug to get back up if you don't mind cheating.) Kill the 2 gorillas from above. Turn right and take a running jump to the next ledge. Enter a cave with a pool. If you can get a lock on it, kill the crocodile in the water with your pistols before jumping in. Or, swim across the pool quickly, climb out of the water and either kill the croc or just go on.
TEMPLE ROOFTOP: Continue to the back of the cave and climb the rocks to an opening. Kill 2 bats then jump across the gap to the roof of the temple ahead. Cross the roof and pick up the third LEAD BAR (plus a save crystal).
If you're patient, you should be able to kill 2 lions and 2 gorillas from the roof before climbing down. If you don't want to wait for the gorillas to show, you can dangle from the roof to draw them near, or drop down then jump on the rocks at the side of the temple to kill them from safety. When all is clear, approach the temple door, pick up the large medi pack and enter (the door opens automatically). Follow the passageway to a switch and use it to open the gate to a garden near the pool at the entrance. (PS1 players will find another save crystal here.)
Leave the temple and go down the stairs to the next room. If you like, you can jump up on one of the blocks to kill the 3 gorillas running around in here. They can climb but probably won't. Continue on through the far doorway, turn right at the pool where you entered the level and go downstairs to the gate you just opened.
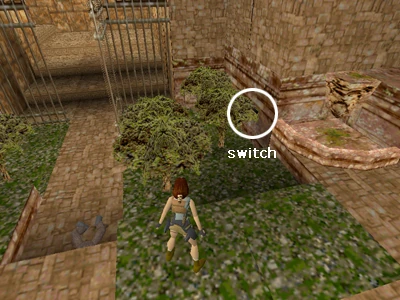
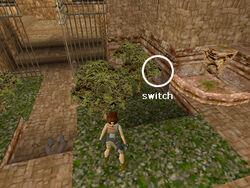
GARDEN/MIDAS: Two more gorillas lurk in the garden. Kill them then find the switch on the left wall behind a small tree. (This screenshot to the right shows its location.) Use it to open the gate a little farther along the left side of the garden. Enter slowly. When you reach the corner a pair of chomping blades begin to work. At this point the chime sounds for SECRET #3. So you can actually go only this far and still have the secret count. But if you want the items, you have to navigate past the trap ahead.
Between the chomping blades is a section of break-away floor with spikes below. So you can't pass one set of blades at a time without falling into the spikes. You'll have to jump past both sets. Walk Lara up to about arm's length from the blades. Listen to the sounds they make. There are two "clangs" as the blades clamp together, then they begin to separate. Take a standing jump past the blades just as you hear the second clang (i.e., just as they begin to separate). Pick up the goodies from around the room—magnum clips, shotgun shells and a small medi pack. Exit past the blades the same way you came in. (NOTE: If you don't already have the MAGNUMS, you'll get them here in place of the clips.)
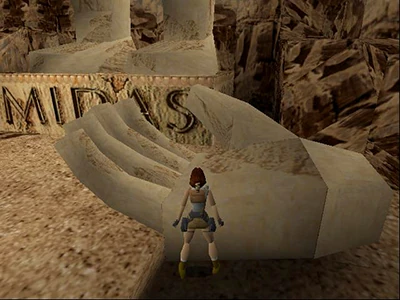

Cross the garden to the far right (northwest) corner. Climb on the low ledge, turn around and walk to the edge. Then take a standing jump to grab the edge of the roof. Pull up, take the large medi pack and enter the passageway at the back of the roof. Follow the passage to a cave with a statue of King Midas, now in pieces. If you want to, save your game first. (There's a convenient save crystal on a ledge near the statue.) Then, just for fun, jump onto Midas's hand. Reload and this time use the magic hand to change those LEAD BARS you've collected into GOLD BARS. To do this, face the side of Midas's palm and "use" the lead bars as you would use a key (as seen in screenshot to the right).
ROOM WITH FIVE SWITCHES (AGAIN) & LEVEL EXIT: Take your gold bars and return through the garden, up the stairs, past the pool, around the corner to the right, along the hallway where you met the crocodile and straight ahead to the stairs leading up to the switch room. Reset the switches to match the inscription over the last door: UWWWU—from left to right, Down, Up, Up, Up, Down. Go to that door, which is below the right side of the balcony at the north end of the switch room. Enter with weapons drawn and kill the charging lion.
Climb to the top of the stairs and go out onto the balcony to pick up some shotgun shells (and a save crystal). Then come halfway back down the stairs to the doorway. Enter, place your GOLD BARS in the niches in the alcoves and exit the level.
USING THE CORNER BUG TO GET THE UNREACHABLE LARGE MEDIPACK: There are many seemingly unreachable places in the various Tomb Raider games. One particularly enticing one is the light stone structure with the large medi pack in the ROOM WITH SQUARE PILLARS AND FIVE SWITCHES. To get there, you can use a technique that players call the "Corner Bug" or "Jump Trick." (Jeff Reid brought this to my attention, but I believe the corner bug was a known quantity before it was applied to this particular spot in the game.)
(The following sequence is shown in the set of screenshots below.) Take a standing jump from the switch platform to the tall, square pillar to the left of the switches. From there, take a running jump over to the middle ledge of the light stone structure. Turn so Lara is facing the light stone block and the open room is on her right. Sidestep to the right until her right foot is at the edge. Then turn about 45 degrees to the right so Lara is facing the switch platform. Jump straight up and down in place repeatedly and Lara will creep forward toward the corner of the block. If you've positioned her correctly, after a couple of jumps, you'll notice her left shoulder and foot start to merge into the block. Keep jumping. Then, at a certain critical point, she'll suddenly pop up to the top of the block above, right next to the medi pack. Why? As Lara creeps forward, the game program interprets her position as being INSIDE the block. It knows this can't be true, so it "corrects" by repositioning her on top of the block. This is obviously a bug in the game, but apparently the programmers meant it to be exploited, or they wouldn't have put goodies up there.
After getting the medi pack, drop back down to the lower block, jump over to the nearest square pillar and from there, jump to the platform with the switches.
")
")
")
")
")
ALTERNATE METHODS FOR GETTING ACROSS THE FIRE PILLARS: The first method involves no cheating. It's easier than the method I suggest above, but you'll need to use a few medi packs. The second combines elements of the first and second methods.
First make sure Lara has full health. (If you're short on medi packs, you can do some of the other stuff in the level first, then come back here.) Stand Lara on the brown starting line with her left foot at the left edge of the platform. Take a running jump to the left corner of the first pillar. Take another running jump to the right corner of the second pillar and then another running jump to the left of the third pillar. The flames will probably come back on around now, but that's OK. Hold the walk button and step back carefully from the flame to the front edge of the pillar. Lara will start losing health, but as long as you keep her away from the flame, she won't catch fire. Keep an eye on the health bar from this point and pause to use medi packs as needed. Sidestep to the left of the pillar and make sure Lara is facing forward lined up squarely with the left corner of the final platform. Use another medi pack if necessary. Then immediately take a running jump along the left edge of the pillar and press action to grab the edge of the last pillar. Before pulling up, traverse to the left to make sure Lara is as close to the edge as possible. Then pull up and walk across the edge of the pillar out of the range of the flame. (Special thanks to Norman G. for this suggestion.)
If you're playing on the PC or Macintosh and you make it to the point where you grab the last pillar and the flames come on as you're about to pull up, try this trick: Traverse to one corner before pulling up, and walk across the edge of the pillar to avoid catching fire. If this doesn't work and Lara has caught fire, immediately save your game. Reload and Lara will have taken some damage, but she'll no longer be on fire. (MAKE SURE YOU SAVE IN A NEW SLOT in case it doesn't work for you.)
Copyright © 1998-2015 - Stellalune (stellalune@tombraiders.net). Special thanks are given to the participants in the alt.games.tombraider newsgroup, without whom some parts of this walkthrough couldn't have been written. Thanks also to Helena for finding the alternate weapon pick-up points, Mandy, Norman G. and Ingrid G. for help on this level, and Greg D. for the Macintosh savegame. All TR1 screenshots were made using Glidos and Fraps. Feel free to copy or print this walkthrough for personal use. By all means, share it with friends, but please include this credit line so people can send me their feedback. No part of this walkthrough may be reproduced on another site without permission.
The Cistern[]
From the start, safety drop into the room below and kill a big, nasty rat. Find the movable block and push it twice into the next room. Go around to the side and push it under the switch. Climb up and throw the switch to open the trapdoor below, as well as the silver door, letting in 2 more rats. Kill them from above, then hop down and retrieve a large medi pack from the small room behind the silver door.
MAIN ROOM OF CISTERN: Drop down through the trapdoor. Exit onto a ledge jutting out into a huge room with a pool, but don't drop down to the floor just yet. First get your bearings. Ahead on the far (north) side of the room is a tiered balcony with railings on both sides. At ground level on the same wall is a small metal door. To the left (west) are two ledges with locked metal doors. Below and beyond them (also on the west side) is another small metal door at ground level. On the right (east) side is the highest balcony, and below that, an elevated walkway with a square pillar at one corner. On the same side, there's also an opening with a ramp below it that leads down to the pool and is flanked by two gargoyles. To your immediate right (in the southeast corner) is a long, L-shaped ledge with a horizontal crevice running along it. Where to start. . . .
Walk out to the end of the ledge at the entrance. You can probably kill the 2 rats on the ground below from here. Jump across to the short elevated walkway ahead, from which you can kill the 2 crocodiles in the pool.(You don't have to do this first, but it will save you some difficulty later on when you enter the pool through an underwater tunnel.)
Jump back to the walkway near the entrance. Turn left, so the entrance is on Lara's right, and then take a running jump to the ledge ahead. Kill the rat lurking there, then walk down the steps and to the right. Grab the horizontal crevice in the ledge ahead and traverse to the left until you can drop down onto a block with some shotgun shells on it. Turn and grab the crevice on the other side of the corner and keep going to the left until you can drop onto the elevated walkway below. Turn around, go to the other end of this walkway and climb onto the square pillar at the corner. (There's a save crystal here in the console game.) From the top of the pillar, take a standing jump onto the high balcony and climb the stairs to the room at the top.
ROOM WITH METAL GRATING AND CISTERN SWITCH: Your buddy Pierre is waiting inside on the right. To get rid of him quickly and easily, draw the shotgun, run in, blast him twice at close range and then run past him. He should then scurry out the door and disappear. You can also use pistols here if necessary, but Lara will probably lose some health in the process. In any case, try to injure him and then get behind him as quickly as possible. If you block his route to the exit, he'll keep shooting at Lara.
Try not to fall through the openings in the grating floor. If you do, you won't be able to climb out again and you'll have to swim through the underwater tunnels to get out of the room below and then climb up to the entrance again. And don't pull the switch yet. It floods the cistern, and you still need to do a few things above water.
NOTE: If you are coming to this walkthrough after flooding the cistern too soon, just pull this switch again to lower the water level, go on about your business and re-flood the area again when you're ready. Others might want to do this just for fun to see the interesting effect of the floating crocodile corpses. They rise with the water but forget to sink when it recedes again. I had fun making Lara stand beneath one and wear its as a hat.
Climb on the block in the near right (southwest) corner. Turn around and take a standing jump to grab the raised arch near the middle of the room. Pull up and, from there, take a running jump to grab the next higher ledge. Pull up and collect a large medi pack and some shotgun shells.
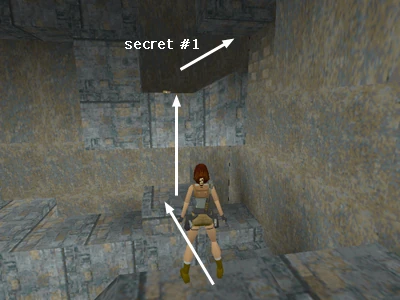
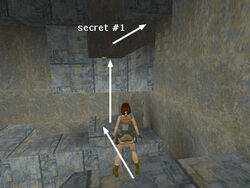
Take a standing jump, not a running jump, down to the previous ledge. Jump over to the next ledge and then climb into the inverted arch above (as shown in this screenshot to the right). Pick up the small medi pack, go to the top of the low ramp on the right and climb into the barely visible opening above on the left. This is SECRET #1. Climb up three blocks to find more shotgun shells. Step off the edge onto the slope below. Slide forward and, just before the end of the slope, jump to grab the ledge ahead. Pull up, pick up 2 more boxes of shells, then slide down the chute into the room below.
Climb over the low wall to the other side of the room. Before jumping into the water, get rid of the 2 rats lurking below. To do this, jump over the hole in the grating floor to activate the rats. Then shoot them through the opening in the grating. (You may need to jump over the opening again a few times to attract them.) Then jump in and swim through the tunnel in the southeast corner. Follow this underwater tunnel through a few twists and turns to a room where you can surface. Quickly swim to the far corner of the room, climb out at the foot of the steps and kill another swimming rat.
Go to the top of the stairs. Take a running jump to grab the gray block opposite. Pull up, then take another running jump to grab the ledge where you'll find the first RUSTY KEY.
Walk through the doorway ahead to the edge of a pit with 2 rats in it. Shoot them from above. Then turn around, drop and hang from the doorsill, traverse along the crevice to the left and drop to the floor. (It's not far to traverse; you just don't want to drop into the pit or Lara will lose health from the fall.) Cross the room and slide down the ramp to emerge back in the main room. (There's another save crystal here.)
MAIN ROOM OF CISTERN (AGAIN): Once on the ledge outside, turn left and take a standing jump to grab the elevated walkway; pull up. From there, climb to the top of the long, L-shaped ledge and follow it around the southeast corner (toward the doorway where you entered this area). At the end of the ledge pick up the second RUSTY KEY. (The first and second screenshots below show the path from the ramp to the key.) Drop down onto the ledge with steps where you killed a rat earlier. Go to the end and jump back to the ledge near the entrance. Walk to the end and jump across to the short elevated walkway ahead. Turn left (west) and take a running jump to grab to the ledge in front of the locked door. Pull up and use one of the RUSTY KEYS to unlock the door. Just to be clear, this is the left door of the two identical doors on the west wall (shown in the third screenshot).
")
")
")
IMPORTANT: There is another locked door on the west wall of the big room. This door can also be unlocked with a rusty key, but it's not the door you want right now. You want the door on the left, as shown in the third screenshot above, not the one on the right. It is possible to open the door on the right, drop down into the spikes, and survive. If you do this, you will be stuck down there and unable to complete the level. If you enter the left door first, you'll be able to flood the area later and enter the right door safely.
ROOM WITH TIERED LEDGES AND GORILLAS: Two gorillas wait in the side alcoves toward the back. Advance and draw them out, then back up shooting. Or, enter, turn around, climb up on the ledge above the door and kill them from there.
From the ledge above the door, take a running jump to the next higher ledge. At this point, Pierre reappears in the room below. You can either shoot it out from up here or drop down and try and chase him out. If you shoot at him a little and then duck behind something so he can't see Lara, he should run off. If you're having difficulty here, try this strategy: First, position Lara on the ledge directly above the entrance. Draw magnums. (You won't need much ammo, but this method depends on the more powerful guns.) Take running jump to the next ledge, which will cause Pierre to appear. Roll as you land so Lara falls off the ledge and lands facing Pierre and the room's entrance. Start shooting as Lara is falling and continue shooting as you run past Pierre and out into the MAIN ROOM. This should do enough damage that he'll disappear while Lara is outside.
If you've dropped down, return to the second ledge. From there take a running jump to grab the third, where you'll find a large medi pack. Take another running jump to grab the fourth and highest ledge. Pull up and walk towards the edge. Turn around so Lara's back is to the alcove with the magnum clips below. Walk backwards to the edge. Then walk one step forward. Backflip and Lara will land on the ledge. Or, walk to the edge facing forward, walk one step back, and swan dive onto the ledge (Walk + Jump + Forward). Pick up the clips. (NOTE: If you didn't find the MAGNUMS earlier, you'll get them now instead of the clips. In my opinion, this should count as a secret.)
Now use a running jump and grab to get back to the highest ledge. Turn around and this time take a running jump to grab the narrow crevice above the alcove where you got the clips. Traverse to the right until you can drop down safely. Follow the passageway, hop down onto the gray ledge, then go down and around to the left, sliding down until you're on the flat spot above the final short slide.
ROOM WITH SLIDES, LEDGES & CROCODILES: Kill the crocodile from above. Slide down to the floor and either use the shotgun to deal with the second crocodile or jump or climb onto the block in the far left corner to shoot it from safety. (and get another save crystal). A third croc lurks in the passageway behind the slides. Go in on the right side and back out shooting. When it's dead, go all the way into the passageway, kill a rat and pick up a large medi pack.
Return to the croc room, climb up the two blocks in the corner, turn around and take a standing jump to grab the small ledge in the middle of the room. Pull up and take a running jump to grab the corner ledge. Turn right and take a running jump to the next ledge. Run off the end of the ledge to land on the ledge below without losing health. Now turn to face the crevice in the wall. Grab it and traverse to the left until you can pull up into the doorway.
Throw the switch to open the door. Enter cautiously—there are spikes and a couple of rats below. One rat won't come out until you drop down, so kill the first one from above, jump diagonally to the left to clear the spikes, and then kill the other rat. Continue to an opening in the floor.
NOTE: If this opening is filled with water, then you've flooded the cistern too soon. See the footnote below for details.
ROOM WITH FIRST SILVER KEY: Drop down onto a block in a mossy room. Kill the rat below. Hop down, enter the next room and kill another rat. Do not fall or jump into the pool. You won't be able to climb out and will have to swim back to the main room (as described in the second footnote below).
Climb the stairs to the right of the metal door. Climb onto the ledge ahead and then to the higher ledge on the right. Go to the end of this ledge, turn right and take a running jump to the ledge below. Pull up onto the next ledge, turn right and take a running jump to the ledge beyond. From there, it's a standing jump into the alcove with the switch. Use it to open the door below.

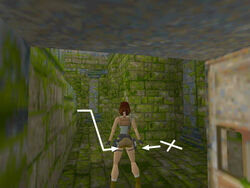
After picking up the silver key, quickly position Lara in the far corner of the alcove on the right (at the spot marked with an X in the screenshot above), facing out into the room. Pierre will approach from the other side of the room (along the path marked with the arrow), and she'll remain under cover until he's right in front of her. As soon as he steps into view, blast him twice with the shotgun and he'll run off.
Climb down and take the first SILVER KEY. Immediately roll and draw your shotgun for another confrontation with Pierre. To get through this confrontation with little or no health loss, quickly position Lara in the far corner of the alcove on the right, facing out into the room. (This screenshot to the right shows the spot.) Pierre will approach from the other side of the room, and she'll remain under cover until he's right in front of her. As soon as he steps into view, blast him twice with the shotgun and he'll run off. When he's gone, jump into the pool and swim through the underwater passage to the next room where you can surface.
ROOM WITH SECOND SILVER KEY: High up on the ledges are a couple of rats. You'll be back in a bit, but to make your job easier then, you can kill one or both of these guys now: Climb onto the low block in the corner and jump up and down with pistols drawn until you get a lock on it. Keep jumping and firing until it's dead. (Note the location of the high lever and the small door with the other SILVER KEY behind it. You'll return here soon.) Now jump back in the pool and follow the other, twisty passage (to the south) back to the pool in the main area.
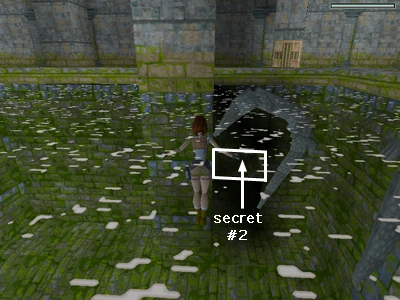

MAIN ROOM OF CISTERN (AGAIN): If you haven't killed those crocodiles yet, climb out of the water quickly and do it. If you have, keep swimming to pick up SECRET #2: Swim into either of the openings on the west side (one is shown in this screenshot to the right). They connect in a U shape. In the middle of the underwater tunnel, in a shallow depression, is a set of magnum clips.
Climb out of the pool at the base of the ramp (on the east side between the two gargoyles). Climb/jump up to the walkway above, and from there back onto the balcony (on the east side) and into the ROOM WITH METAL GRATING AND CISTERN SWITCH. Now pull that switch to flood the area.
ROOM WITH SECOND SILVER KEY (AGAIN): Return outside and swim down to the north end of what was the pool, through the small opening where you came out earlier (it's outlined in the first screenshot below). Follow the passageway until you can surface. Climb out of the water and kill the 2 rats if you didn't do so the first time you came through. Pick up a small medi pack (and a save crystal in the PS1 game) on one ledge, a large medi pack and shotgun shells on the other. (NOTE: If you don't already have the SHOTGUN, you'll find it here in place of the shells.)
Jump back in the water and pull the lever to open the door below. Swim down, pick up the second SILVER KEY and the exit door opens automatically. (The lever and key are shown in the second screenshot below.) Swim back to the surface. Climb out of the water on the ledge near the right door of the two identical doors on the west wall (shown in the third screenshot below).
")
")
")
IMPORTANT: There are two identical doors on the west side of the main room. You should have already explored behind the one on the left (as described above). Now it's time to enter the one on the right, but only after flooding the cistern. It is possible to open the right door while the area is still dry, drop down into the spikes and survive. If you do this, you will be stuck down there and unable to complete the level. If you followed the walkthrough above, this area should now be flooded, enabling you to enter safely.

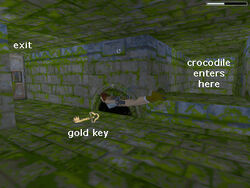
SHAFT WITH SPIKES LEADING TO GOLD KEY: Unlock the door with the second RUSTY KEY. Jump in the water and swim down through the spikes. (They're safe now that you're in the water.) Take a left at the spikes, then swim down into a little room and turn around. There's an opening ahead and to the left. Go through it, pick up a small medi pack and the GOLD KEY then exit.
When you take the key, the door ahead opens and another crocodile appears in the underwater tunnel to the right. (This screenshot to the right shows the spot.) Quickly swim through the door and out into the MAIN ROOM. Climb out on the nearest ledge and kill the croc. Then head for the ornate balcony (on the north side).
ORNATE BALCONY NORTH SIDE OF MAIN ROOM: Climb up but before entering find the movable block to the left of the entrance. Push it once and enter the room behind, which is SECRET #3. Stand underneath the balcony with Lara's back toward the slope. Step back to make sure she's as close to the base of the slope as possible. Backflip onto the slope and then hold Jump and Action to spring forward off the slope and grab the edge of the balcony. Pull up and get 2 sets of magnum clips and a large medi pack. (This sequence is shown in a series of screenshots below.)
")
")
")
")
Return outside to the locked doors and use the 2 SILVER KEYS to unlock them. Go in and climb on the square pillar on the right. (In the console versions, there's another save crystal here.) Turn around and take a standing jump to grab the ledge above the door. Pull up. Take a running jump to the ledge with the gold keyhole. Immediately safety drop to the floor to get out of the way of the angry gorilla. Climb back to the ledge above the door and kill the ape from there. Jump back across and use the GOLD KEY to unlock the door below. Don't drop down until you've killed the 2 lions that emerge. (You can dangle Lara from the ledge to get their attention and/or jump back to the other ledge or down to the square pillar to get a better shot if necessary.)
BIG ROOM WITH CHECKERBOARD FLOOR: When the coast is clear enter the next room. Advance cautiously. The checkerboard floor has a number of broken tiles, some with spikes beneath. The far left break-away tile conceals a small medi pack, so be sure to drop in and pick it up. At the rear is a switch. It opens the door to the right releasing 3 lions. You can pull the switch, hop back and then jump onto the block above the switch. The lions can't reach Lara there. Or, don't pull the switch and wait to shoot the lions from above in a little while. Or, you can ignore the lions altogether, since there's no reward in that room.
Go around to the right of the switch and find the movable block. Pull it twice. (The level exit is behind it, but don't leave yet.) Go around to the side and pull the block out into the room. When you can't pull any further, go around the back and push it once more. Now you can use it to climb up to the balcony.
If you want all the kills, run up the angled block on the right and hop down behind it to trigger the appearance of 2 rats. Kill them. Then pick up the large medi pack and 2 sets of magnum clips at the other end of the balcony. If you didn't kill the 3 lions earlier, you can snipe at them from the well-lit doorway. Drop down either into the lion room or onto the block you moved. There's a switch in one corner of the lion room that opens and closes the door.
LEVEL EXIT: To finish the level, go to the opening where the movable block was and fall down the long shaft.
CISTERN FLOODED TOO SOON - CAN'T REACH FIRST SILVER KEY: The easiest thing to do in this case is to reload an earlier save, but if you don't have one, it's OK. From the hallway with the spikes and the 2 rats, swim down through the underwater tunnel to the next room, where you can surface for air. This is the ROOM WITH THE FIRST SILVER KEY, but you won't be able to get it yet, since you can't climb out of the water. Swim through the tunnel near the bottom center of the room. This leads to the ROOM WITH THE SECOND SILVER KEY. You can get that one now (follow the walkthrough above if you need help). The exit near the second silver key returns you to the MAIN ROOM. In order to get the first silver key, you'll have to climb back up to the ROOM WITH METAL GRATING AND CISTERN SWITCH and use the switch to lower the water level. Retrace your steps through the ROOM WITH TIERED LEDGES AND GORILLAS to the FIRST SILVER KEY, following the walkthrough above if necessary.
IF YOU FALL INTO THE POOL BEFORE GETTING THE FIRST SILVER KEY: Reload an earlier save if you have one, but if not, don't worry. Swim down through the underwater tunnel to the next room. This is the ROOM WITH THE SECOND SILVER KEY, but you can't reach it yet. Swim through another flooded tunnel (to the south). This leads back to the MAIN ROOM. Retrace your steps through the ROOM WITH TIERED LEDGES AND GORILLAS to the FIRST SILVER KEY, following the walkthrough above if necessary.
Walkthrough text and diagrams copyright © 1998-2015 - Stellalune (stellalune@tombraiders.net). Special thanks are given to the participants in the alt.games.tombraider newsgroup, without whom some parts of this walkthrough couldn't have been written. Thanks also to Ian T. for the locations of the save crystals in the console versions, to Helena for finding the alternate weapon pick-up points, and to LordGroghe, Rick J., Ian T. and Black Tiger for other help on this level. All TR1 screenshots were made using Glidos and Fraps. Feel free to copy or print this walkthrough for personal use. By all means, share it with friends, but please include this credit line so people can send me their feedback. No part of this walkthrough may be reproduced on another site without permission.
Tomb of Tihocan[]
Swim down and forward through a long tunnel. When you reach the silver grate, swim down past it. At the bottom turn around and swim forward to a lever. Pull it to lower the water level, turn around again and swim back up to the surface. Climb out on the ledge and use the switch to open the door to the right.
NOTE: The most common problem in this area is confusion between the T-shaped switch, which can only be used on dry land, and the broom handle-shaped lever, which can only be used underwater. First you want the lever then, after the water is drained, the switch.
ROOM WITH FLOATING BLOCK: Draw weapons and proceed along the hallway and through the door you just opened. Kill the crocodile in the next room. Notice the block that looks like it should move but doesn't? It actually moves up. Here's how: Climb the stairs to the top and hop down on the other side. Take a running jump from here to the greenish ledge next to the square block at the top center of the room. Pull up onto this block at the right corner. Darts begin to shoot out from the walls and across this block. As long as you stay near the corner, Lara will be safe.
Turn right and take a standing jump from the corner of the block to the small, square ledge ahead. From here, take a running jump to the ledge just beyond the dart pipe. Climb into the alcove and use the switch to raise the water level again. The previously immovable block floats up to the opening above. Swim down to where the block was and retrieve a small medi pack, then climb onto the block and enter the passageway beyond.
Follow the passage to an opening and swim down and forward, then down again to another silver grate on the bottom. Swim forward past the grate to another the underwater lever. Pull this to lower the water level once again and speed up the water current. If necessary, return to the opening above to breathe, then swim down and forward through a very long passageway. With the current working in your favor, Lara will be swept along to a room where she can surface.
TALL ROOM WITH LEDGES AND SWINGING BLADE: Climb out of the water and kill a rat. Pull the movable block once and use it to climb up to the ledge above. Then climb onto the square ledge above, then the rectangular gray block. There are 2 doorways at the top of this room. Take a running jump to grab the edge of the doorway on the right and pull up.
NOTE: If you're playing one of the console versions, you may want to jump over and use the save crystal before doing this next bit.
Draw pistols and proceed into the passageway. Pierre DuPont will be waiting in the passage ready to do some damage. Shoot him a few times, preferably with the shotgun so you'll do more damage in a short time, then back up into the doorway. He should vanish when you do. If not, try hanging from the edge of the doorway.
Continue down the stairs where Pierre went. Go cautiously to avoid running into the chomping blades ahead. Stand as close to them as you can without getting cut. Listen to the sounds they make and on the second "clang" (i.e., when they start to separate), run or take a standing jump through them.
ROOM WITH CROC & PRESSURE PADS: Continue down the stairs to an opening in the floor. Drop down and kill the crocodile in the room below. Pick up some magnum clips and 2 boxes of shotgun shells. Now take a close look at the floor. There are 3 squares that look different from the others—two in the northeast and southwest corners and one near the steps. These are actually pressure pads. Step on all three, in no particular order, to open a door concealing SECRET #1.
Inside is a small room with a slope that meets the floor, 3 angled blocks and a small ledge above. Position Lara with her back to the ramp and her chest against the side of the lowest angled block. Backflip onto the ramp and hold the Jump key, and Lara will spring off the ramp then jump forward onto each of the 3 angled blocks in turn, landing on the ledge above. Pick up the reward: a large medi pack and a box of shells. (This sequence is shown in a series of screenshots below.) Drop down and return back up the stairs, past the blades, to the doorway at the top of the room where you met Pierre before.
")
")
")
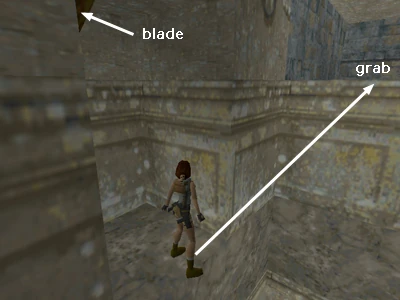

TALL ROOM WITH LEDGES AND SWINGING BLADE (AGAIN): Hop down onto the square block below the doorway. Turn right and take a running jump across the gap to grab the edge of the alcove with the shotgun shells. Pull up and get the shells. Whether or not you've already triggered the swinging blade on the left side of the alcove, it shouldn't be a problem. Turn so Lara is facing the doorway above. Adjust her position so she's fairly close to the wall of the alcove but still has room to get past it (as shown in this screenshot to the right). Then take a standing jump to grab the doorsill and pull up.
NOTE: If you haven't yet retrieved the save crystal here in the console game, you can get it without triggering the blade. Start from the ledge opposite the crystal and take a running jump across the gap to grab the ledge with the crystal. Pull up and use it. Jump back to the previous ledge, then to the square block, then to the ledge with the shotgun shells. In any case, it's not too difficult to get past the swinging blade if you do trigger it. Just stand facing the blade and the raised doorway beyond it. Position Lara just forward of the faint line between the two floor tiles nearest the blade. As soon as the blade begins to swing to the left, take a running jump past it to grab the doorsill ahead.
Follow the passage to a gap above a mossy room. (The room below is where you found secret #1.) Turn around and drop back to grab the edge of the floor. Traverse to the right until you can pull up. Go down the short passageway to a switch and pull it to flood the room below. Drop down into the water and surface right there. Don't bother swimming through the underwater opening. That just takes you back to the hallway with the chomping blade where you were before. Instead, swim along the surface to the other end of the rectangular opening, climb out of the water and kill a rat. Go to the end of this short hallway and jump into the water again. Swim down, then up again through a twisty passage until you can climb out of the water in a room with spikes on the floor.
ROOM WITH LION, GORILLAS & SPIKES: Stay on the step at water level until you've killed the lion lurking in the room. In the U-shaped passageway on the side of the room opposite the spikes you'll find a switch. Use it to open a door above and awaken 2 gorillas. Return to the spike room and climb into the alcove opposite the spikes. You should be able to kill the apes from the higher ledge in the alcove. (There's also a save crystal here in the PS1 game.)
When they're dead, take a standing jump to grab the floor above and pull up. Stand at the edge of the hole above the spikes. Take a standing jump to grab the crevice to the left of the doorway and traverse right until you can pull up. Enter the room and pick up a large medi pack and a GOLD KEY. Jump from the doorway back over the hole with the spikes below. Go to the other opening in the floor and drop down.
GOLD KEY LOCK: Climb into the alcove then out the other side, where you'll find the keyhole your GOLD KEY fits. Use it to raise a series of blocks in the pool. Take 3 running jumps and a standing jump to get across. Pick up the small medi pack to the right of the door before going in.
NOTE: In the PC game the secret chime sometimes rings when you use the gold key. It doesn't count as a secret, though.
ROOMS WITH MOVABLE BLOCKS & LOCKED DOORS: This area contains a locked door with two keyholes straight ahead, two closed doors on the right and another room to the left beyond some square pillars. That room has two more closed doors at floor level and a higher door. There are also 4 dark squares on the floor with writing on them (pressure pads) and a movable block between two of the pillars. Pull the block twice to position it on top of one of the dark squares. Hop back and jump onto the block. One of the doors in the other room opens, releasing a gorilla. Kill it from above and then go to the room you just opened to get some magnum clips and shotgun shells.
Pull the block twice more until it is on the dark square below the high door. Again, jump on the block. The door high on the wall opens, along with the second door in the other room, which lets out another gorilla. Shoot it from the block. When it's dead, turn and take a standing jump from the edge of the block to grab the high doorway. Pull up and enter cautiously. Another chomping blade trap is in the way. Go past it as you did the last one, and take the large medi pack and RUSTY KEY. Coming back you won't be able to jump through the blades without banging Lara's head, so run through instead.
Drop down and go around the other side of the block. Pull it twice onto the dark square, hop back and jump on top of the blocks to take out the 4 rats that come swarming out of the room on the left. Jump down and enter to find a small medi pack.
Go back to the block and move it onto the last dark square. This opens the remaining door. Walk forward into the doorway. Don't be tempted by the small medi pack on the floor. If you try to get it now, Lara will be squashed by a pair of rolling boulders. Instead, take a running jump across the room and into the alcove ahead. The boulders roll past harmlessly. Pick up the second RUSTY KEY, then the medi pack, and return through the block room to the room with the locked door.
Don't forget to go into the other small room you opened to get some more shotgun shells. Then use the two RUSTY KEYS to unlock this door. Here you'll find a long ramp leading down to an underground lake. (There's also save crystal here in the console game.)
LONG CHUTE AND SECRET ROOM: Before sliding down, pick up a secret. Save your game. If you miss this secret, you'll have to reload in order to try again. Position Lara at the right side of the doorway facing down the slope. Turn her about 30 degrees to the left. Then take a standing jump forward onto the first low block beyond the higher angled blocks on the left side of the long slide (i.e., the first one that slopes down toward the slide). Keep holding the Jump key, and she'll backflip off that block and then take a series of forward jumps along the right side of the slope. On the third jump, she'll spring back across the slope to the left side. At that point, release the Jump key to slide down the last slope and land in a doorway. (This sequence is shown in a series of screenshots below.)
")
")
")
Ahead is a rectangular room with 5 break-away tiles jutting out from the two sides—two on the left, three on the right—and an alcove at the far end opposite the entrance. Stand in the middle of the doorway. Walk to the edge and then walk one step back. Then do the following series of jumps to land on the tiles: standing jump forward, side flip to the left, jump forward, jump forward, side flip right, and jump forward to land in the alcove. If you fall through you can climb out easily, but you'll have to reload a saved game to try for the secret again.
If the jumps are too tricky, try this alternate method: Stand in the middle of the doorway, walk to the edge and hop back once. Take a standing (not running) jump forward to grab the edge of the first break-away tile. As long as Lara hangs there, the tile won't start to collapse. Pull up and immediately take a running jump to grab the edge of the tile straight ahead near the alcove. Pull up and run into the alcove before the tile breaks. (Both methods are shown in these screenshots below. Thanks to Mark R. for this alternate strategy.)
")
")
")
")
")
Once in the alcove, pick up SECRET #2, clips for the magnums and Uzis. Drop down, cross the room, climb out and continue down the slide to the lake.
UNDERGROUND LAKE: There's a crocodile in the water, so swim forward without hesitating. On the far side of the lake is a square gray ledge on which you can climb out. Kill the croc and then turn around and enter the passageway. Climb the rocks until you reach a gap high above the lake. On the far side you'll see a switch. Take a running jump across the gap to the square block below the switch. Climb up and use the switch to open an underwater door.
Drop into the water. Face the small, flat ledge at water-level (to the north). Swim down through the underwater tunnel just below that ledge. It takes several twists and turns and eventually emerges on the other side of the lake. Surface and face the door of Tihocan's tomb, which is flanked by two centaur statues.
Before climbing out of the water, find the switch to open that door. It's behind the small door you just opened, at the end of a well-concealed underwater passage beneath the right side of the building. If Lara is treading water facing sandy ledge near the centaur statue on the right, the passage is below, ahead and just a little to the left. There's a pointy, light-colored rock overhanging the opening (shown in the first screenshot below). Swim into the passageway, through the door you just opened using the switch above, and into a room where you can surface. Pull the switch here to open the door of the tomb. (And use the save crystal.) Swim back to the lake but don't climb out right at the entrance. Instead, go to the left side and climb out onto the sand (in the area shown in the second screenshot below).
")
")
Draw weapons and cautiously approach the door. The centaur statue on the left comes to life and begins to hurl fireballs. Backflip onto the flat sandy area. When you see it launch a fireball, side flip out of the way. Keep shooting and eventually it will explode. Alternatively, run past the statue into the building. It will animate as you pass, then you can kill it from inside, using the doorway for cover.
NOTE: In the console version, you can use the save crystal in the sandy area near the tomb building before or after destroying the centaurs, and if you run past the statues into the tomb both will animate at once. In the PC and Macintosh games, the statue on the right won't come to life yet.
TIHOCAN'S TOMB: Once inside the tomb, prepare for your final showdown with Pierre. This time you can use the magnums, if you've got them, to take him down fairly quickly. When he's dead, relieve him of a GOLD KEY, the SECOND PIECE OF THE SCION that he took from the pedestal at the center of the room, and his MAGNUMS. (You won't have two sets of magnums if you've already got them, but the pick-up will be added to your total.)
BUG NOTE: If you're playing the PlayStation game and decide to wait to save until after you've defeated Pierre, be sure to pick up the items he drops FIRST. If you save and then reload, without first looting Pierre's body, his items will be gone, leaving you without the key to unlock the level exit. If you've already done this, you can use the level-skip cheat to finish.
Now, if you haven't done so already, you can go back outside and take on the second centaur. Once you awaken it, it's easy enough to kill it from the safety of the doorway. It won't come inside. Just get a lock on it, hold that Action key and be sure to side flip out of the doorway whenever it launches a fireball.
Use the square blocks to climb onto the ledges on the sides of the Scion room to pick up 2 sets of magnum clips. Then jump over to the balcony at the back of the room. Pick up the large medi pack at the left end of the balcony. Use the GOLD KEY you lifted from Pierre in the lock up here to open the door below. Lastly, drop down and enter Tihocan's tomb to finish the level.
Walkthrough text and diagrams copyright © 1998-2015 - Stellalune (stellalune@tombraiders.net). Special thanks are given to the participants in the alt.games.tombraider newsgroup, without whom some parts of this walkthrough couldn't have been written. Thanks also to Ian T., Martin V., Mark R. and Black Tiger for their help with this level. All TR1 screenshots were made using Glidos and Fraps. Feel free to copy or print this walkthrough for personal use. By all means, share it with friends, but please include this credit line so people can send me their feedback. No part of this walkthrough may be reproduced on another site without permission.
Egypt[]
City of Khamoon[]
Go forward to the drop-off. Turn around, drop and hang from the ledge, then drop and quickly press Action again to grab the narrow crevice just below. (If you miss the crevice, climb up onto the block to grab it.) Traverse to the right until you can drop into the alcove. Throw the switch to open the door in the trench below. Drop down, enter and pull the carved block three times. Go into the opening behind it and retrieve some magnum clips and a small medi pack.
Climb out of the trench and go to the second movable block on the ledge above. Pull it once, go around on top of the first block and pull the second block over it into the room (three times in all), then go behind it and push it once so it's next to the tall square pillar. Climb up the block, then the pillar. Grab the crevice above, traverse to the right and pull up into the opening.
Stay on the sandy ledge in the opening to kill the black panther running around in the cave beyond. When it's dead, hop down, turn around and climb onto the ledge above the opening to find another small medi pack and magnum clips. (NOTE: If you didn't find the MAGNUMS earlier, you'll get them here instead of the clips.)
OPEN AREA WITH SPHINX & OBELISK: Drop down and continue forward toward the opening overlooking the sphinx. Climb onto the square block at the right side of the opening and then hop down onto the small ledge just below. Kill your first mummy from here before siding down to the area at the base of the sphinx.
Take a little swim in the pool and pick up 2 sets of magnum clips on the bottom. Climb out of the water in the green area with the palm trees. Use the low step to reach the top of the wall. Climb up, go to the left and take a running jump to grab the top of the tall pillar at the center of the pool. Pick up the shotgun shells and jump or dive back into the water.
This time, climb out near the sphinx and get up on the movable block between its paws. (No need to move it yet.) Pull up onto the sphinx's chest, then walk around to the back of the head. Climb up and retrieve some more shells and a SAPPHIRE KEY in the little alcove above (plus a save crystal in the console games). Return to the block in front and pull it out. Behind it you'll find a small door, which you can unlock with the SAPPHIRE KEY.
AREA BEHIND THE SPHINX: Enter and follow the hallway to a room with pharaoh statues flanking a narrow passage. Climb onto the first block on the right (actually the base of a tall statue) and pick up a small medi pack. Hop over to the next block and draw weapons to kill a panther that emerges from one of the alcoves ahead.
NOTE: It's possible to take a shortcut here, using the corner bug, to skip nearly to the end of the level. Details are included with this series of screenshots below.
")
")
")
")
")
Continue through the room with the statues and into the sloping hallway on the right. Advance with weapons drawn until another panther charges. Either backflip down the hall shooting or roll, run back into the statue room, climb onto one of the blocks and shoot from there.
OPEN AREA WITH POOL & CAT TEMPLE: Continue up the sloping hallway. When you emerge outside, go to the left and pass underneath an elevated walkway. Approach the edge overlooking a large room with a pool and a temple. (There's a save crystal just before the drop-off.) Kill the crocodile from above. Then drop down and go forward down the long passage below where you were just standing. At the end, you'll find a large medi pack.
Exit the hallway and go to the ramp to the right. Run up the ramp and when you see/hear the boulder begin to roll down from above, run or side flip off the ramp. (You need to trip this trap now, since later you'll be dropping from the roof and don't want to get flattened.)

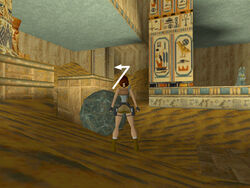
Go to the northwest corner of the sandy room, beyond where the boulder landed. Climb up as far as you can then take a standing jump up the sandy slope to land just to the right of the square pillar in the corner. Down and to the right of the pillar is SECRET #1, a dark depression containing a large medi pack and magnum clips. (The entrance to the secret area is shown in this screenshot to the right.)
POOL & BLUE ROOM WITH MANY LEDGES: Climb out and head for the pool in the southwest corner of the room. Jump in and follow the underwater passage to a lever. Pull it to open the nearby door, swim through and climb out as quickly as possible. Kill the crocodile in the water. Pull up to the walkway above. (PS1 players will find a save crystal here.) Pull the carved block twice toward the steps (east). Climb on it and take a standing jump to grab the ledge above. Pull up, go to the top of the stairs, turn around and pull up into the opening above. Use the switch there to extend a gold ledge above the pool room.
Climb down to the movable block and push it twice more toward the steps, go around to the right side and pull it once, then climb over it and push it once more. Take a running jump off the top of the block to grab the ledge next to the second movable block. Pull up and push this block once to reveal an opening. Enter the room beyond.
- NOTE: Console gamers should draw weapons because there will be a mummy waiting inside. Or, after pushing the block once, hop back several times and safety drop from the end of the ledge to the ledge below. Climb up on the other movable block to shoot the mummy from safety. Then climb back up to enter the room.
Throw the switch to open the trapdoor above the gold ledge. (You can also get a glimpse into the next room through the window opposite the switch. Inside is another SAPPHIRE KEY on a pedestal.) Return to the walkway, push the block once more and climb onto it. Take a running jump to the gold ledge, then pull up into the opening above. Use the switch at the top of the low steps to open the trapdoor entrance to the cat temple below.
LEDGES ABOVE CAT TEMPLE AREA: Walk out to the opening above the main area. Jump to the L-shaped stone ledge on the left. Walk to the far end of the L-shaped ledge and take a running jump to the slightly sloped stone ledge beyond. Turn right and walk to the base of the stone pillar to find a set of magnum clips. Get them and then turn around and walk back along the lower part of the ledge. Slide down the long slope to the flat ledge below. Pick up the small medi pack.
NOTE: You may hear the secret chime when you jump onto the L-shaped ledge, but this is not it. If you don't continue to the point where you pick up the Uzi clips, as described below, the actual secret won't register. This sequence is shown in a series of screenshots below.
Now turn to face the building you just came from—the one with the silver )O( ornament in the opening above.** Walk to the corner of the ledge nearest the stone overhang. Take a running jump to land on the slightly angled middle block of that stone overhang. Kill the second crocodile that emerges below, then take a running jump to the roof of the cat temple (i.e., the blue roof). Pick up the magnum clips. Climb onto the angled block at the front right corner of the roof. If it helps, you can line Lara up with the silver ornament in the room above. Then take a running jump without pressing Action to land on the ledge above the ramp. This is SECRET #2. Pick up the Uzi clips and then safety drop onto the ramp. (You did trip that boulder first, right? If not jump to the side immediately or it's Lara pancakes for breakfast.) Alternatively, drop from the far left end of the ledge to avoid losing health from the fall.
")
")
")
")
INSIDE THE CAT TEMPLE: Go to the temple with the cat statue and drop down onto the blue block below one corner of the opening. From there, drop to the floor. The dark corner with the sand-colored tile is a trap. There's nothing below but deadly spikes. Instead go through the other (south) doorway, pick up the magnum clips in the alcove and drop down through the opening in the floor. Go around to the left and pull the switch in the alcove to open the trapdoor above, letting in some light. (And get the save crystal.)
Now you can see, and kill, 2 panthers in the room below. For a better shot, hop down onto the long, narrow ledge below. When the real cats are dead, get the magnum clips in the alcove behind the small cat statue, then safety drop down into the room below. Ready weapons. (I prefer the shotgun here.) The door on the right opens as you cross the room and 2 more panthers emerge. It's generally easier to just keep moving and shooting, but you can also climb up on the carved block on the far side of the room.
Pick up the large medi pack at the end of the corridor from which the cats came. Return to the main room. Climb up on the carved block near the right wall and from there to the ledge above. Cross the bridge to the platform around the square pillar. Another 2 panthers come out of the second door below. It's possible to kill them from the bridge, but this will take time. It may be easier to go to the back left side of the platform and take a running jump to grab the ledge with the cat statue. You'll get a better shot from here. Or drop down onto the block you used to climb up to the bridge. This is also a safe spot.
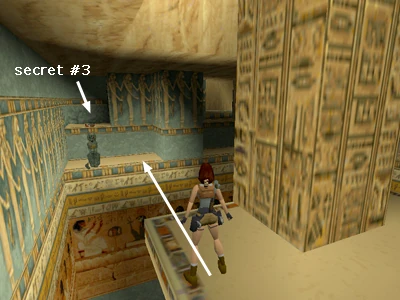

When the panthers are dead, jump over to the ledge on the left with the cat statue (if you didn't do so already) and climb into the alcove behind the statue for SECRET #3, a box of shotgun shells. (This screenshot to the right shows the spot.) Drop down and retrieve a small medi pack from the passageway where the panthers came out. Climb back up the carved block to the ledge.
LARGE, SANDY ROOM WITH MUMMY: This time enter the passage ahead. Ready weapons because when you reach the end of the serpentine passageway, you'll meet a mummy. I have found the best way to deal with this critter is to run past it into the large room beyond. If it gets Lara cornered in the narrow hallway, she'll take a lot more damage. If you have shells to spare, use the shotgun. (Three clean shots will take the mummy down.) Otherwise, just keep firing, jump and roll as needed, and don't hesitate to pause the game and use a medi pack.
SAPPHIRE KEY ROOM: When the mummy explodes, head for the raised doorway in the southwest corner—the only other accessible opening out of this room. Follow the passage to the room above. Here you'll find the second SAPPHIRE KEY on a pedestal. Take it and climb to the top of the sand pile. Follow the passage to emerge above the room with the pharaoh statues where you were earlier. Hop across the ledges, pick up the magnum clips, then jump across the room and climb into the alcove with the switch. Use it to open a trapdoor, dumping a load of sand into the previous room.

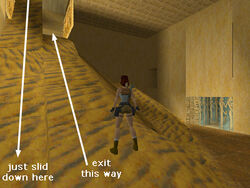
LEVEL EXIT: Return back across the ledges to the opening above the SAPPHIRE KEY ROOM. Approach the opening cautiously. It's a long way down. To avoid injury, safety drop into the opening and slide down the slope. Then turn around and go up the slope just to the right of the one you came down. (See this screenshot to the right if you're not sure where to go.) At the top is a room with gold doors. Use the SAPPHIRE KEY to open them and exit the level.
Copyright © 1998-2015 - Stellalune (stellalune@tombraiders.net). Special thanks are given to the participants in the alt.games.tombraider newsgroup, without whom some parts of this walkthrough couldn't have been written. Special thanks to Helena for finding the alternate weapon pick-up points. All TR1 screenshots were made using Glidos and Fraps. Feel free to copy or print this walkthrough for personal use. By all means, share it with friends, but please include this credit line so people can send me their feedback. No part of this walkthrough may be reproduced on another site without permission.
Obelisk of Khamoon[]
Enter and head to the right. Go down the sandy steps then climb up to the doorway on the left. Enter and follow the passage to the end. Note the locked door on the left. Go through the doorway on the right into a room with 4 movable blocks, as well as a gold door set high on one wall. Through the windows on the left you can see the BIG ROOM WITH COLUMN & FOUR DRAWBRIDGES, which you'll get to soon.
ROOM WITH FOUR MOVABLE BLOCKS: You really only have to move the leftmost block to proceed, but if you want all the kills and pick-ups, do them all. First, move the rightmost block to the side. Enter the hall you've uncovered. A panther emerges from an alcove on the left. Hop back firing. (Alternatively, pull the block straight out several times so you have room to maneuver. Then, step into the hallway, roll, run back out and jump into the block, where you can shoot the cat from safety.) Once the panther is dead, go to the end of the hallway for a small medi pack. Then return to the room with the movable blocks.
The next block to the left has only a panther behind it, no goodies. If you want all the kills, do this one the same way as the first.
Now move the third block (second from left) and enter the passage beyond. Drop and hang from the opening in the floor to draw out a panther in the room below. Pull up and shoot it from the opening. Or, draw weapons, step off the edge, slide down the angled block and start shooting as soon as you get a lock on the panther. Use the switch to open the door above. Climb the steps, pull up onto the block and grab a small medi pack, then climb to the ledge above. Climb to the highest carved block, near the center of the room, and take a running jump to the doorway. Hop over the opening in the floor and pick up the magnum clips behind the door, then drop down through the opening in the floor to emerge near the ROOM WITH FOUR MOVABLE BLOCKS where you started.
Move the fourth block. In the short passageway is a water-filled opening. Swim down, following the passage, until you can surface. Climb out quickly and shoot the crocodile in the water. Take another swim and find some magnum clips and a small medi pack on the bottom, and a SAPPHIRE KEY on one of the corner ledges of the underwater structure. (There's also a save crystal on the highest step in the console games.) Return to the main room the same way you came (i.e., through the underwater passage in the north wall).
Go through the ROOM WITH FOUR MOVABLE BLOCKS to the hallway beyond. Use the SAPPHIRE KEY in the keyhole you saw as you came in. This opens the door next to the keyhole, which leads to the ROOM WITH COLUMN & DRAWBRIDGES, and also the gold door in the room with the movable blocks.
SITTING ROOM WITH MUMMY (EYE OF HORUS SWITCH): After using the key, return to the room behind you. Move one of the blocks beneath the gold door, climb up and go through. Save your game. (PS1 players will find a convenient save crystal here.) Go up the stairs. When you enter the sitting room at the top, a mummy awakens inside on the left. Run past it into the room, then roll and do your best to take it out quickly. Use the switch in the left window to lower the BRIDGE TO THE EYE OF HORUS.
NOTE: If you're desperately low on health, you can go up the stairs to awaken the mummy. Then speed back down to the block room and try and kill the mummy later on from outside. Or, avoid this room altogether for now.
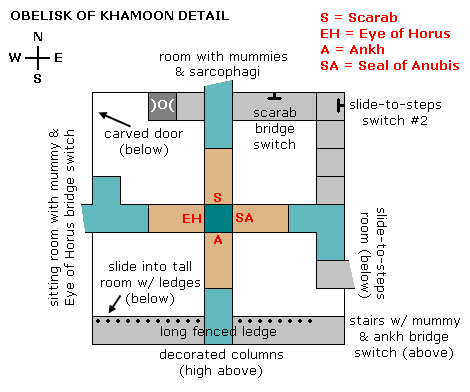
BIG ROOM WITH COLUMN & FOUR DRAWBRIDGES: This room is illustrated in the diagram to the right. It isn't to scale and doesn't include all the side rooms, but it may help if you get disoriented.
Exit the mummy room through the window on the right and take the EYE OF HORUS from the column. You'll receive a vision of an underwater door. This is in the pool below the column. (NOTE: If you had to avoid the mummy for now, don't worry. You can get the EYE OF HORUS later.)
Drop into the water and pick up some magnum clips on the bottom. Climb out onto the ledge below the tall column with the artifacts to find a box of shotgun shells. On the south wall (opposite the carved door) are a series of alcoves separated by greenish stone blocks. The rightmost alcove is actually a door. Enter and slide down the ramp to a doorway. If you don't jump down into the room yet, you can kill the 2 panthers from safety.
TALL ROOM WITH LEDGES: Hop down into the room, go up the stairs, then climb onto the block above. Turn around and take a running jump to the next higher block. Turn around, take a running jump to grab the ledge and pull up. Walk forward and pull up onto the next ledge. Take a running jump to the ledge ahead and another to the (southeast) corner ledge. Drop to the ledge below and pick up the large medi pack.
NOTE: If you don't care about getting all the kills, you can skip the next bit with the mummies, since there are no goodies involved. Instead, after getting the large medi pack, climb onto the ledge above the doorway. Go to the end, past the little table with the vase on it. Turn left and take a running jump to grab the L-shaped ledge with the greenish stone block in the corner. Skip the next two paragraphs and continue with the walkthrough below.

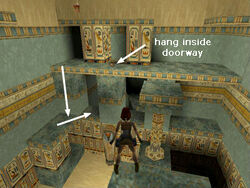
DARK ROOM WITH TWO MUMMIES: Just in front of where you got the medi pack is a doorway above a long stone ramp. Don't slide down or you'll be ambushed. Instead hang from the edge of the doorway to rouse the 2 mummies in the room below and then pull up. You could shoot the mummies from this doorway, but it's easier if you go to the left end of the ledge and drop onto the rectangular ledge below. From there, jump into the opening that looks in on the room with the mummies (shown in this screenshot to the right). You should be able to shoot them from here without getting hurt. Alternatively, slide down the ramp into the room, roll, run and climb onto that same ledge from inside. (It's to the right of the slide when facing it.)
When you've destroyed both mummies, turn to face out over the TALL ROOM WITH LEDGES. Jump to the ledge on the right. Then take a running jump to grab the small corner ledge ahead. Turn left, climb onto the greenish stone block and take a running jump to grab the ledge ahead. Pull up, walk forward and pull up onto the ledge above. Turn around and take a running jump to the L-shaped ledge in the northeast corner—the one with the greenish stone block in the corner.
Climb from the block onto the next higher ledge. Take a running jump to the large, square ledge ahead. Take another running jump to grab the block at the top right of the stone steps and pull up. (Console players will find a save crystal here.) Walk down one step and pull up onto the ledge at the doorway. This will awaken a mummy at the top of the stairs.
WIDE STAIRS WITH MUMMY (ANKH SWITCH): Try to kill the mummy as it comes down, or jump back down to the steps below the ledge and do it from there. Then climb back up. At the bottom of the stairs on the left is an opening overlooking the COLUMN & DRAWBRIDGES. Step out onto this ivy-covered ledge and use the switch to drop the BRIDGE TO THE ANKH.
After using the switch, turn left and step down. Then drop down to the fenced ledge below. Pick up a small medi pack and 2 sets of magnum clips. (NOTE: If you don't yet have the MAGNUMS, you'll get them now in place of one set of clips.) Climb back up to the switch.)
Now go to the top of the stairs, where that last mummy came from. Here you'll find a gold door, which you can't open yet, and an opening in the floor. Drop through the opening and slide down into the room below.
SLIDES-TO-STEPS ROOM: This tall room contains not only the slide you just came down, but also two more slides above, which can be changed back and forth between slides and staircases using a set of switches. But before doing that, advance with weapons drawn into either of the openings in the opposite wall (they connect). A panther will charge. Back out shooting and, when the cat's dead, enter and pick up some more magnum clips. Go back out to the room with the slide.
The rightmost alcove on the opposite wall contains a switch. Use this to change the slide you just slid down into steps. Climb to the fourth step and jump to the ledge on the left. Pick up the shotgun shells and jump back to the steps. Go up two more steps then drop down to the pale blue platform on the left (where PS1 players will find another save crystal). Notice the second slide above but, for now, go through the doorway on the right to a ledge on the east side of the COLUMN & DRAWBRIDGES.
Halfway up the stairs you'll find a large medi pack. At the top is another switch. Use this to change the second (middle-level) slide in the previous room into steps, but don't return there yet. First, turn around so the switch is behind Lara and then hop down onto the ledge ahead. Go through the (north) door opposite the SCARAB. (This bridge is still up.)
ROOM WITH MUMMIES & SARCOPHAGI (SCARAB SWITCH): Once inside the room, turn left, go up the steps, then climb down the blocks toward the ground. When you reach the lowest block, drop and hang, let go to drop to the floor, then immediately pull up. You will have awakened 2 mummies, which you can then kill from this block. (It helps to do this ahead of time, since you'll need to drop down on the other side of this room in a few minutes.)


Climb back up the blocks. Then hang from the ledge on the west wall and traverse to the right, under the tan block, and pull up. Climb onto the ledge with the pillar. At the rear is SECRET #1, a room containing a large medi pack and magnum clips. (The path to the secret is shown in the first screenshot to the right.) Exit on the other side of the pillar and take a running jump to the small, square ledge ahead. From there, jump to the next ledge, go to the end, then jump to the long ledge on the right. Follow it to the end to get a box of shotgun shells.
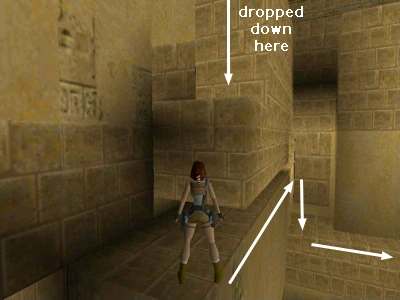

Go back to the gap between the first long ledge and the small, square one. Drop down to the flat spot below. (Ignore the corridor with stairs leading up. This just takes you back where you were before.) Drop again to the block below. Hang and traverse to the right until you reach the next corner (as shown in the second screenshot to the right). Let go of the crevice. Now drop and hang from this ledge. Traverse to the right again until you reach the next corner. Drop to the square ledge below. Turn around and take a running jump to grab the top of the block ahead. Pull up and go through the doorway on the left, to a fenced ledge overlooking the ROOM WITH COLUMN & DRAWBRIDGES. Use the switch to lower the BRIDGE TO THE SCARAB (and get a save crystal in the console versions).
Return through the doorway. Turn right, walk to the edge and take a standing jump back down to the corner ledge and drop down into the room with the sarcophagus. (If you didn't destroy the 2 mummies earlier, they'll awaken and attack now.) Climb up the blocks on the other side of the room and exit where you came in.
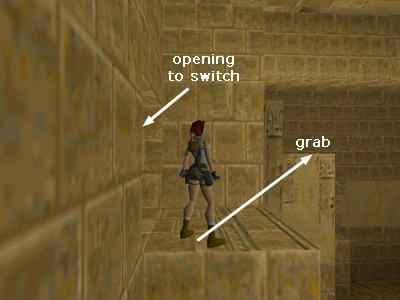
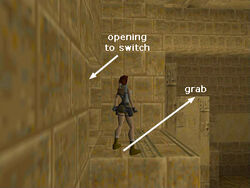
NOTE: If you didn't kill the mummies earlier and don't want to chance fighting two at once, you can traverse back along the crevices the way you came. Then climb onto the block above the second crevice and follow the stairs to the top of the room. Or, take a carefully angled running jump from the ledge near the doorway to grab one of the steps leading up to the entrance, as shown in this screenshot to the right. Or, use the corner bug to cheat Lara from the lower doorway to the upper one, by using it at the corner shown just in front of Lara in that same screenshot.
BIG ROOM WITH COLUMN & FOUR DRAWBRIDGES (AGAIN): Cross the bridge to get the SCARAB. Take two standing jumps from bridge to bridge and pick up the ANKH on the other side of the obelisk. With each artifact, you'll get another watery vision. (Guess these things have something to do with that door in the pool below, eh?) Walk across the ANKH BRIDGE, turn left and go to the end of the fenced ledge. Jump the gap and re-enter the SLIDES-TO-STEPS ROOM, which will be on Lara's right (east).
NOTE: You won't be able to do the above if you didn't kill that first mummy and lower the EYE OF HORUS bridge yet. In this case, you'll get the remaining artifacts all at once at the end. For now, after getting the SCARAB, return across the SCARAB bridge, take a right and climb up near the switch in the northeast corner. Use the switch to change the middle-level slide into steps if you didn't already do this. Then go down the steps to the door of the SLIDES-TO-STEPS ROOM, which is on the east side of this area.
SLIDES-TO-STEPS ROOM (AGAIN): After using the switch as described above, the long slide leading down from the top of this room will now be a set of block steps. (In case you missed that switch, it's just outside, at the top of the steps in the northeast corner of the COLUMN & DRAWBRIDGES area.) Climb these block steps. At the top, turn right and take a running jump to grab the narrow horizontal crevice. Traverse to the right and drop onto the golden blocks. Go around to the other side and drop down. Enter the room and throw the switch to change the upper-level slide, which is just outside, into steps. Climb to the top. Another mummy waits in the room above. To kill it safely, jump in place to get a pistol lock on it, then keep jumping and firing until it explodes.
HIGHEST ROOM (SEAL OF ANUBIS SWITCH): Climb up into a room overlooking the entire COLUMN & DRAWBRIDGES area. Pick up a small medi pack behind the silver )O( ornament (plus a save crystal if you're playing on one of the consoles).* Then use one switch to lower the BRIDGE LEADING TO THE SEAL OF ANUBIS, and the other switch to open the gold door next to it.
NOTE: You can take a shortcut here if you like. Instead of going back down the stairs, you can jump directly from this room to secret #2. Details appear in screenshots below. This shortcut leads directly from the HIGHEST ROOM—the one with the switch that lowers the SEAL OF ANUBIS bridge—to secret #2, on top of the column at the center of the drawbridges. It's a bit tricky, and Lara will lose about 3/4 of her health, so be sure to have full health and save your game first.
")
")
")
")

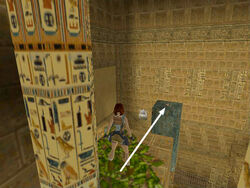
If you don't use the shortcut, go through the gold door next to the switch to emerge in the room at the top of the WIDE STAIRS, where you killed a mummy earlier. Descend the stairs, turn right onto the greenery-covered ledge (near the ANKH BRIDGE SWITCH, which you should have used earlier) and walk forward past the three painted columns. Here you'll find a ledge that juts out toward the square column with the artifacts. You'll need to take a running jump to reach the top of it. Walk to the edge and use the Look key to help set up the jump. When you hop back you won't be able to see where you're going because the camera will shift to behind the pillar, but trust Lara to get it right. (This screenshot to the right shows the correct starting point.) Take a running jump, without pressing Action to grab, and you'll just make it. This is SECRET #2, the prize a small medi pack and Uzi clips.
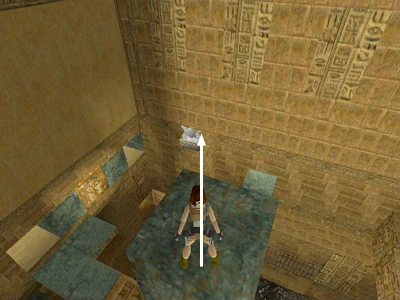

Now turn and set Lara up for another running jump—this time from the obelisk to the pillar with the silver )O( ornament below (shown in this second screenshot top the right). Lara will take a little damage on this one, but it's worth it for the reward—a large medi pack and 2 sets of Uzi clips. This is SECRET #3.
NOTE: If you didn't lower the bridge to the EYE OF HORUS at the beginning of the level, don't drop down yet. Follow the instructions in the footnote below to get the artifact.
BIG ROOM WITH COLUMN & FOUR DRAWBRIDGES (YET AGAIN): From the pedestal with secret #3, drop to the walkway below and step out onto the SCARAB bridge. Jump over to the next bridge on the left to get the final artifact, the SEAL OF ANUBIS, and observe the underwater door below the obelisk opening.
NOTE: If you missed any of the other artifacts earlier, pick them up now to open the door in the pool.
THROUGH THE UNDERWATER DOOR: Drop into the water and swim through the door. Swim down to the bottom then forward. Ahead is a long passage with alcoves along both sides. At the second set of alcoves, you'll find a set of magnum clips on the left. Get those and resurface for air if you need to. Swim down again and forward to the third set of alcoves. Here you'll find shotgun shells and a small medi pack. If you have at least half your air left, continue; otherwise go back to the pool to breathe first.
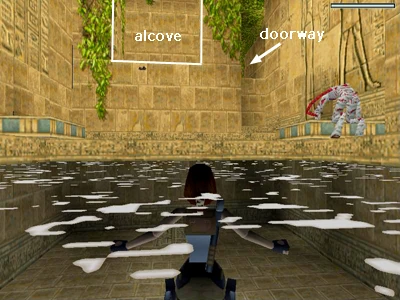
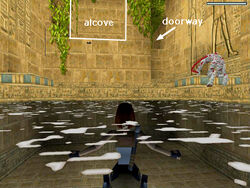
At the far end of the underwater tunnel, turn right and keep going forward, then up, to a pool where you can surface. On the bottom are some goodies: a small medi pack, shotgun shells and magnum clips. Now get ready to kill that mummy. The safest way I found was to swim to the edge of the pool opposite the raised alcove and doorway (shown in this screenshot to the right). If you tread water there for a little while, the mummy will come toward you. When it does, swim quickly underwater to the opposite edge, climb out, run to the alcove to the left of the doorway and pull up. Kill the mummy from safety. Pick up the 2 sets of magnum clips (and the save crystal in the PS1 game). Hop down and climb up into the doorway.
Follow the hall, past the pharaoh statue room on the left (remember it from the previous level?) to a sandy room. There's another mummy below, which you can easily kill from the doorway. Jump over to the pile of sand ahead and hop down on the left side of the pile to get a large medi pack. Climb over to the other side of the pile, jump to the block steps and then climb to the ivy-covered doorway in the corner. This leads back to the area by the sphinx.
OPEN AREA WITH SPHINX & OBELISK (FROM PREVIOUS LEVEL): The previously impassable slope is now a set of steps. Climb down and head for the obelisk by the pool in the far left corner of this area. On the way, take a little detour to the room between the sphinx's paws to pick up an extra box of shells. (It wasn't there before. Maybe one of the panthers dropped it.) Place the artifacts in their proper spots on the pillar in the middle of the pool to open the exit, which is on the far side of the sphinx.
IF YOU MISSED THE EYE OF HORUS AT THE START OF THE LEVEL: If you were low on health and avoided the mummy near the start of the level, and thus missed getting the EYE OF HORUS, you'll need to do that. Here are two ways:
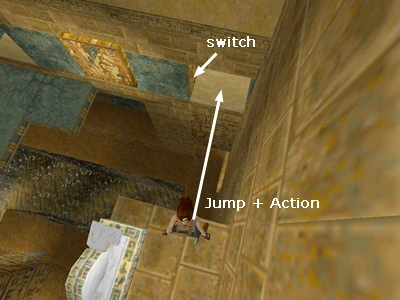
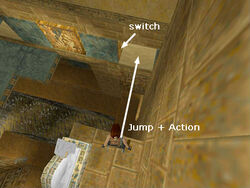
From the edge of the pedestal with secret #3, take a standing jump, pressing Action to lower Lara's arc, to land in the window with the switch (shown in this screenshot to the right). Use the switch to lower the drawbridge. The mummy inside will not move. If you want to kill it, go through the sitting room and down the stairs. As you go, the mummy will awaken. If you want to, you can drop down into the ROOM WITH FOUR MOVABLE BLOCKS below. Move a block beneath the gold door and shoot the mummy from there. Then return upstairs and get the EYE OF HORUS.
Alternatively, jump down from the pedestal with secret #3 into the pool. Climb out and go through the small door in the northwest corner to the ROOM WITH FOUR MOVABLE BLOCKS. Climb up through the gold door, fight the mummy and pull the switch to lower the bridge so you can get EYE OF HORUS.
Walkthrough text and diagrams copyright © 1998-2015 - Stellalune (stellalune@tombraiders.net). Special thanks are given to the participants in the alt.games.tombraider newsgroup, without whom some parts of this walkthrough couldn't have been written. Special thanks to Helena for finding the alternate weapon pick-up points and Mark R. for the shortcut to secret #2. All TR1 screenshots were made using Glidos and Fraps. Diagrams made with the aid of GraphTablet freeware ([3]). Feel free to copy or print this walkthrough for personal use. By all means, share it with friends, but please include this credit line so people can send me their feedback. No part of this walkthrough may be reproduced on another site without permission.
Sanctuary of the Scion[]
Go down the stairs. The doors close behind you. Pick up 2 sets of magnum clips, one in each corner at the base of the stairs. (NOTE: If you didn't find the MAGNUMS earlier, you'll get them here instead of one of these sets of clips.)
LONG STAIRCASE WITH MUTANTS: Notice the closed gates. You'll be returning later. Advance up the stairs and 2 Atlantean mutants will start down. Backflip down the stairs shooting and continue to jump from side to side if necessary to avoid their attacks. Or, stand your ground and use the shotgun. When they explode, go to the room at the top of the stairs. Pick up more magnum clips in the dark area to the right of the blocks. Climb up the blocks and through the opening in the ceiling to emerge on the back of a sphinx.
HUGE CAVE WITH SPHINX: Face the front of the sphinx, cross over the left shoulder to the front and hop down onto the small ledge below (the sphinx's collarbone?). Another mutant will be running around on the sand below so don't go all the way down yet. You'll be seeing more of these shortly. Some throw fireballs, others spit dangerous goop of unknown origin, and both attack Lara if they can reach her. Use the ledge for cover and shoot the mutant until it explodes.
If you're low on health, climb back up onto the sphinx's back and pick up the large medi pack on the raised path at the rear. Then slide down the side of the sphinx to the ground. Otherwise, just jump down onto the paw and from there to the ground. (You can get that medi pack later.) Between the sphinx's paws are some magnum clips and a closed door. Your goal now is to open that door.
CLIMBING TO THE FIRST SWITCH: First, head for the northwest corner of the cave, beyond the sphinx's right paw. Here you'll find a sandy area with square pillars of various heights. Climb onto the lowest one. (This spot, and the rest of the climb is shown in a series of screenshots.) Take a running jump to the next low block up the slope near the cave wall. Pull up onto the ledge above. Stand so the tallest pillar is on Lara's left and take a running jump to grab the second tallest pillar. Turn and take another running jump to land on top of the tallest. Pull up onto the jutting ledge above. Walk forward and turn right. (Console gamers get a save crystal here.) Advance slowly as there is a metal jaw trap just around the corner. Carefully run or jump through it, pick up the small medi pack and follow the ledge around to the right toward the switch. Be careful to jump the gap in the path just before the switch.
NOTE: To avoid the blade trap, after climbing from the pillar onto the jutting ledge, turn right and take a running jump over to the path. Go left to get the medi pack, then turn around and head toward the switch.
Throw the switch to open a gold door on the far side of the cave. A winged mutant flies in from the southwest. You can kill it from this ledge, but I found it easier to make a quick descent and shoot it from the ground. Take a standing jump from the edge of the ledge with the switch down to the one with the large medi pack. Hang from the far edge of that ledge (so Lara's back is toward the sphinx). Drop and slide down the sloping rocks to the ground, pressing and releasing Action as Lara slides to break her fall.
NOTE: If you prefer to fight the mutant on the high ledge, try and kill it before it gets to Lara, or it may knock her off the ledge. Also, try backing Lara into the corner near the switch. There isn't much room to maneuver there, but it's more difficult for the mutant to push Lara. Also, be sure to begin with at least half health. If the mutant explodes close to Lara, she'll take some damage.
CLIMBING TO THE SECOND SWITCH Return to the front of the sphinx. Along the cave wall, just opposite its left paw, is a light-colored block just the right height for climbing. (These screenshots below show the spot and the climbing sequence.) First get on top of that block then take a standing jump to the angled block to the right. Turn around and take another standing jump to grab the brownish ledge above. Pull up. Walk along the ledge to get the magnum clips ahead on the left.
Turn around and make your way back along that same ledge to the spot where you just pulled up. Vault onto the low ledge to the left and then jump the gap to the ledge ahead (the one with a low sandy step above it). From there, take a running jump to the next higher ledge. Turn left to face the cave wall. Climb onto the ledge ahead and above, then to the block on the right, where you'll find more magnum clips.
After picking up the clips, turn so the cave wall is on Lara's right. Climb or jump onto the angled block ahead. Then jump the gap to land on the next flat block. Do the same again and continue down and to the left to the switch. (Pick up a save crystal on the way.)
")
")
")
")
")
Use the switch to open a carved stone door down below (not the one between the sphinx's paws). Turn and ready weapons. Another flying mutant approaches from the far side of the sphinx. Again, try and kill it before it reaches the ledge where Lara is standing and/or move into the corner to make it harder for the mutant to push her off the ledge.
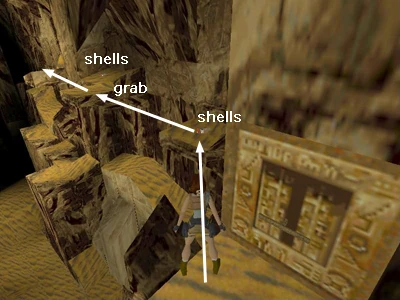
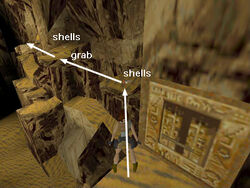
When the coast is clear, face the switch, angle Lara a little to the left and then jump to the ledge with the shotgun shells. Take a running jump to grab the next thin, jutting ledge. Pull up and get more shells. Return to the spot where you just pulled up and take another running jump to the next ledge (as shown in this screenshot to the right). From here, you should be able to see a gold door high on the cave wall ahead and a bit to the left. This is the one you opened earlier using the first switch, and it's where you're headed next. But first, if you want to, you can go after the level's only secret: the Uzis.
NOTE: Console players may want to try the Alternate Method for Getting Uzi Secret (below) just before leaving the sphinx area. You'll wait a little longer for the Uzis, but there is a save crystal just before the tricky part. It's your call.
SECRET ON INVISIBLE PLATFORM: (The following sequence is shown in this series of screenshots below.) When standing on the jutting ledge after the one with the second box of shotgun shells, turn to face the sphinx. If you use the Look button and rotate Lara's vision, you can catch a glimpse of a dark object against the lighter background of the sphinx's neck or headdress. This is the SECRET #1, the UZIS, floating on an invisible platform.
To get there, carefully set up a running jump: Position Lara at the edge of the ledge, between the left corner and the middle. (If she's too far to the right, she won't be able to jump far enough to grab the invisible ledge.) Save your game if you can. Hop back once, then press Forward and Jump to make Lara take a running jump right at the edge. While Lara is in the air, press and hold Action to grab the edge of the invisible platform; pull up. Hold the Walk button while on the platform. This way you can maneuver Lara around without fear of accidentally stepping off. Pick up the guns. (At the same time you get some clips to go with them.)
After the secret chime sounds, 2 winged mutants fly in from the other side of the sphinx. If you use the Uzis, you can kill both before they get close enough to push Lara off the platform. Or, to conserve ammo, quickly descend from the platform (next paragraph) and kill them with pistols or magnums from below.
To get down, turn back toward the cave wall. Walk to the edge and line Lara up so she's squarely facing the left side of the ledge where you started. (The right edge is a little too high to grab, and Lara will fall if you try.) Hop back and then take a running jump to grab the ledge. Let go to drop to the rocks below. (NOTE: Lara loses a tiny bit of health when you do this. To avoid any injury, hang from the left side of the ledge instead of the front, traverse to the left and then drop.)
")
")
")
CLIMBING TO THE GOLD DOOR (FIRST ANKH): Now you'll be making your way to the gold door you opened earlier using that first switch. Turn so the sphinx is again on Lara's left. Walk forward along the sandy ledge. Jump the gap, continue forward a few steps and then climb up the blocks on the right. Turn so the cave wall is again on Lara's right and continue along the ledge. Jump one more gap and enter the dark passageway ahead. Turn left and climb two low blocks. You're now facing the side of the sphinx, and there's a drop-off ahead. Take a diagonal standing jump to the flat spot on the right. Climb the rocks to the gold door. (Console players will find another save crystal here.)
Enter and go to the right. Find the movable block—the middle one, which is much brighter than the surrounding blocks—and push it through to the other side of the wall. Go around the wall, climb onto the block and from there to the ledge. A centaur mutant stands guard inside. If you draw weapons (pistols or magnums work fine) and take just a few steps toward the doorway, you should be able to target the centaur without prompting it to attack. (If you get too close it will begin to hurl fireballs.) Once you get a lock on it, hop back and toward the wall and just keep shooting as it runs past the opening. (Hold the Look key to see what's going on.) When the mutant explodes, enter and pick up a small medi pack from the floor and the ANKH from the pedestal.
Climb down from the wall, exit through the gold door and slide down the ramp on the right. If you didn't take it when you entered this area, there will be a large medi pack on the path. Another mutant lurks on the back of the sphinx. Kill it quickly before it starts spitting or throwing fireballs. You can use the pointy block for cover if you like. Hop down onto the sphinx's back.
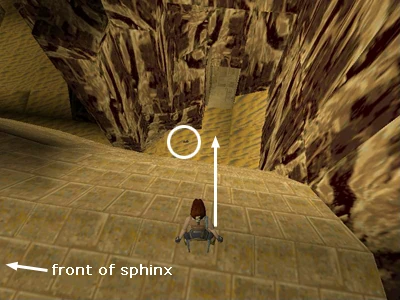
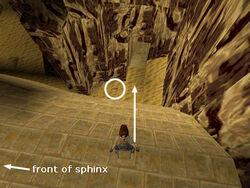
SIDE AREA WITH STAIRS, POOL & BRIDGE (SECOND ANKH): Slide down the right side of the sphinx to land near the carved stone door you opened earlier using the second switch (shown in this screenshot to the right). Or, if you are already on the ground, find this door by heading for the back left side of the sphinx when facing it. Pick up some magnum clips on the ground near the door and enter.
Walk forward to a slope above a pool. Turn around and slide down backwards, grabbing the end of the slope. Traverse to the left and drop onto a ledge. Pick up more magnum clips and climb into the opening above. Climb the block steps. At the top, turn left and head down to a second pool. Swim down to the bottom to find a GOLD KEY. Climb back up the block steps, turn left and then go up the smaller steps to another ramp. (Save your game if you're playing on the PC or Macintosh.) This time slide facing forward and jump at the very bottom of the slope to grab the bridge ahead; pull up. If you miss and fall into the water, reload your saved game or swim to the left, climb back to the top of the ramp and try again.
Once on the bridge, use the GOLD KEY in the lock to open the door at the opposite end. There's another centaur in the room beyond. Again, take a few steps toward the door with weapons drawn, get a lock on it and step back toward the keyhole. As with the last centaur, if you don't get too close at first, it won't start to throw fireballs. Maintain the target lock by holding Action and Lara will shoot whenever the centaur runs past the door. When it explodes, go into the room and pick up another small medi pack and ANKH. (There's also a save crystal here in the PS1 game.)
NOTE: I encountered a minor bug here. If you save the game just as Lara uses the Gold Key in the lock, the gold door does not open. However, if you attempt to use the lock again without a key, Lara says "No", but the door opens anyway.
To get back to the SPHINX CAVE, take a standing jump from the edge of the bridge into the opening below on the right, pressing Action to lower Lara's arc so she nails the landing. Or, jump into the water and swim to that opening. Climb the block steps, turn right and go down more steps to the other pool. Swim to the doorway, climb out of the water, go up the steps and turn left toward the exit.
At this point you should have TWO ANKHS. If not, refer to the previous sections of the walkthrough to find whatever you're missing.
CLIMBING TO THE TOP OF THE SPHINX: Go around to the front of the sphinx and climb up onto its left paw (i.e., the one on the right when facing it). Climb the ledges on its shoulder to reach its back. Step up onto the low angled block on the sphinx's back and from there take a running jump to grab the ledge at the back of its head. (These screenshots below show where to climb.) Pull up and climb to the top of the head. Place one of the ANKHS in the receptacle here. Go around to the other side of the head, hop down onto the ledge there and put the second ANKH in place. This opens the door between the sphinx's paws. (PS1 players also find a save crystal on this ledge.)
")
")
NOTE: If you haven't already gotten SECRET #1, the Uzis and some clips, you can do that now. See the note "Alternate Method for Getting Uzi Secret" at the end of this walkthrough.
To reach the ground quickly and safely, first climb back onto the sphinx's headdress on the right side (when facing the rear of the sphinx). Turn right and walk out to the corner overlooking the rocky cave wall. (The correct spot is shown in these screenshots below.) Turn around and slide down the side of the headdress, holding Action to grab the edge. Drop to the ledge below, losing a little bit of health. Or, to avoid taking any damage, traverse to the right and drop onto the darker ledge. Climb down onto the sphinx's paw and slide down to the door you just opened. If you didn't already get the magnum clips on the ground here, pick them up now.
")
")
UNDERGROUND POOL BENEATH THE SPHINX: Step through the door and fall into a deep pool. Here you'll find huge submerged statues of the Egyptian gods Horus, on the left with the falcon's head, and Set, on the right with the head like an aardvark crossed with a jackal. Swim down and pick up some Uzi clips on a ledge between the two statues and shotgun shells on the lap of the statue on the left. Note the doors below each statue and the switch on the arm of the statue on the right. This is one of those switches that doesn't work underwater. The lever you're looking for is down in the tunnel between the feet of the statue on the right, just to the right of the gold door. Pull it to partially drain the lake. In the process, Lara will be sucked through the door and whisked along to a room where you can surface.
A strong current prevents you from swimming back the way you came. So get out of the water and climb up onto the lowest square pillar. Stand at the front left corner of this pillar and take a standing jump to grab the front right corner of the next taller pillar. Pull up. Turn right and take a running jump to grab the bottom of the stairs. Pull up, climb the stairs and follow the ledge to the end. You'll hear and see a winged mutant rise up in the area beyond the doorway. Don't slide down the slope yet. Instead, shoot the mutant from the safety of the doorway. After it explodes, slide down the slope.
You're now on a ledge above the two statues. (There's a save crystal here in the Saturn/PSOne game.) Go to the left and drop down to the small, square ledge below. Turn around and take a running jump to grab the head of the statue of Set. Climb on top of the head and pick up a large medi pack.

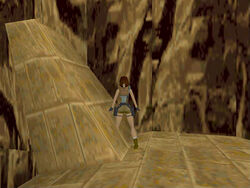
NOTE: In some versions of the game, this medi pack is not visible. It may be partially or completely embedded in the statue's right ear. Using the Look button and swiveling Lara's view may help you spot it. Even if you can't see it, you can still get it. Just step into the ear where it meets the top of the head, as shown in this screenshot to the right, press Action and Lara should pick up the medi pack.
The quickest way to the bottom is to jump into the water; however, the programmers have made this a bit difficult. (It's impossible to jump or swan dive over the statue's nose but worth trying since the result—Lara springing back to the head—looks so goofy.) Instead, taking a running jump straight down the statue's nose. Lara will bang into an invisible wall then drop into the water between the statue's legs without taking any damage. Alternatively, walk to the edge of Set's head nearer to the Horus statue. Drop down onto the ledge with the carved hieroglyphs. From there, drop down onto Set's shoulder. Turn to face out over the pool. Walk to the edge, hop back once and then take a standing jump onto the tall, dark brown block sticking up between the two statues. Drop down off the left side of this block onto the Set statue's lap. Then climb up onto his opposite arm and use the switch there. This opens the door at the base of the Horus statue. Swim down and through it.
LONG, WINDING PASSAGEWAY TO TOP OF SPHINX: Surface and follow the long passageway all the way up to the top. On the way pick up 2 sets of magnum clips (and another save crystal in the PS1 game). At the top is a SCARAB artifact. Remember you saw it behind the closed gate at the beginning of the level? In the stairway beyond the gate are 2 "regular" mutants and a centaur. When you pick up the SCARAB the gate opens.
If you have shotgun ammo, you can probably kill both of the smaller mutants before they reach you. Backflip or roll and run about halfway down the long, straight hallway leading up to the gate. Advance toward the gate. Then, when the first mutant approaches, get a lock on it and hop back shooting. Three clean shotgun blasts should take it down. Repeat the same process with the second mutant.
Save the game if you can and then approach the gate and listen for the centaur whinnying and trotting around out near the staircase. When you hear it go up the stairs, run out, drawing weapons. (Uzis or magnums work better, but pistols will do.) Stand at the bottom looking up the stairs. Get a lock on the centaur and begin side-flipping from left to right while shooting. If you keep moving side to side, its fireballs will miss and you should be able to take it down fairly quickly.
If you prefer a less direct approach (or can't hear the centaur in order to use that method) try this instead: After taking the SCARAB, backflip or roll and run down the hallway to the first bend. The mutants will approach first. Wait for them to come down the hallway, then back (or side flip) down the ramp about a third of the way. They won't follow Lara beyond this point and you can kill them from here, though you may have to go up into the hallway a few times to draw them closer. When both are dead, advance toward the doorway to attract the centaur's attention. Get a lock on it then back down the hallway about halfway. Its fireballs won't reach this far, and you can shoot it as it runs past. Again, you may need to advance into the room a couple of times to draw the centaur down the stairs. This will take a while but can be done with pistols only.
SCION ROOM: When all the mutants are dead, cross the room at the base of the stairs and place the SCARAB in the lock to open the other gate. Pick up the large medi pack and magnum clips, then slide down the ramp. Climb through the opening on the left and prepare to take on Larson once again. (Apparently Lara only stunned him back in the Lost Valley.) He is lurking behind the pillars on the right but emerges spouting threats and lead as soon as Lara hits the ground. Keep moving and shooting, and try not to let him get behind Lara, and you'll be done quickly. Go to the top of the stairs and take the third PIECE OF THE SCION to end the level.
BUG NOTE: If you're playing the Windows PC version of the game using Glidos and the game crashes after the statistics screen at the end of the level, try this fix, suggested by Tom C.: Run Glidos and on the Glide Server screen, click the 'Adjust' button. Click the Audio tab and then un-check 'Redbook Emulation'. Click 'OK' and then run the game as usual. (Or, open the Glidos.ini file with a text editor and delete the line "Redbookemulation: Yes". Save the file and run the game as usual.) Play through the buggy spot, save your game and quit. Before starting the game again, change the audio settings back to normal.
ALTERNATE METHOD FOR GETTING UZI SECRET: Ideally this alternate method for reaching the level's only secret, the Uzis, should be used after obtaining both Ankhs. Then you only have to climb to the top of the sphinx once. Of course, you can go for the guns at any time and then return to the top of the sphinx later. The idea is to jump from the sphinx's head to the invisible platform, get the Uzis, and then jump back to the head and slide down. Details and screenshots appear below.
")
")
")
")
")
Walkthrough text and diagrams copyright © 1998-2015 - Stellalune (stellalune@tombraiders.net). Special thanks are given to the participants in the alt.games.tombraider newsgroup, without whom some parts of this walkthrough couldn't have been written. Also, for their invaluable help, I give thanks to Kara and Angela, Helena, Daffy C., Gareth, Ian T., Andrew B., Tom C., Mark R., Cris B. and Ingrid G. All TR1 screenshots were made using Glidos and Fraps. Feel free to copy or print this walkthrough for personal use. By all means, share it with friends, but please include this credit line so people can send me their feedback. No part of this walkthrough may be reproduced on another site without permission.
Lost City[]
Natla's Mines[]
Swim forward and surface in an UNDERGROUND LAKE. To the left (east) is a ledge with some wooden crates. Ahead on the left (southeast) is a larger ledge with some barrels and crates. There's also a small boat moored there. To the right (west) is a small waterfall. Swim under and behind the waterfall. Surface and follow the passageway until it widens, but don't bother climbing into the raised tunnel yet. (It's a dead end at the moment.) On the near left wall is a switch. Pull it to open a wooden door elsewhere.
SOUTHEAST LANDING WITH BARRELS, BOXES & BOAT: Return along the passageway to the LAKE and swim across to the landing with the boat and barrels. Follow the tunnel to a room with a mine car blocking another tunnel on the right. Go to the left side of the rock pile ahead and pull the movable crate out. Climb over it and enter the passage behind. Here you'll find the door you just opened and, beyond it, another switch. Use it to open another wooden door. Then return to the LAKE the way you came.
Jump into the water and swim behind the waterfall again. Follow the passage past the switch you already used, climb into the opening and continue through the now open door. When you reach the ledge above the lake, take a running jump to the ledge with the red-and-white barricades. Continue along a twisty tunnel to a room with a small building suspended from the ceiling.
CAVE WITH GLASSED-IN ROOM & DANGLING BUILDING: Lara will look up as you pass, indicating that this is important. Pick up the large medi pack on the ground. Don't worry; the building won't come down yet. In the glassed-in room on the left, there are 3 receptacles on the wall. You need to find 3 FUSES to fit them. Also inside this building is a set of magnum clips (and a save crystal in the console game, which you can use now but might want to save for after you find the fuses).
CAVE WITH BOARDED-UP BUILDINGS, TIRES & OTHER JUNK: Continue through the (west) opening opposite where you entered. Here you'll find 2 boarded-up structures, piles of discarded tires and other debris. The brown wooden crate is movable. Pull it under the opening in the ceiling. Then climb onto the crate and take a running jump to the roof of the building. Drop through the broken tile in the back corner and follow the tunnel to an alcove with a switch. Throw it and the boat back at the LAKE moves toward the other ledge. Continue to the end of the passage and drop down onto the crate you just moved. (NOTE: If you didn't move the crate under the opening, you can still drop down, but Lara will lose a little health.)

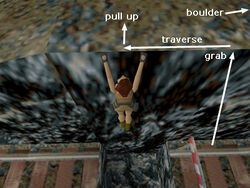
TRACKS WITH BARRICADES & BOULDER TRAPS - FIRST FUSE: Now follow the tracks on the floor to the wooden door opposite the entrance. It opens automatically and the tracks continue into the tunnel beyond. Striped barricades block the track and warn of boulder traps ahead. You can choose the easy or hard way through this area. (1) The hard way: Walk forward to the first barricade to trigger a boulder that rolls across the tracks ahead without harming Lara. Then back up and take a series of 3 running jumps over the barricades. On the last jump, veer to the right to land on the ledge and dash into the passageway to safety. (2) The easy-as-pie way: Go forward to the first barricade to trip the boulder that rolls in from the side. Turn right and grab the ledge that runs along above the track. Don't pull up yet. Instead traverse to the left above the shallow pit (as shown in this screenshot to the right). Now pull up. As long as you don't go toward the boulder on the right, it will not roll. Turn left and follow the ledge, jump the gap, and continue to the end. Avoid the lava pit on the left and enter the tunnel on the right, where you'll find FUSE #1 lying on the ground (along with another save crystal).
NOTE: If you accidentally trigger the boulder trap and manage to jump out of the way in time, you can still continue. Two different ways of doing this are described in the TRACKS WITH BARRICADES & BOULDER TRAPS - ALTERNATE METHOD note at the end of this walkthrough.
SLOPE WITH ROLLING BOULDERS: After picking up the FUSE, continue along the passage as it slopes upward. Where it opens out and slopes up to the left, step forward cautiously and then quickly hop back to avoid a rolling boulder. Turn left and stand under the angled ceiling with the boulder behind and to the right. Side flip to the right to trip the second boulder, then side flip back to the left to safety. Go up the slope and continue to the opening in the floor. Drop down. You're now where the first (side-to-side) boulder originated. Walk forward to where the two tracks cross, then to the right. This will trip the first boulder above. You can then climb up onto the ledge and follow it to where that boulder originated (above and to the left of the wooden door). Enter the tunnel on the left and follow the passage to an opening where you can drop back down into the CAVE WITH BOARDED-UP BUILDINGS.
In this cave there's another tunnel beyond the pile of tires (on the south wall). This leads to a CONVEYOR BELT where you'll find another FUSE. You can't get at it yet, though.
STOREROOM (MINE CAR SWITCH): Return to the LAKE by following the wide tunnel boot the east, beyond the tracks. Continue through the CAVE WITH THE DANGLING BUILDING and out the other side. When you reach the ledge with the red-and-white barricades, drop into the water below. Swim across and climb onto the small boat, which you moved earlier. Take a running jump to land on the ledge with the wooden boxes. Climb over the one on the left.
Here you'll find a small room packed with "Natla Technologies" crates. Pick up the magnum clips in the alcove. Find the movable crate (it's slightly darker than the others) and pull it once. Go around to the right and push it into the alcove where the clips were. There's another movable box behind the first. Pull it twice. Go around it to the right and pull it again to open up the passageway behind. Enter and use the switch to move the mine car.
SOUTHEAST LANDING WITH BARRELS & BOXES (AGAIN) - SECOND FUSE: Return to the LAKE, swim to the left and climb out on the ledge with the barrels. Follow the passage to the mine car, which you just moved so it's no longer blocking the tunnel. Go into the tunnel beyond it. Push the Natla box twice. Go around it and enter the tunnel beyond. Where the passage widens, walk forward carefully and pick up FUSE #2, which is lying on the ground. Don't go any farther or you'll attract the attention of the cowboy in the room beyond. Turn around and go back to the Natla box. Climb onto the box and pull up into the tunnel above. Pick up the Uzi clips and throw the switch to open the door near the CONVEYOR BELT.
To get back there, drop back down onto the Natla box, go through the room with the mine car and out through the tunnel on the left (north) side, which leads back to the LAKE. Swim across and behind the waterfall. Follow the passage back past the DANGLING BUILDING to the CAVE WITH BOARDED-UP BUILDINGS, TIRES, ETC. Go through the opening on the left (south) wall beyond the stack of tires.
CONVEYOR BELT: Follow the dark, twisty passage. When you reach the conveyor belt itself, go around its left side and through the door you just opened. Here you'll find some Uzi clips on the ground and a switch. Throw the switch to activate the conveyor belt, dumping FUSE #3 on the ground in front of it. Take it and return through the tunnel to the CAVE WITH BOARDED-UP BUILDINGS. Exit on the right (east) side.
CAVE WITH DANGLING BUILDING (AGAIN): Place the FUSES in their proper spots in the glassed-in room, and the winch will activate, lowering the small building. Inside you'll find the PISTOLS.
NOTE: The first time you use the pistols again, you'll need to select them from inventory. After that the draw-weapons key will work again.
PASSAGEWAY TO SECRET #1: After getting the guns, climb onto the roof of the building. Take a running jump to grab the edge of the opening ahead and pull up. Start up the slope and then climb into the raised opening on the right. Continue to a wooden door, which opens as Lara approaches and then closes behind her. Ahead is a lava pit with sloping sides and a collapsing trapdoor. The cave with the secret is above the trapdoor on the left. Turn around to face the wooden door. Slide down the slope and grab the edge as the trapdoor opens beneath Lara. Pull up and the trapdoor will close again so Lara can stand on it. Climb into the opening and drop down into the room beyond. This is SECRET #1—a large medi pack and Uzi clips. (This sequence is shown in a series of screenshots below.)
")
")
")
")
")
Pull the switch to open the wooden door out in the passageway. Drop down onto the trapdoor, then take a standing jump up the slope. Go forward and hop down into the lower passage. Turn right and follow the tunnel to a ledge above the LAKE. (PS1 players get a save crystal here.) Drop down, swim across the lake and once again climb out on the landing with the barrels.
SOUTHEAST LANDING WITH BARRELS & BOXES (AGAIN) - FIGHT THE COWBOY: Follow the tunnel to the room with the mine car. Enter the passage on the right and go past the Natla box to the area where you got FUSE #2. Now that you're armed, you can take on that cowboy. As you enter the cave he starts talking. Then he emerges from behind the pillars on the right with magnums drawn. Get a lock on him and keep shooting as you advance and withdraw into the doorway. If you rush into the room with the pillars be careful not to jump around too much or you may fall into one of the lava pits. When the cowboy is dead, take back your MAGNUMS.
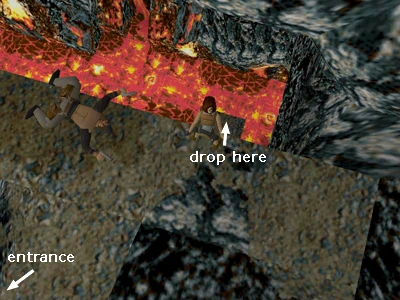

LAVA RIVER: Go to the far right (southwest) corner of the cave to a drop-off overlooking a lava river. Down below is a small square ledge jutting out from the wall (shown in the first screenshot to the right). Safety drop down to it. (In the console game, there's a save crystal here.) Still facing the wall with the lava river behind Lara, drop and hang from this ledge. Let go and quickly press Action again to grab the ledge below. Pull up and pick up a small medi pack.

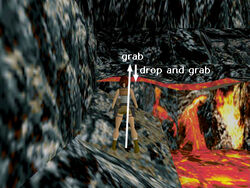
Grab the crevice in the rock wall and traverse to the right as far as you can. Drop to the block below. Go around the corner to the right and grab the next crevice. Again, traverse to the right to the end and drop onto the block. Turn right and examine the wall beyond. A horizontal crevice runs along below an angled ledge. Take a running jump to grab the angled ledge. Let go and grab the crevice below. (See this second screenshot to the right for a visual.) Traverse to the right until you can drop onto a flat spot.
Follow the passage uphill and continue to a steep downward slope. Slide down, turn right and emerge near the lava river. Walk to the left side of the ledge and take a standing jump to the rectangular block in the middle of the lava falls. Move to the end of this block and take a running jump to the square pillar on the right. Take another running jump to the next block. Turn right and take a final running jump into the opening in the cave wall. (These screenshots below show where to jump.)
")
")
")
SIDE AREA WITH SECRET #2: Lara can stand just inside the opening without triggering the boulder that rolls in from the left. But as soon as she steps toward the wooden crate, the boulder starts to roll. So run forward and immediately push the block into the room beyond. If you move the box quickly enough, Lara will be in safe space where it had been by the time the boulder reaches the end of the tunnel.
NOTE: If instead of pushing the crate you trigger the boulder and then hop back so Lara doesn't get crushed, you can still get into the secret room. See the ALTERNATE METHOD FOR SECRET #2 at the end of this walkthrough.
Go around the crate to enter a small room. This is SECRET #2. Pull the crate once to the side to reveal an opening in the ceiling. Climb up through it to find a large medi pack and Uzi clips in the room above. Jump over the opening in the floor and follow the passage. Drop down and walk along the tracks toward the boulder. On the way you'll find more Uzi clips, a SHOTGUN and another large medi pack.
Follow the tracks to the end and squeeze Lara between the boulder and the left wall. (The low ceiling prevents you from getting past the boulder on the right side.) To do this, stand facing and touching the left wall with the boulder on Lara's right. Then side flip to the right repeatedly until Lara squeezes through into the room with the crate. Then either repeat the process to get past the boulder to the exit or climb up into the secret room and drop down through the opening on the other side of the boulder. Or, if you can't get past the boulder this way, just return along the tracks to the raised opening, climb up and follow the passage back to the room above the crate. Jump the gap in the floor and drop down through the opening on the far side of the boulder.
LAVA RIVER (AGAIN): Take a running jump from the doorway to the nearest tall, square pillar in the lava river. Turn right and take a running jump to the next pillar (the one on the right). From here, take another running jump to the next pillar, and a third to the last pillar on the left. Hop down and go through the doorway. (These screenshots below show where to jump.) Slide down the slope and land on a small ledge above a pool of lava. Take a standing jump to grab the opposite edge. Pull up and continue to the next room, where you'll find a number of boxes marked "TNT".
")
")
")
CAVE WITH TNT BOXES: The darker box in the far right corner moves. Pull it away from the others. Then maneuver it through the doorway into the next room, position it near the opening high on the left wall and use it to climb up into that opening. Go to the top of the slope (nabbing a save crystal on the way) and climb up the rocks.
Carefully approach the lava pit with the four sloping sides. Don't try and jump all the way across. The opposite slope is too steep to stand on. Instead take a running jump to either angled side ledge. Wait there for a boulder to roll down the slope into the pit. Then take another running jump to land on the other side of the pit.
Follow the passage and you'll soon emerge on a ledge above the lava river opposite where you killed the cowboy earlier. Turn right and follow the ledge up and around to the top. Pick up the magnum clips on the ground and throw the switch. This will detonate the explosives you saw earlier.
Return along the ledge and through the passage to the lava pit with sloping sides. Cross it the same way you did before: by jumping to one of the side ledges then to the far side. Continue down the slope, which is now caved in. Back at the TNT room, you'll see broken boxes and a pile of rubble on the left where there had been a wall. Climb up and over this rubble.
SKATE PARK - FIGHT THE KID: Ready weapons. There's a skateboarder waiting in the big room ahead and he's armed with your Uzis! If you prefer not to go head-to-head, you can use the same basic tactics I suggested for the cowboy: Advance into the room, get a lock on your target, and hop/flip back firing. When he skates past, advance again. Again, there are lava pits on either side of the entrance so watch where you're jumping. Alternatively, you can run ahead to the SECRET AREA (description below) and shoot the skate punk from the opening above. When he is dead, reclaim your UZIS.
There is a secret in this area. To find it, starting from the entrance, go to the left and follow the wall, taking a running jump across the lava pit. Pick up the Uzi clips lying on the ground in the (northeast) corner. Turn right and continue on. About halfway up the left side of the room you'll find one pit filled with water instead of lava. Jump in and swim down and forward, through the wooden door, which opens automatically. Pick up small and large medi packs plus some Uzi clips from the bottom. This is SECRET #3. (The path to and from the secret is shown in these screenshots below.)
")
")
")
")
")
")
Leave the way you entered, but instead of swimming all the way out, go through the wooden door and immediately swim upward to a small room where you can surface. Climb out onto the ledge and then follow the tunnel to an opening above the big room with the ramps. (Shoot the skateboarder from this opening if you didn't already.) Drop down and get the Uzi clips lying on the ground just below the opening. There's also one more Uzi clip pick-up about two-thirds of the way up the west side of the room near one of the square columns. The exit is opposite the entrance, at the top of the ramps. (Console gamers get another save crystal in the passage beyond.)
YET ANOTHER BOULDER TRAP: Exit the skate park area, follow the passage to a T and turn left. At the top of the slope ahead are 3 boulders waiting to roll. Walk up the center and, as the first boulder comes rolling down, side flip to the right. The second boulder will then start to roll, so side flip to the left. This will set off the last boulder. Side flip back to the right to avoid it. Walk as you approach the top of the slope to let a fourth boulder roll past in front of you. At the top, go to the left, through the opening from which the boulder came.
TALL, NARROW ROOM WITH LEDGES: At the top of the ramp turn left and pull up. Now you're in a small but high-ceiling ed room with a number of blocks and ledges. One is low enough to climb on. From the top of this block, it's a series of four standing-jump-and-grab combinations to reach the block below the opening above. Climb up through the opening into a small room with sandy-colored walls.
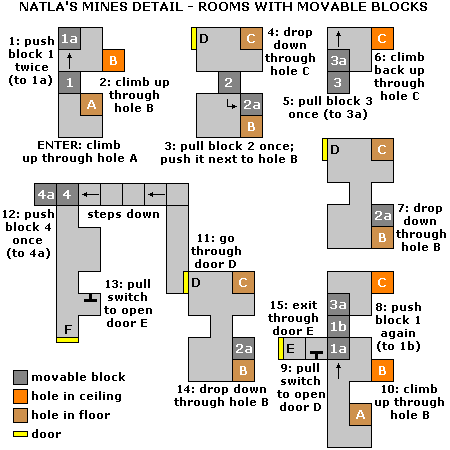
LOW-CEILING ED ROOMS WITH MOVABLE BLOCKS: This next area involves pulling and pushing several movable blocks in order to access switches and open doors. To make it a little easier, I've included a diagram (right). The diagram follows the sequence of actions more or less clockwise from upper left.
The opening leading down into the room with the ledges is (A). To one side of this opening is a movable block (1). Push this block twice into the next room (to position 1a). To the right is an opening in the ceiling (B). Climb up through it into the room above. Here you'll find another movable block (2). Pull it once, then go around to the left and push it once so it ends up next to the hole in the floor (at position 2a). Go through the opening where the block was. Here is another small room with an opening in the floor (C) and a gold door (D). Drop through the opening in the floor into a small room with yet another movable block (3). Pull this block once (to position 3a). This will make space for you to move the first block back in the room where you entered. Return there by climbing up through the opening in the ceiling (C), then going into the next room and dropping down through the opening in the floor (B).
Now push that first block once more (to position 5b). This will open up an alcove on the left with a switch and a gold door (E) beyond. (PS1 users can save their game with the save crystal near the gold door.) Pull the switch to open the gold door (D) in the room above. To get back to it, climb through the opening in the ceiling (B), and go through the doorway into the next room. The door is on the left.
Go through the gold door (D) and turn right. At the end of the passage, take a left and go down the steps to another movable block (4). Push this block once (to position 4a). This will give you access to a hallway with alcoves on one side and a gold door (F) at the end. This door opens when you step on a certain spot in the floor but quickly closes. Ignore it. Instead, go to the alcove near that door and use the switch there to open the gold door (E) near the first switch. Return there by going back up the steps, along the hallway and through the gold door (D). Ignore the hole in the floor just ahead (C). Instead go through the doorway on the left into the next room and drop down through the other hole in the floor (B). Across from this opening, beyond the switch, is the door you just opened.
OUTSIDE NEAR THE PYRAMID - FIGHT THE BALD DUDE: Draw weapons and proceed through the door. The big bald guy is waiting outside with a shotgun. You can climb on the roof of either of the small buildings and try and shoot him from there, but this takes a while. I've found it easier to just run past him into the open area near the pyramid and shoot at him while jumping from side to side. He's not extremely hard to kill, but that broomstick packs a punch so watch out, and don't hesitate to use a medi pack in the middle of the fight if necessary. When he falls, take his SHOTGUN. (If you already have a shotgun, you'll get shells instead.)
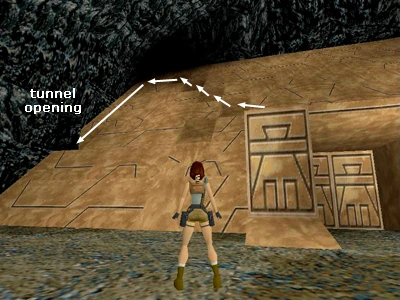

Go down to the pyramid and climb onto the ledge above the door. Now take a series of standing jumps up the flat spots on the left side to the top (as shown in this screenshot to the right). Jump to the left and slide down the side of the pyramid and land in front of the opening in the cave wall. Go in and use the switch to open two gold doors back in the area where you fought the bald guy.
Slide down the pyramid to the ground and return to the small buildings. The gold door on the left (F on the map) leads back into the movable block rooms. You don't need anything there now. Go through the gold door on the right and pick up some Uzi clips and a large medi pack in the doorway. Go a little farther in and you'll find the PYRAMID KEY. Take it and return to the pyramid door. Unlock it and enter to finish the level.

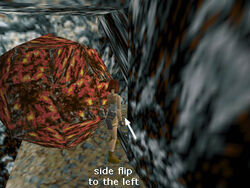
TRACKS WITH BARRICADES & BOULDER TRAPS - ALTERNATE METHOD: If you accidentally trigger the boulder trap on the way to get the FIRST FUSE and manage to jump out of the way in time, you can still continue. Follow the ledge down to where the boulder landed. Be careful not to fall into the lava pit on the left. Face the wall with the boulder on Lara's left. Step forward so Lara's chest is against the wall and then sidestep to the left as far as you can. (This screenshot to the right shows Lara in position.) Then side flip to the left toward the boulder. You may need to adjust Lara's angle slightly a few times (turning a little to the right may help) but, with repeated side flips, you should be able to gradually squeeze her through the crack between the boulder and the wall and into the doorway.
Or, if that doesn't work for you, follow the ledge back up to where the boulder originated (above and to the left of the wooden door). Enter the tunnel on the left and follow it to an opening above the CAVE WITH BOARDED-UP BUILDINGS. Drop down and return along the tracks through the wooden door. When you re-enter the trapped area, the boulder will be reset.
SECRET #2 - ALTERNATE METHOD: If you trigger the boulder trap near secret #2 and hop back out of its way, you can still get into the secret room. (These screenshots below illustrate the process.) Face the wall on the right, so the boulder is on Lara's left. Adjust her position so she's flat against the wall. Then side flip to the left toward the boulder. You may have to adjust Lara's angle and repeat the side jump several times but eventually Lara will squeeze between the boulder and the wall. Continue to side flip to the left until she reaches the corner behind the boulder. Turn to face the wooden crate. Use the Look button to make sure Lara is flat against the crate and facing it squarely. Then side flip to the left again as many times as it takes to work her into the space between the crate and the boulder. Now you should be able to push the crate into the room behind it and access secret #2.
")
")
")
")
Walkthrough text and diagrams copyright © 1998-2015 - Stellalune (stellalune@tombraiders.net). Special thanks are given to the participants in the alt.games.tombraider newsgroup, without whom some parts of this walkthrough couldn't have been written. Thanks also to Max and Ian T. for their help on this level. Diagrams made with the aid of Graph Tablet freeware ([4]). All TR1 screenshots were made using Glidosand Fraps. Feel free to copy or print this walkthrough for personal use. By all means, share it with friends, but please include this credit line so people can send me their feedback. No part of this walkthrough may be reproduced on another site without permission.
Atlantis[]
Walk forward. The lights come on and you'll find some Uzi clips on the ground. In the room ahead are 6 incubators ready to hatch some nasty Atlantean mutants. Step forward cautiously and the first egg on the left will hatch, releasing a spew-spitting mutant. Backflip into the doorway and kill it from there.
NOTE: You'll encounter a number of these incubators throughout this and the next level. You can tell when an incubator is ready to hatch a live mutant because the mechanical arms that support each yellow "egg" begin to move. If the arms aren't moving, it's safe to approach.
Advance forward and to the right and the first egg on that side of the room will hatch. This one contains a fireball-launching mutant. To minimize the damage, you can backflip a few times to get a little distance between Lara and the creature. Then jump from side to side to avoid the fireballs while shooting. When the mutant explodes, go down the right or center to the opposite end of the long room. As you approach the Uzi clips on the floor, the last egg on the left explodes and another mutant emerges. Use those side flips to avoid the toxic spew, kill the mutant and pick up the clips.
Here at the back of the room are 3 doors: one on each side and another in the center. The door on the left opens as you approach. Enter and go up the stairs. The see-through floor is safe to walk on, but there are gaps where Lara can fall through, so stay alert. Pick up a small medi pack in the far left (southwest) corner. The door in this corner leads back downstairs, but it doesn't open yet.
NOTE: This area is very dark. If you have trouble seeing where you're going, try turning up the brightness on your TV or monitor.
Head up the left (west) side of the room. When you near the middle, step out toward the walkway with the shotgun shells and the egg below will hatch. Kill the flying mutant from above if possible. If it flies up above floor level, jump from side to side to dodge its fireballs, taking care not to fall through the openings in the floor. When the coast is clear, get the shells if you didn't already and then continue to the far right (northeast) corner. Use the switch in the dark alcove to open the door across the room (in the northwest corner). Behind that is another switch. Use it to open the door near where you got the small medi pack (in the southwest corner).
Exit the switch room, and head straight across the room to the previous switch. Turn right and continue along the left (east) side of the room. When you reach the middle, the egg below will explode releasing another flying mutant below. Kill it as you did the other, then cross over the bridge at the center and continue along the right (west) side. The remaining egg will hatch below and another mutant will come up the stairs in the far left (southeast) corner. If you don't run forward, you should have plenty of time to kill it as it approaches.
Go down the stairs on the right (southwest). On the way down, you'll see another switch. Throw this to open the middle door in the room below. Continue down. The door at the bottom of the stairs opens as you approach. Go forward then to the right through the door you just opened.
TALL ROOM WITH LEDGES ABOVE BIG LAVA POOL: Advance to a ledge above a large lava pool. Kill the flying mutant that comes down from above.
NOTE: This will happen several more times as you make your way to the top of the pyramid. The fliers can knock Lara off the ledges. Also, they explode when you kill them, and Lara will take some damage if she's close to the explosion. Since they tend to avoid the small doorways, a useful strategy is to draw them down then back up and kill them from cover.
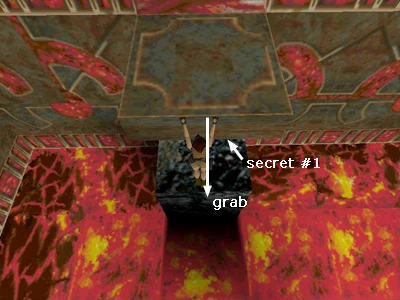
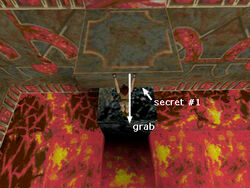
When the flier explodes, turn around and hang from the outside edge of the ledge. Let go and grab the ledge below (as shown in this screenshot to the right). Pull up and enter the passageway, which is SECRET #1. Pick up a large medi pack and clips for the magnums and Uzis. Continue along the tunnel to an opening in the floor where you can drop down into another hallway with gray and gold tiles. At one end of this hallway is a ledge above the big lava pool. (This is within jumping distance of the ledge you stood on previously, but by finding the secret, you avoided that jump.) There are chomping blades in the doorway, but you need not worry about them. Go the other way.
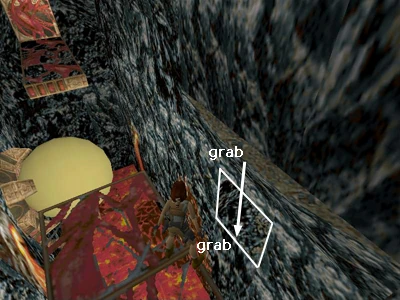
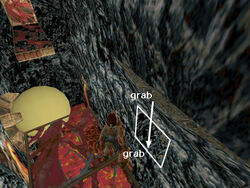
ROOM WITH TRANSPARENT BRIDGE & MUTANT INCUBATOR: The next room contains a lava pit below a transparent bridge with a gap in the middle. Down in the gap is an incubator. Walk to the right side of the bridge and take a standing jump to grab the crevice in the wall. Drop and grab the bottom of the doorway below. (This second screenshot to the right shows the spot.) Pull up and follow the tunnel to a switch. Use it to open the red door on the far side of the bridge. Continue along the tunnel to the opening, pick up 2 sets of Uzi clips and take a standing jump down to the bridge. Take a running jump across the gap to grab the other side of the bridge. As you pass the incubator, the egg will hatch, releasing a winged mutant. Pull up and head for the doorway. You can kill the mutant from here or, if you don't want all the kills, just keep going. (Console gamers get a save crystal in the passageway.)
POOL BELOW EXPOSED PYRAMID: Continue to a room with a pool of water. On the left is a part of the sloping outer wall of the pyramid. Like the visible part of the pyramid at the end of the last level, there are several flat spots. There are also two spike pits at the bottom of the slope and a couple of stone blocks. On the right side of the pool are some rocks and pillars. These are climbable but there's no way to get onto them from the water. The exit is that red door on the far side of the pool.
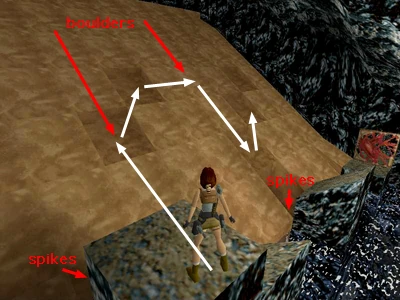
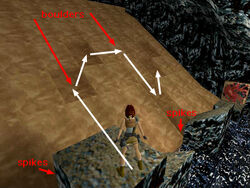
You'll need to go across the pyramid twice: once to spring some boulder traps and find a secret, and again to get out. First, take a running jump from the doorway to grab the tall square block ahead. (Note the square ledge below on the right. You can climb out of the water here if you fall in.) Turn left and take a running jump from the top of the tall block to the nearest flat spot on the pyramid. A boulder rolls from above, so quickly take a standing jump to the next flat spot higher up and to the right. This spot is safe. Now angle Lara slightly uphill and take a standing jump forward to land on the pyramid and slide down to the flat spot just above the second spike pit. Another boulder rolls down. If Lara is facing uphill, you can immediately take a standing jump to the next higher flat spot to get out of the boulder's way. (This series of jumps is indicated on this screenshot to the right.)
NOTE: Alternatively, you can avoid triggering the second boulder by taking a running jump from the second flat spot straight across the slope to land on the next flat spot four squares beyond. Just make sure you do this—or watch out for the boulder—later on when making the timed run.

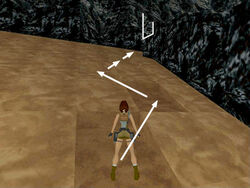
After clearing these two boulders you can take your time. Take a series of standing jumps, from flat spot to flat spot, up the side of the pyramid to the top right corner. As you get closer, you'll be able to make out an opening in the rock wall (outlined in this other screenshot to the right). Climb into it for SECRET #2, magnum and Uzi clips, plus a large medi pack. Exit this room and slide down the pyramid to the flat spot near the red door.
Take a running jump across the water to grab the lowest step on the other side. Pull up and climb onto the step on the right. From here, take a running jump to grab the edge of the tall block ahead. Pull up and get the large medi pack. Take a running jump to grab the next higher block, pull up and enter the room on the left. Pick up the 2 sets of Uzi clips on the ground and pull the switch. This alters the terrain in the next room enabling you to exit.
TIMED RUN TO THE EXIT: Jump into the water and find the underwater lever to the left of the pillar where you just got the medi pack. When you pull it, the red door opens and you have about 40 seconds to get through it before it closes. Here's the sequence (also shown in these screenshots below): Pull the lever, turn around and swim to the ledge at water level just below the tall pillar near the entrance. Climb out of the water onto the ledge so you're already facing the pillar. Then when you climb up, you're ready to take the next jump without having to set up first. Take a running jump over the spikes to the nearest flat spot. Press the right direction key to pivot in the air so Lara lands on the flat spot facing the far wall. If you make it this far without stumbling, save your game if possible. Then, if you mess up, you can just reload and skip the business with the lever and the swimming.
With Lara on the flat spot above the first spike pit, facing the wall with the exit door, step back until her heels touch the raised edge of the tile behind her. Then take a running jump straight across the pyramid. Lara should land on the slippery slope and slide down to the flat spot above the second spike pit. Again, step back so Lara has enough distance for the take-off and do another running jump to the ledge near the red door. You should have plenty of time to go through before it closes. Just be careful not to run on into the lava in the room ahead.
")
")
")
")
NOTE: If you didn't trigger the second boulder on the way to secret #2, you should probably do the timed run the same way you did it the first time, since you won't have time to set up the last running jump to the doorway before Lara gets squashed by the boulder.
ROOM WITH PARTIAL WALKWAY AND THREE LAVA SLIDES: Face the door opposite the entrance and take a running jump to grab the left side of the walkway (the lower of the two steps). Follow the walkway to the end and take a standing jump diagonally to the left into the doorway. (Get a save crystal here in the PS1 game.)
NOTE: If you neglected to pull the switch in the small room above the pool in the previous area, this room will not be filled with lava. Instead it will contain a larger elevated walkway and 3 closed chutes, and you won't be able to reach the exit from the walkway. Go back through the red door or, if it's closed, drop down, walk around the right side of the walkway and climb up next to the switch. Use the switch to open the door opposite and return to the pool room that way. Then climb up to the room in the far left corner—on the opposite side of the water from the pyramid—and pull that switch now. Do the timed run through the exit door again and resume the walkthrough with the paragraph above. Thanks to MrCairo for this tip.
After exiting the room with the three lava slides, follow the passage to the top, jumping over a spike pit partway along. Jump into the pool and swim down and forward. There are some shotgun shells on the bottom and a lever to the left of the entrance (when facing it) that opens the exit on the opposite wall. Swim through this door and climb out of the water.
Walk forward and pick up the 2 sets of Uzi clips on the ledge. The chomping blades only begin to work after you pass. Once again, you find yourself in the TALL ROOM WITH LEDGES above the huge lava pool. Another flying mutant approaches from above. Rather than going back through the blades, take a running jump to the next ledge on the right. Pick up 2 sets of Uzi clips and either kill the flier from that doorway or leave it and continue on.

ROOM WITH SWITCHES & UNDERWATER DOORS: Follow the short hallway to another pool. Swim down and forward into a room with 4 underwater pillars. Behind the first pillar on the right is a small medi pack. Surface near the entrance. The room above contains 4 mutant incubators, none of which are active yet. There are also 3 underwater doors on the left (north) side and 5 switches (plus a convenient save crystal). You only need to pull 3 of the switches to open the doors so you can exit. The others activate the incubators. Each switch and incubator described here is also labeled in the diagram at right.
Start with switch #1 in the northwest corner. Use it to open the outer door. Walk up the short ramp between the two switches to get 2 sets of Uzi clips and a closer look at the exit doors. Continue clockwise around the perimeter of the room, skipping switch #2 in the northeast corner, and using switch #3 in the southeast corner to open the middle door. Continue to switch #4, the middle one of the three on the south wall. Use it to open the inner door. It also activates incubator A, the one on the northeast side of the room between switch #2 and the exit. You'll see the arms holding the egg begin to move.
You can now choose to skip the next four kills, or take between one and four of them. For no kills, after opening all three doors, jump into the water and quickly swim through them and away. For one kill, after throwing switch #4, approach the incubator to hatch the egg and kill the fireball-hurling mutant. Use the usual back-flip/side-flip routine. Just be sure not to fall into the water or you'll have difficulty getting out without being toasted. Now leave through the underwater doors.
Or, for the rest of the kills, use switch #2 (on the northeast side near the incubator that just hatched) to activate incubator B (in the northwest corner between switch #1 and the entrance). Walk toward it to hatch the egg, releasing a flying mutant. Again, hop back and flip from side to side while shooting, and it shouldn't harm Lara. Switch #5, in the southwest corner, activates the last 2 incubators. The one just above the switch (C in the diagram) hatches immediately, and a winged mutant attacks. To prevent it from pinning Lara in the corner, as soon as you pull the switch, roll and run away from the switch. Take a running jump across the pool, roll again and start shooting. This will give you a little more room to maneuver. Do not approach the other egg yet, or it will hatch and you'll have 2 mutants on your hands at once. When the flier is dead, hatch the remaining egg (D) and kill the fourth mutant, which shoots fireballs. Then swim through the 3 doors you just opened.
ROOM WITH BOULDER & MOVABLE BLOCK: Surface and follow the passage to a hallway with pulsing, fleshy walls. After stepping up into this hallway, turn right and throw the switch to open the door. Enter and pick up 2 sets of Uzi clips on the ground. As you walk across the room, a boulder will roll down the ramp and stop at the bottom, blocking the doorway. To get out, position Lara with the boulder on her right, the ramp behind her and her chest against the wall. Side flip to the right several times, and Lara should be able to squeeze past the boulder into the hallway beyond.

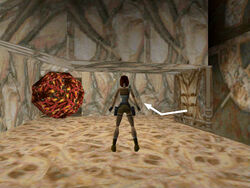
Alternatively, find the movable block which forms the corner at the bottom of the ramp. Pull the block once, then go around to the right side and push it against the wall so it's in the path where the boulder rolled (as shown in this screenshot to the right). Exit through the pulsing tunnel and go around to the left to the door where you originally came in. Use the switch again to open the door and magically reset the boulder trap. This time, when you enter, the boulder rolls down and is stopped by the block. Exit through the doorway that was previously blocked by the boulder.
Continue to emerge once again in the TALL ROOM WITH LEDGES above the lava pool. Kill another winged mutant and take a running jump to the next ledge ahead and to the right.
ROOM WITH INCUBATORS & TRENCH FULL OF SPIKES: Advance along the passageway. (There's another save crystal here in the console games.) Enter the room slowly to hatch the eggs one at a time. Kill each of the 2 winged mutants from the doorway. Position Lara facing either section of pulsing floor on the opposite slope (not the tan stone, which is slippery). Slide down the slope and jump at the bottom to clear the spikes and land on the fleshy floor. Go to the top and pick up 2 sets of Uzi clips, a large medi pack and some shotgun shells.
BIG ROOM WITH LAVA POOL & FLESHY BRIDGE: Follow the tunnel to a ledge above a lava pool. There is an incubator on the left and an uneven bridge made of that freaky, fleshy stuff spanning the length of the room. Approach the Uzi clips on the ground near the end of the bridge and a winged mutant rises up ahead. Kill it and take the clips. Then return to the entrance and face the incubator. Take a diagonal standing jump to the ledge on the left. Take a running jump from this ledge to land on the small square ledge that juts out just in front of the incubator. The egg will hatch, releasing another winged mutant. This doorway is not quite big enough to keep the mutant out, so use the shotgun or Uzis to kill it quickly.


Turn around and follow the passage around to its higher opening, picking up some Uzi clips on the way. Take a running jump from the either opening to the tan ledge projecting from the fleshy bridge. (This screenshot to the right shows the spot.) Walk forward onto the bridge and turn around to face the wall you just jumped from. Now you should be able to target the 2 mutants in the cave on the left of the empty incubator. One spits and the other shoots fireballs. Don't jump around too much or you're likely to slide into the lava. Instead lock onto either target and sidestep to the left so you're out of range of the mutants' attacks. Hold the Action button and Lara will shoot whenever the enemy comes within range. It shouldn't take too long before the first mutant explodes. Then repeat the process for the second.
Turn around to so Lara's back is toward the empty incubator. Walk out onto the sloping projection on the other side of the bridge. (There's a fleshy area just below in the lava pool.) Take a running jump to the opposite side and go to the right, up the ramp to the switch, picking up 2 sets of Uzi clips on the way. Use the switch to open a door you can't see yet. Turn around and head back down the stone walkway. Take a running jump across the gap to avoid sliding into the lava. In the far right (southeast) corner of the room there's a movable block. Pull it once to uncover the door you just opened with the switch.
Enter and follow the passage to the chomping blades. Stand close to the blades without touching them and then run through just as they begin to open. Take care not to run off the ledge. If you slide down the slope ahead, you'll have to hop up to the middle of the bridge, jump to the ledge on the left and retrace your steps past the blades again. From the flat ledge beyond the blades turn right and take a running jump to the cave where the 2 mutants were. Head up the slope, turn left and climb the blocks to a ledge with a small medi pack and more Uzi clips. Follow the hallway to a higher another ledge in the TALL ROOM WITH LEDGES above the big lava pool. Kill another winged mutant that swoops down from above. Then take a running jump to the next ledge ahead on the right.
ROOM WITH SQUARE PILLARS & LAVA POOL: Go through the door, which opens automatically as you approach, into a room with square pillars set in a lava pool. (Use the save crystal here if you're playing on Saturn/PSOne.) Go to the end of the walkway and take a running jump to the ledge ahead. Follow the hallway to a switch and use it to change the heights of the pillars. Return to the lava room and take a running jump back to the walkway by the door. Take a running jump to the nearest pillar, which is just to the left of the entrance. Take a standing jump to the pillar on the left, then a running jump to grab the edge of the doorway to the left of the next pillar. Pull up, go into this hallway and use the second switch to move the pillars again. Return to the doorway and take a standing jump to the pillar on the left. Take a running jump to the next pillar ahead. Turn left and take a standing jump to the pillar near the exit. From here, take a running jump into the doorway, then follow the passage to the left.
FLESHY RAMP & SECRET ROOM: Get ready before entering the next area. There are 3 mutants ahead. In this situation, you're better off not drawing them down into the hallway. The mutants can easily corner Lara there. Instead ready those Uzis and run forward, turn left and start up the ramp. Begin shooting as soon as Lara locks onto one of the mutants. About halfway up the first slope, stop running and just concentrate on shooting. The low ceiling makes it difficult to jump from side to side, but you can do some sidestepping to avoid the mutants' attacks. Or just concentrate on the offense and use health packs as needed.
The secret in this area is difficult to spot but easy to get once you know where it is. Return to the hallway at the bottom of the slope. Step on the one floor tile without the gold pattern on it. This pressure pad opens a concealed door at the very top of the ramp where you fought the three mutants. It's on the right, just before the hallway narrows. The door stays open for about 25 seconds, giving you ample time to reach it. Inside is SECRET #3, consisting of Uzi clips, shotgun shells and a large medi pack. (These screenshots below show the pressure pad and secret door.) Pick up the goodies then return to the ramp, turn right and follow the tunnel to another red, see-through door.
")
")
SWITCH & LAVA TRAP: The door opens automatically. Don't use the switch ahead on the right. It's a trap. Rather than opening the next door, it causes lava to flow into the hallway. Instead climb up through the opening in the ceiling near the first door. Continue to come out again in the TALL ROOM WITH LEDGES above the big lava pool. You're almost at the top now. You can see the underside of a big ledge above, and this time, there's no flying mutant. Take a running jump to the next ledge on the right, pick up 2 sets of Uzi clips and enter the passage beyond.
RAMP WITH DARTS, BLADES & BOULDER: Advance into the next room toward the Uzi clips with weapons drawn. Kill the mutant that emerges at the far end of the room, then get the clips. Continue forward to the bottom of the ramp. There are dart pipes on either side, blades in the doorway mid-way up the ramp and, for good measure, a boulder up at the very top. This looks a lot more difficult than it is. Go around the right side of the ramp (when facing it) and head for the corner. The darts won't start to shoot out of the pipes yet. Now turn to face the highest part of the ramp before the blades and sidestep to the left so Lara isn't directly below the dart pipe. (This screenshot shows the spot.) Vault up onto the ramp and then immediately hop back to avoid the boulder. When the boulder rolls past, it disables the blades so you can climb back onto the ramp and continue to the top.
THRONE ROOM: Here you'll find a room with 3 large thrones (and a save crystal as well). Notice that they are labeled with the initials of the Atlantean rulers: Natla, Tihocan and Qualopec. The "seat" of Natla's throne is actually a movable block. Push it twice to get into the area behind.

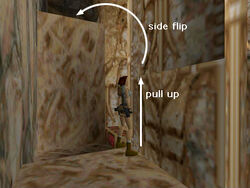
NOTE: Instead of going through one of the trapdoors, as described below, you can take a shortcut. After entering the area behind Natla's throne, go all the way around to the right, to the low step behind Qualopec's throne. There's a raised opening above, through which you would return to this room after doing the business described below. Instead, stand on the low step behind Qualopec's throne. Sidestep as far as you can to the left and then try to climb onto the block that forms the seat of the throne. Lara can't stand there and will start to slide back, but before that happens side flip to the left to land in the opening above, as shown in screenshot to the right. Climb up and throw the switch to open the red door between the trapdoors in the room below. Climb back down the way you came and go through that door. Skip down to the section "SMALL ROOM WITH THREE INCUBATORS". Special thanks to Beau for this tip.
Or, taking the usual path, after pushing the block, go to the back of the area behind the thrones, where you'll find 2 switches with trapdoors beneath them. There's also a red door between them which doesn't open yet. It doesn't really matter which trapdoor you choose, since both lead to the same place. If you choose the switch on the left, throw it, and quickly jump back off the trapdoor as it drops open. Turn around and drop back to hang from the opening. Let go and, as soon as you hit the slope below, jump to clear the spike pit. Continue up the slope and turn left.
For the trapdoor on the right, throw the switch and quickly jump back off the trapdoor. Turn around and drop back to hang from the opening. Drop into the room below. (You can also just fall through the trapdoor, but Lara loses some health.) Take a standing jump over the lava pit, then immediately backflip to where you first landed in order to avoid the rolling boulder. Hop back across the lava and continue forward then to the left.
Climb up through the opening and throw the switch to open the red door between the trapdoors above. Continue climbing to emerge in the throne room above and behind Qualopec's seat. Drop down and go through the red door between the switches. Head to the right and up the ramp. Advance cautiously into the next room.
SMALL ROOM WITH THREE INCUBATORS: When you enter this room, only the incubator on the far side is active. So you can pick up 4 sets of Uzi clips (in two piles) near the entrance without any interference. Then draw weapons and move toward the active incubator. (In the Saturn/PlayStation game it may not appear to be active yet, but it is.) A centaur hatches out. Do the back-flip/side-flip routine to avoid the fireballs as you shoot it.
Cross the room and throw the switch to the left of the empty incubator to open the exit door. This also activates the two incubators above. As long as you don't step on either of the low, fleshy ramps next to the door, the eggs won't hatch and you can leave at any time. If you want all the kills, you can hatch the eggs one at a time and fight the 2 mutants that emerge.
Alternatively, after throwing the switch, run across the fleshy ramps to hatch both remaining eggs. Immediately slide down the ramp into the next area, popping a health pack as you go, if necessary. Deal with the mutants down there (see next paragraph). Then turn around and shoot the two mutants at the top of the slope. (Thanks to Ian T. for this tip.)
NOTE: In the console version there's a save crystal just beyond the exit door.
CAVE WITH FLESH CREATURE: Be sure you're at full health before exiting down the ramp. At the bottom are 2 more mutants. It's probably easiest to just keep moving and shooting, but you can also run out into the open area, head to the right and climb onto a block where the mutants can't reach Lara. You've got to be quick to do this, though, and you may lose as much health as you would just fighting.
Once the mutants are dead, head for the middle of the room. After examining this next fleshy creature for a minute, you'll realize it mirrors Lara's movements precisely—including shooting at her if she shoots at it. You have to kill it in order to leave, but to do that, you'll need to lure it into a trap.
Here's how: (This sequence is shown in a series of screenshots below.) Head for the tall column near the entrance. Walk up the short ramp next to it and climb onto the block above the ramp. Turn around and take a standing jump onto the tall column. From here, you can see how Lara's doppelgänger has mimicked her movements using the tan blocks on the other side of the room. Now take a running jump to grab the right side of the raised platform ahead. Pull up. Here you'll see a switch, a trapdoor in the floor and the exit door. Pull the switch to open the trapdoor above a lava pit. You have a little over 40 seconds before the trapdoor closes. So you don't need to rush, but don't dawdle either.
Roll, run past the exit door and jump at the edge to land on the low ramp ahead. Then climb onto the low block at the top of the ramp. (Or, after throwing the switch, roll and run off the platform, slide down to the ground, run forward to the side of the block and vault onto it, avoiding the ramp altogether.) Jump onto the tall pillar. Now take a running jump to grab the platform and run to the middle. The flesh creature should then run to the middle on her side and fall into the lava pit. When she does, the exit door near the pit will open. Drop down to the floor, climb back up the gray rocks to the other platform and go through the door.
NOTE: The flesh creature is not counted as one of the official kills.
")
")
")
")
BUG WARNING: If you save your game and reload while exploring this area, the flesh girl may stop moving. If this happens, try jumping onto the ramp where you slid into this area. This will usually un-stick her. If you are on top of a block or ledge when you save and reload, the flesh girl can end up stuck inside the rocks instead of on top of them. If this happens, climb down to the ground, move into the open area, save again and reload. Then try jumping onto the ramp at the entrance to get the flesh girl moving again.)
Climb up into another sloping, flesh-textured hallway. Pick up the Uzi clips. Draw weapons and advance to the bend. As soon as Lara gets a lock on the centaur around the corner, hold the fire button and backflip down the hallway shooting. As usual, jump from side to side to avoid the fireballs and keep pumping the centaur full of lead until it explodes. Go back up to the bend and pick up some more Uzi clips. Now advance slowly. There's a drop-off at the top of the slope with a pool of lava below. Just go far enough to attract the attention of the mutant lurking ahead on the right. You may be able to stand and shoot it using the doorway for cover, but you can also back down the tunnel if necessary.
TIMED DRAWBRIDGE: The exit is straight ahead across the lava, but it's closed and the drawbridge leading to it is down. Both door and bridge are controlled by switches at either end of the U-shaped walkway that runs along the edge of the room. The left switch raises the bridge. The right switch opens the door. Both are timed, but the door stays open longer than the bridge stays up (about 45 seconds and 15 seconds, respectively).
Here's the drill: First, follow the walkway to the left and pick up some Uzi clips. Don't use this switch yet. Now go all the way around to the right end of the walkway and throw that switch to open the door. Immediately roll and run all the way around the edge of the room to the left switch. Use the switch to raise the bridge. Roll, then run back to the center and across the bridge to exit. You should have just enough time if you run without weaving too much and don't bump into anything. But if you want to shave off a few seconds, take running jumps along the straight parts and leap over the corners instead of running all the way around them.
SCION ROOM: Just beyond this door is the room where Natla placed the Scion on the mechanical altar. Pick up 2 sets of Uzi clips on the floor, then walk up the low ramp on the left side of the pedestal and try to take the Scion to end the level.
Walkthrough text and diagrams copyright © 1998-2015 - Stellalune (stellalune@tombraiders.net). Special thanks are given to the participants in the alt.games.tombraider newsgroup, without whom some parts of this walkthrough couldn't have been written. Thanks also to Rick J., Ian T., David P. and Beau for their help with this level. All TR1 screenshots were made using Glidos and Fraps. Feel free to copy or print this walkthrough for personal use. By all means, share it with friends, but please include this credit line so people can send me their feedback. No part of this walkthrough may be reproduced on another site without permission.
The Great Pyramid[]
Quite obviously, the first thing you'll need to do is take out the humongous, legless mutant without letting it grab Lara or knock her off the platform. There are a number of strategies you can employ to do this. Some prefer to use the Uzis and run or side flip from corner to corner as the mutant lumbers after. Some prefer the shotgun, since fewer rounds are needed to bring the creature down (about 800 rounds of Uzi fire, versus about 25 shotgun blasts). Needless to say, you don't want to hop around too much or you'll risk going over the edge. And, for the most part you don't have to, since the mutant moves pretty slowly.
Also, as Mark R. points out, while fighting the mutant you can take a running jump at its right shoulder (on the left when facing it) and Lara will sail straight through. Once on its other side, roll and start shooting again. It'll take a little while for it to turn around to face Lara. While it's maneuvering, you can jump or run to the side or, if you have room, back up and take another run at it. Just watch out for those claws. If Lara stands too long in front of it, the mutant can easily snag Lara in mid-air and toss her around like a rag doll.
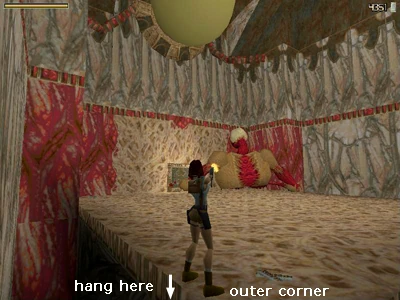

Another trick is to hang from the edge of the platform and wait for the mutant to go back to the door. When it does, pull up and shoot at it until it approaches, holster the guns, and hop back to dangle again. Sometimes this takes a while, and if you hang in the wrong place, it'll reach under and grab Lara. The best spots seem to be the corners farthest from the door (northeast and southeast), with Lara's back to the side (north and south) walls. The northeast corner is farthest from the mutant's favorite spot (shown in this screenshot to the right). So if you hang here, and wait for it to go back to its corner, it then takes the beast longer to reach you and you get more shots in each time. If you're hanging and the mutant just won't move away, try traversing to the side of the platform near the rear wall, then back to the corner and it'll back off. When you do this, you may lose a little health—presumably as a result of the mutant's stomping on Lara's hands. But, as long as you don't stop except at the corners, it won't grab Lara. (Thanks to Sharon for the hanging tips.)
If you're playing on the PC or Macintosh, I also recommend saving your game in the middle of the fight if you're doing well. Then you won't have as far to go if you do get killed and have to reload. (Use a new slot, though, just in case something goes wrong.) When it starts to keel over you can stop shooting. Soon after, the mutant explodes and the exit door opens. Pick up the Uzi clips in each of the 4 corners of the platform (6 sets in all) and head for the door.
PASSAGEWAYS WITH MOVABLE BLOCKS: Go forward, then left, and slide down the ramp. Pass the movable block in the alcove and go down the next ramp. (The sound of chomping blades is audible from somewhere above.) Continue to another movable block. Push it 3 times. Go up the ramp on the right and around the corner to reach the back side of the movable block you passed earlier. Push it once. Then go around the right side of the block and climb on top of it.
Turn around and take a standing jump to grab the ledge ahead. Pull up into a hallway with break-away tiles over spikes, as well as chomping blades. (Console players get a save crystal here.) Stand at the edge of the break-away floor and listen to the blades. Start to run through the blades on the second "clang," or just as they begin to open. Continue forward and around the corner.
Don't go down the next ramp. Instead turn right into a corridor with gray and white tiles. Follow it to the bottom and push the movable block once. Follow the gray-and-white hallway back to the previous hallway, turn right and go down the ramp you didn't take earlier. Here you'll see a red door and a switch that's too high to reach. Drop down and go forward to the rag doll block you just pushed from behind. Climb over it and push it beneath the switch. Turn around and follow the passage on the right. Come back down the ramp until you're standing on the block you just moved. Throw the switch to open the red door.
ROOM WITH LAVA STREAM & DRAWBRIDGE: Go through it into a room with sandy colored slopes and a lava stream running down the center. Straight ahead across the lava is a doorway you can't reach yet. There's a drawbridge spanning this gap, but it's down at the moment. For now, take a standing jump to the first flat spot on right side of the tan slope. Take another standing jump forward to the next flat spot. Now take a running jump to the next. (Be sure to set up this jump by walking forward to the little "lip" where the next floor tile juts up a bit. Then hop back before taking the running jump. Otherwise, Lara can stub her toe on that jutting floor tile and do a standing jump instead of a full running jump and end up in the lava.)
Don't jump across the lava yet. Turn around and you'll see that the drawbridge has now been raised over the lava. It is on a timer but not a particularly fast one. You have about 40 seconds to get across the bridge before it collapses again. Do the same jumps in reverse, with the last standing jump landing you on the bridge. Turn right and run through the doorway into a cave. This is SECRET #1, the reward a large medi pack, magnum clips and a box of shotgun shells. (These screenshots below show the path to the secret.)
")
")
")
")
Use the switch twice to raise and lock one section of the bridge in place. Take a running jump across the lava stream back to the entrance. Then repeat the jumps across the flat spots on the sandy colored slope. When you reach the last flat spot on the right side, jump across the lava and enter the tunnel there.
NARROW TUNNEL WITH BOULDER TRAPS: There's a boulder at the top of the slope ready to roll. Advance cautiously up the slope. As soon as the boulder starts to come down, roll and run down and to the right into the safety of the doorway. Go back up the ramp where the boulder came from. Turn right and go up a short ramp. The next long ramp is another boulder trap. This one is a little faster, so either run up the slope, roll and take running jumps down the slope, cutting to the left at the bottom, or, hop backwards up the slope and start running down as soon as you hear the boulder begin to roll. Continue up the slope to the top and follow the passageway to a break-away floor tile. Step on it to break it, then hop back. If Lara has less than one quarter of her health bar left, use a medi pack. Then safety drop into the Scion room below.
SCION ROOM: Shoot the SCION. This opens the door opposite the Scion pedestal and sets off a series of tremors. The quake won't damage Lara unless it breaks your concentration and she falls or something. Just keep going. (There's also a save crystal in the PS1 version.)
NOTE: Oddly, destroying the Scion counts as a kill on your stats screen.
Exit through the small doorway opposite the Scion pedestal. This leads back to the TIMED DRAWBRIDGE room from the previous level, but now the bridge is locked in place. There are 2 mutants on the walkways to the left and right. Step out to get their attention, then kill them from the relative safety of the doorway. Or, drop down onto the black rocks below the right side of the bridge. Just watch out for the lava on the left.
If you want all the kills, cross the bridge to find a third mutant in the fleshy hallway on the other side. That hall now comes to a dead end a bit farther along. There's also a dead-end passage near the switch that used to open the door to the Scion room, but there's nothing inside. Drop from the bridge to the black rocks below. Find the opening in the floor near the south wall and drop down through it.
GAUNTLET OF TRAPS: Turn to face the fleshy wall with the horizontal crevice. Take a running jump to grab that crevice. Then, if you have the PC or Macintosh game, you can disable the flying darts by saving and reloading the game. Be sure to hold Action as the game loads or Lara will fall. After reloading, the darts will have stopped. Traverse to the right. Drop to the slippery slope and immediately backflip onto the flat spot behind to avoid sliding into the lava. Unless you've disabled the darts, as soon as Lara lands, hop back out of the way.
Go through the doorway, pick up the Uzi clips on the left and walk down the right side of the slope. This will trigger a boulder, which rolls down the left side to land in the lava pool below the swinging blade. Once it does, walk down to the blade. Stand as close to it as possible and take a standing jump past it as it swings to the left. Walk forward through the spikes, continue on between the lava pits, go around the corner and then walk to the top of the ramp on the left. Ahead are three squares of break-away tile. Position Lara at the front edge of the ramp near the middle. Take one walking step back from the top edge of the ramp. Then take a standing jump forward to land on the leftmost break-away tile. Immediately side flip to the right to land on the right tile, then jump forward to the ledge.
CONCEALED CREVICE ABOVE LAVA POOL: Continue to the next room. Here you'll find a lava pool with 3 tall, angled blocks standing in it. On a ledge above the far side of the pit you can just make out some items. This is where you're headed, but jumping on the blocks won't get you there. Instead, you'll need to traverse along a nearly invisible crevice in the left wall. It doesn't look like a crack you can grab, but if you look farther to the right, you can see where it widens. (These screenshots below show the spot and how to set up the jump.)
")
")
")
Turn left, so the lava pool is on Lara's right and walk forward until Lara touches the wall. Take one hop back, then sidestep as far as possible to the right so Lara's right foot is at the edge of the pit. Now turn about 10 degrees to the right so Lara is facing the wall just above and to the right of the edge. Take a standing jump to grab the horizontal seam in the wall. Traverse to the right all the way over the lava pit and drop down into SECRET #2. On this ledge you'll find 3 large medi packs and some Uzi clips.
To get down, walk to the edge above the lava and face the angled pillars below. Take a standing jump to the long sloped block and hold the Jump key to immediately backflip and land on the block behind (where PS1 players will find another save crystal). Turn around, walk to the edge and take a standing jump to grab the crevice. Traverse to the right. If you like, you can drop onto the solid block and survey the situation. Just be careful not to drop onto the break-away tiles.
NOTE: If you're in a hurry or aren't interested in the secret, you can continue by taking a standing jump from the first ledge above the lava pit to the first angled block. Hold the Jump key to hop to the next pillar and the next. Release Jump before you land on the third pillar. Walk to the edge and then take a standing jump to grab the crevice. Traverse to the right and drop.
GAUNTLET OF TRAPS (PHASE 2): Ahead is a combination trap involving a concealed spike pit, a pool of lava, a swinging blade and a rolling boulder. To get through without losing any health, first traverse along the crevice as far as you can to the right. Lara will be hanging above the right edge of the first break-away tile concealing the spike pit below. Release the Action key to drop onto the collapsing tiles. As Lara drops, immediately press and hold Jump + Right. This will cause Lara to side flip to the right twice, and the boulder will roll past without harming her. Then you can take your time to set up a run past the swinging blade and come through unscathed.
NOTE: Several people have sent tips on getting through this area. I prefer the method above, which was discovered by several players independently. Shared credit goes to Haydon and Lindsay. He was the first to tell me about it and, at 10 years old, she's the youngest raider to send in a correction.
Beyond the swinging blade, there's another slope with a boulder perched at the top. Run down the slope into the alcove on the right, ignoring the small medi pack on the ground for now. Once the boulder lands you can take a standing jump or a side flip between the boulder and the corner of the doorway, get the medi pack and jump back the same way.
The next trap involves a slope with a boulder behind, a swinging blade ahead, and lava pits on either side and at the bottom. Stand to the left or right of center facing down the slope. (It's easier to avoid the blade if you don't slide down right in the middle.) Wait for the blade to swing all the way to the opposite side from where Lara is standing. Then step off and slide down the slope. Jump without grabbing at the very end of the slope to pass the blade and land on the flat block ahead. (If you wind up grabbing the edge of the block, you won't have time to pull up before being squished by the boulder.)
Hop down on the left and go through the doorway. In this room there's a small medi pack on the ground ahead, several lava flows and a door on the far side. Run forward to the medi pack. Stop and pick it up. The lava flows out behind Lara, but she's safe here. Take a standing jump forward then run into the doorway. The remaining lava flows should miss you. Pull the switch to open the door.
Enter and go to the right. The door closes behind you. Continue to the north end of the passage and pick up some Uzi clips. Turn around and run forward past the door, but stop just at the edge of the next lava pit. A boulder will roll down and pass overhead. Take a standing jump to grab the opposite edge of the lava pit. Wait for another boulder to roll past above, then pull up.
Continue to the next room, which contains a pool of water and a bunch of torch pillars. Relax! It's not anything like the Palace Midas torches. You'll be fine. Stand on either side of the first pillar (not in the center). Face the next pillar and make sure Lara is lined up squarely with the pillar edge. Take 5 standing jumps in a row to clear all of the pillars. (If you do fall or accidentally jump into the water, climb out below the starting point and try again.)
NOTE: Here's an alternate method for this sequence. Position Lara at either side of the first ramp, walk up to the edge, hop back and take a running jump past the first pillar to grab the edge of the second. Pull up and take a standing jump past the second flame. Walk to the edge, hop back and take another running jump over the next flame to grab the edge of the ramp on the other side. As long as you stay at the outside edge of the blocks, Lara won't take any damage. Thanks to Ian T. for this tip.
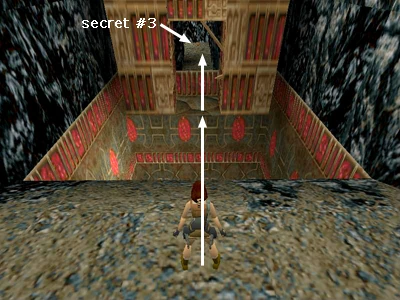

TALL STRUCTURE ABOVE TINY POOL: In the next room there is a red-and-gold structure with a swinging blade in the middle and break-away tiles below the blade. Walk down the slope and stand facing the break-away tiles. Hop back, then take two more steps back (walking). Take a running jump and continue to hold jump and forward. Lara will land on the edge of the break-away tiles then take a running jump off of them into the opening beyond (as shown in this screenshot to the right). If you have trouble with the jump to the collapsing tiles, try this alternative: Walk to the edge of the pit, take a standing jump to grab the edge of the break-away tile, pull up and immediately take a running jump to the alcove. This is SECRET #3. Inside you'll find a large medi pack and 2 sets of Uzi clips.
NOTE: Due to a bug, this secret is not counted correctly. It doesn't affect gameplay, but even if you find it, your stats screen at the end of the game will be one secret short. If this bothers you, ther is an unofficial patch that fixes the issue on the PC, PSX, and iOS versions. For details and downloads, follow this link to the relevant forum thread: TR1 Last Secret Fixer by SuiKaze Raider.
Return to the doorway and either take a standing jump from the edge, or take a step back from the edge and swan dive (Walk + Jump + Forward) to land in the tiny pool below. Pick up the Uzi clips on the bottom, then follow the underwater passage until you can surface. Climb out of the water and pick up 4 more sets of Uzi clips (and the final save crystal in the game).
HUGE ROOM WITH SQUARE PILLARS (FINAL BATTLE): Advance into the next room with weapons drawn. Above on the left is your old friend Jacqueline Natla. Only now she's sporting a spiffy pair of wings and shooting fireballs at you. Use the same basic strategy as with the centaurs: backflip and side flip to avoid the missiles, keep shooting and don't let her get you in a corner.
Once she falls, assess the situation, but don't get overconfident: Natla is not put down so easily. She rises up again to resume the fight. If you've been asleep at the wheel and somehow don't have enough ammo, you can run into the tunnel to the right of the entrance (i.e., in the middle of the west wall beyond the black rocks). Here you'll find 6 sets of Uzi clips. Unfortunately this tunnel can't be used for cover, since Natla will follow Lara inside. Bring down Natla's winged form and you're home free.
NOTE: Earlier versions of this walkthrough stated that destroying each of Natla's forms counted as an official kill. I was mistaken about this. In fact, the extra kill in this level comes from shooting the Scion earlier. Natla only counts as one. (Thanks to Explorer and EscondeR from tombraiderforums.com for setting me straight.)
Now you'll need to get up to the top of the cavern to exit. Go to the northeast corner and climb onto the rock pile. From here you can jump into the doorway behind the rocks. Use a standing jump with Action to land in the doorway, or drop down to the ground and climb in. Follow the passageway up to a doorway. Take a running jump to the nearest pillar, then another running jump to the pillar on the left. Take a standing jump to the next pillar, which is just below a door. Climb in and follow this passageway to an opening in the floor. Safety drop onto another, higher pillar.
Turn around and take a running jump to the pillar ahead and to the left. Take another running jump to the next pillar, then another running jump to grab the pillar beyond, which is also under an opening. Climb up into it and follow the passage to another opening where you can drop onto the highest pillar.
Take a running jump to the red-and-gold ledge. Climb into the opening above and continue forward to a long ramp. Slide down to end the level and the game.
NOTE: If you go to the passport and start a new game now, you'll have all weapons and unlimited ammo.
Copyright © 1998-2015 - Stellalune (stellalune@tombraiders.net). Special thanks are given to the participants in the alt.games.tombraider newsgroup, without whom some parts of this walkthrough couldn't have been written. Thanks also to KimmE, Ian T., Mark R. and Ingrid G. for their help with this level. All TR1 screenshots were made using Glidos and Fraps. Feel free to copy or print this walkthrough for personal use. By all means, share it with friends, but please include this credit line so people can send me their feedback. No part of this walkthrough may be reproduced on another site without permission.